一键搞定SSH登录、密码策略、Ban IP配置,以及一键创建管理员权限的自定义用户
本帖最后由 hoochanlon 于 2023-2-23 20:07 编辑### 说在前面
黑客暴力破解比ddos、中间人、钻程序漏洞提权等方式成本低,而且root用户及规律性的弱密码是主要对象。加上裸奔的阿里云主机被人挖矿,在病毒分析区,也写完了挖矿脚本分析,所以这一次就针对黑客扫描端口暴力破解,采取的对策写个一键脚本。对策如下:
* 任意规律组合的密码、SSH密钥模式
* fail2ban(ban ip)
* 创建一个具有管理员权限的自定义用户,锁root远程登录。
由于新的云主机配置ssh登录、用户密码规则、fail2ban的ban ip规则、创建管理员用户,综合叠加在一起配置特别繁琐,易漏的同时也容易出错。所以就写了一键式脚本方便(云主机 CentOS 8)。
自己从配置报错解决及查找项目到写脚本调试,折腾的也累的...现在总算是完工了。由于此次内容较长,附源码在最后部分。
### 一键搞定SSH登录、用户密码策略配置、Ban IP配置
* SSH登录: 免密的密钥模式、心跳长时间连接,客户端不掉线
* 密码策略: 不限特殊字符、大小写,并支持4~5位长度下限
* Ban IP: 除自己IP外,30秒内短时间三次输错密码,永久封禁IP。
复制代码粘贴即可,GitHub源码地址:https://github.com/hoochanlon/ihs-simple/blob/main/d-shell/lite_ssh_n_ban.sh
```shell
sudo bash -c"$(curl -fL https://ghproxy.com/https://raw.githubusercontent.com/hoochanlon/ihs-simple/main/d-shell/lite_ssh_n_ban.sh)"
```
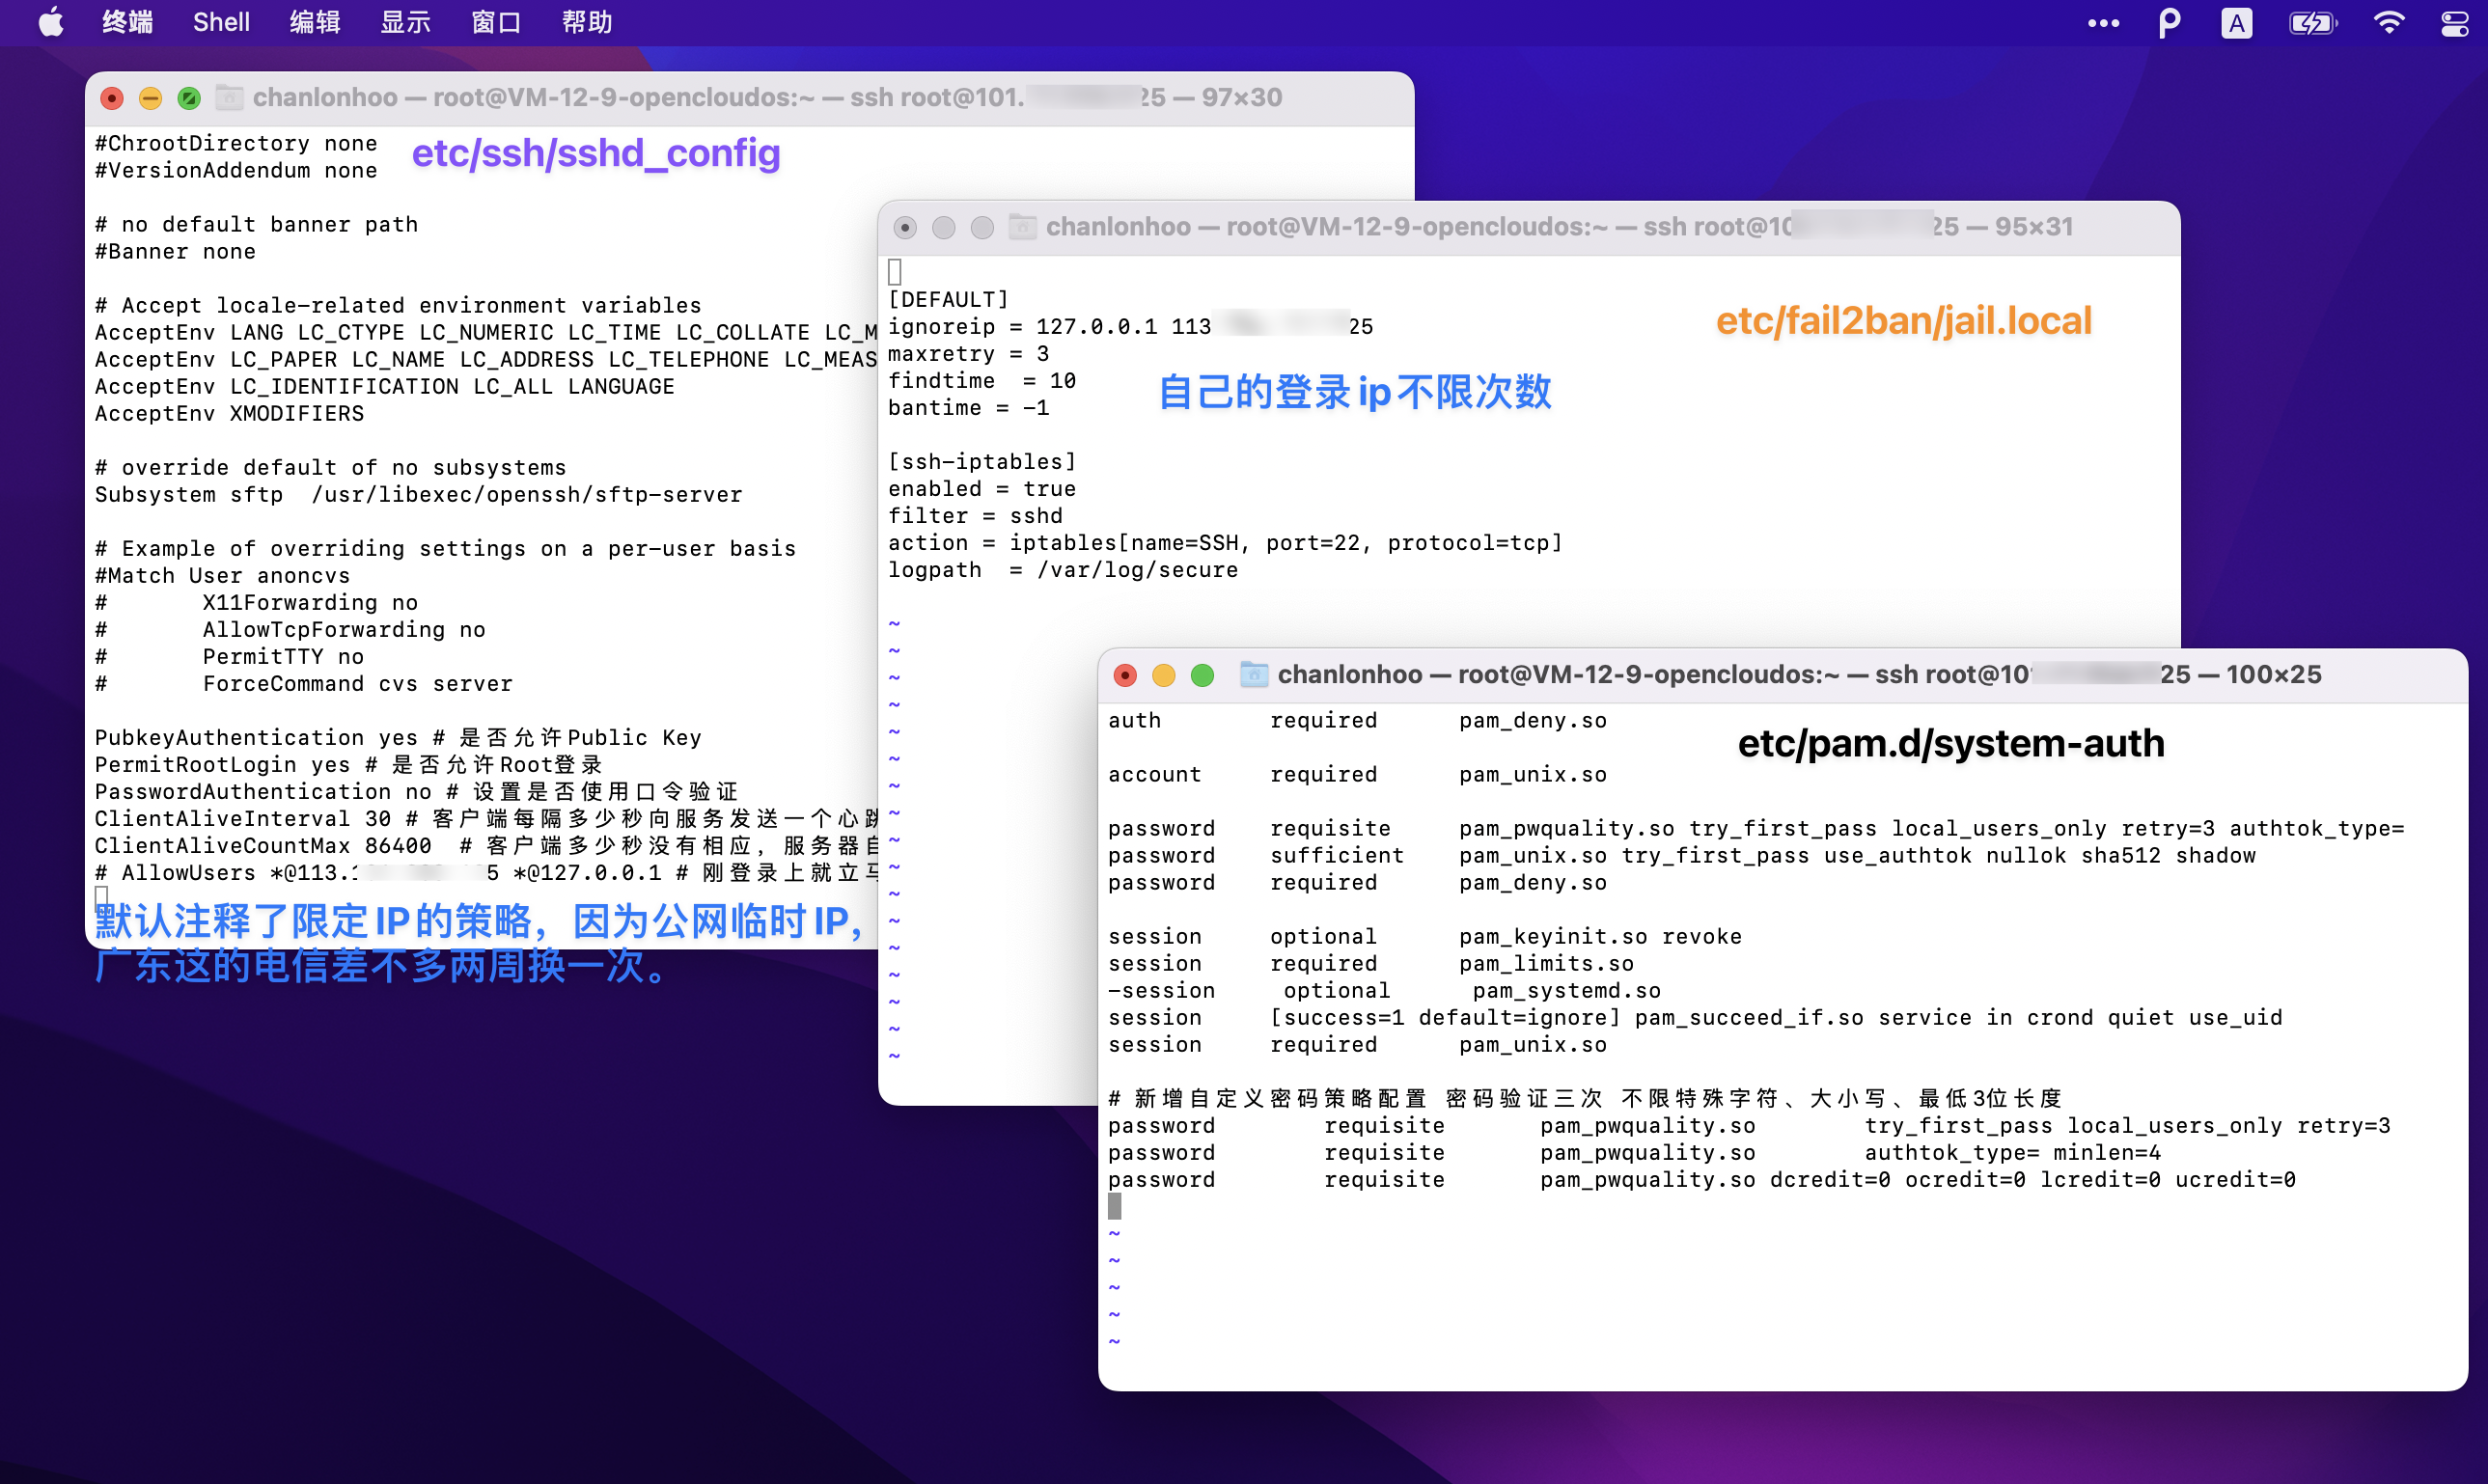
写入配置图

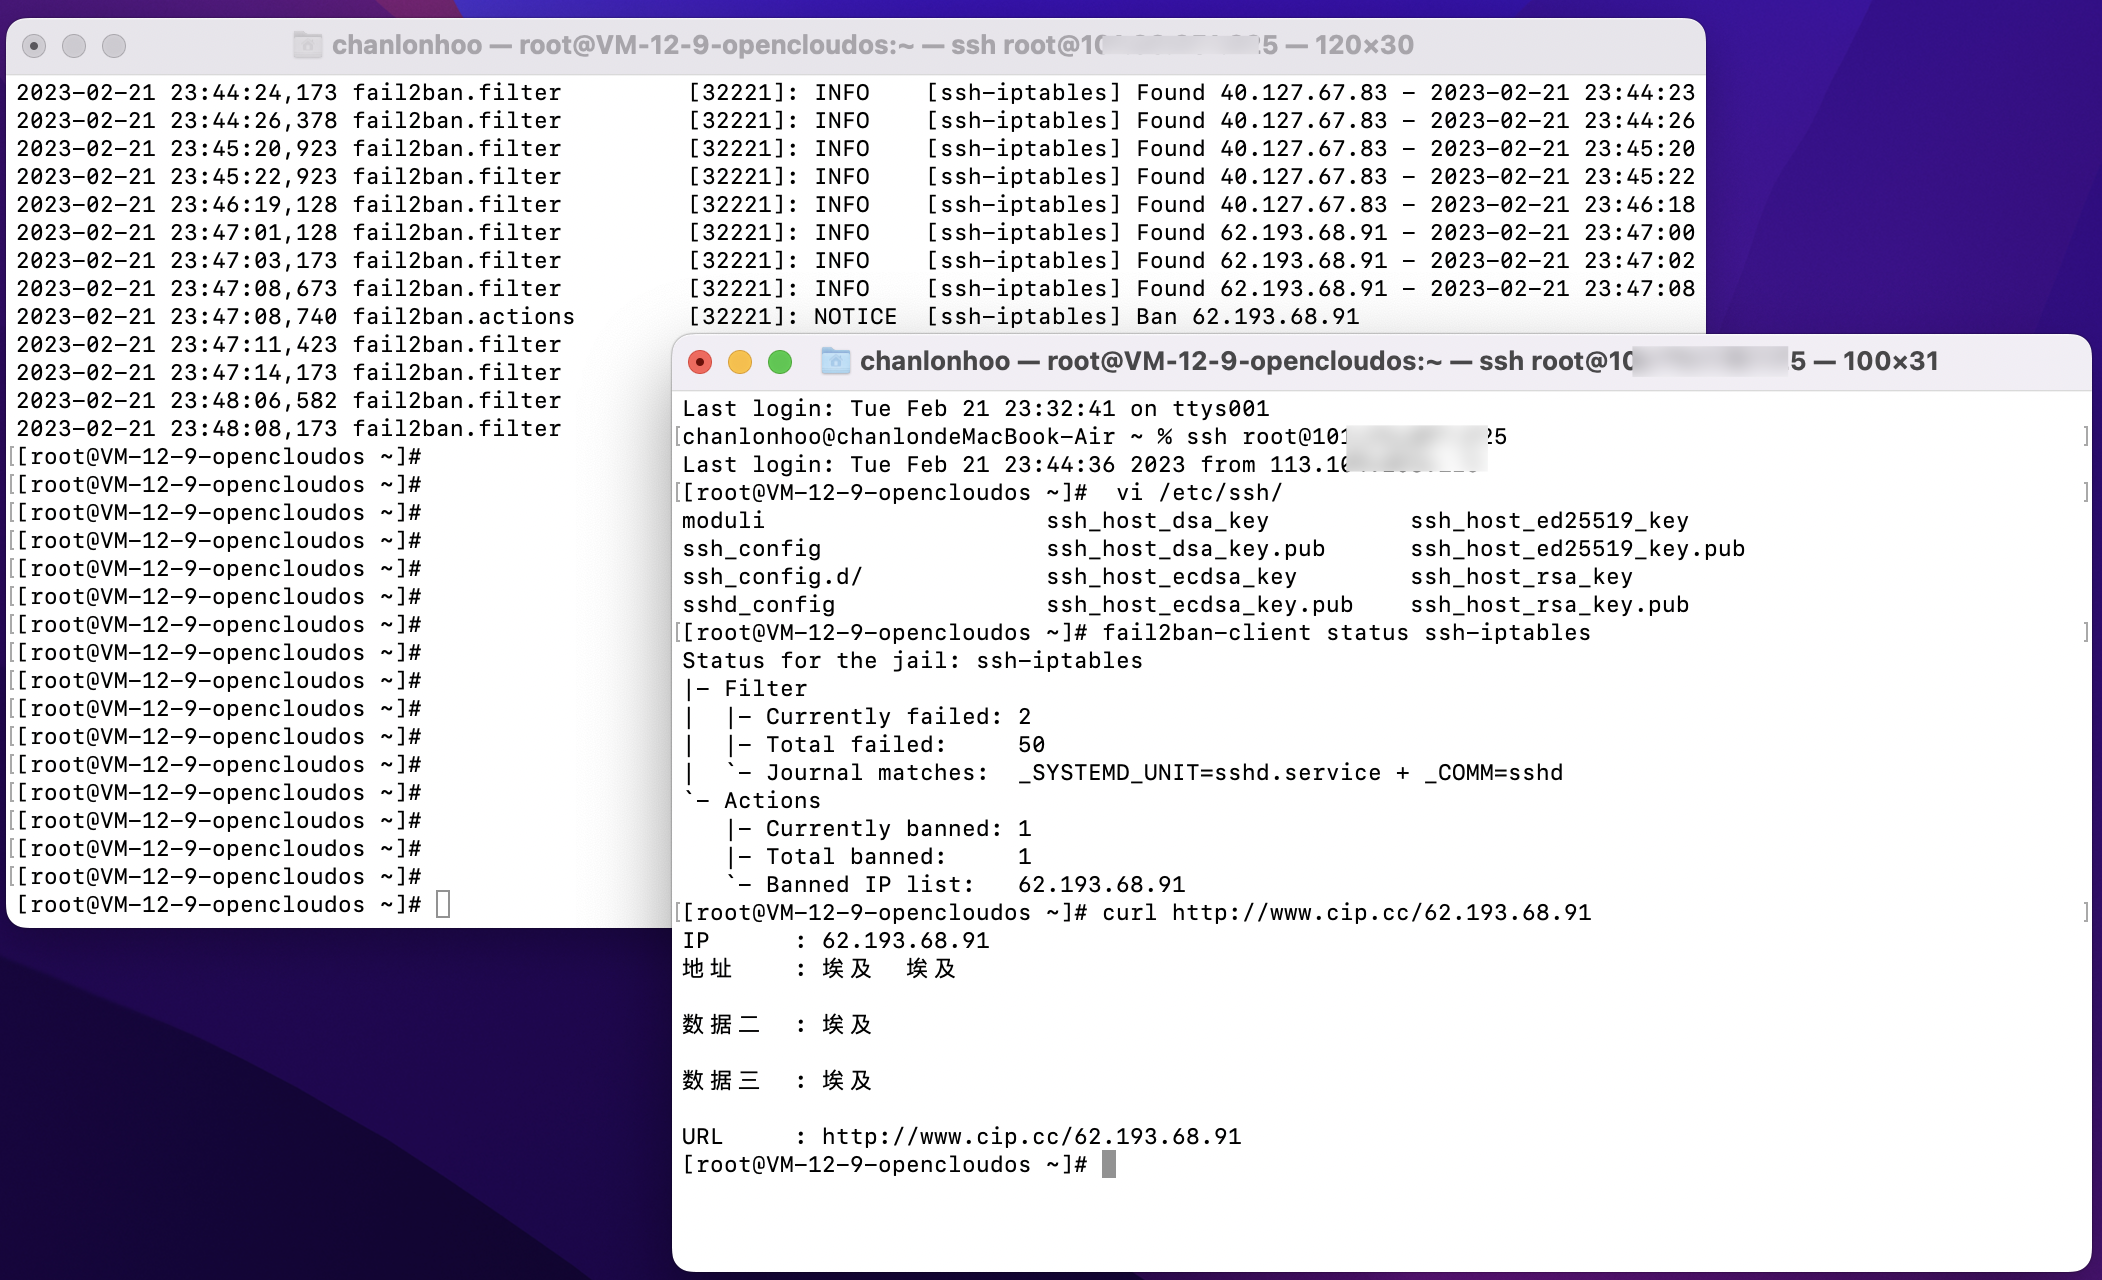
ban ip效果实例图

### 一键搞定Linux自定义创建具有管理员权限的用户
* 自定义用户名
* su、sudo及wheel组成员免密
* sshd_config锁root远程登录,提高安全性
复制粘贴即可,GitHub源码地址:https://github.com/hoochanlon/ihs-simple/blob/main/d-shell/diy_add_wheel.sh
```shell
sudo bash -c"$(curl -fL https://ghproxy.com/https://raw.githubusercontent.com/hoochanlon/ihs-simple/main/d-shell/diy_add_wheel.sh)"
```
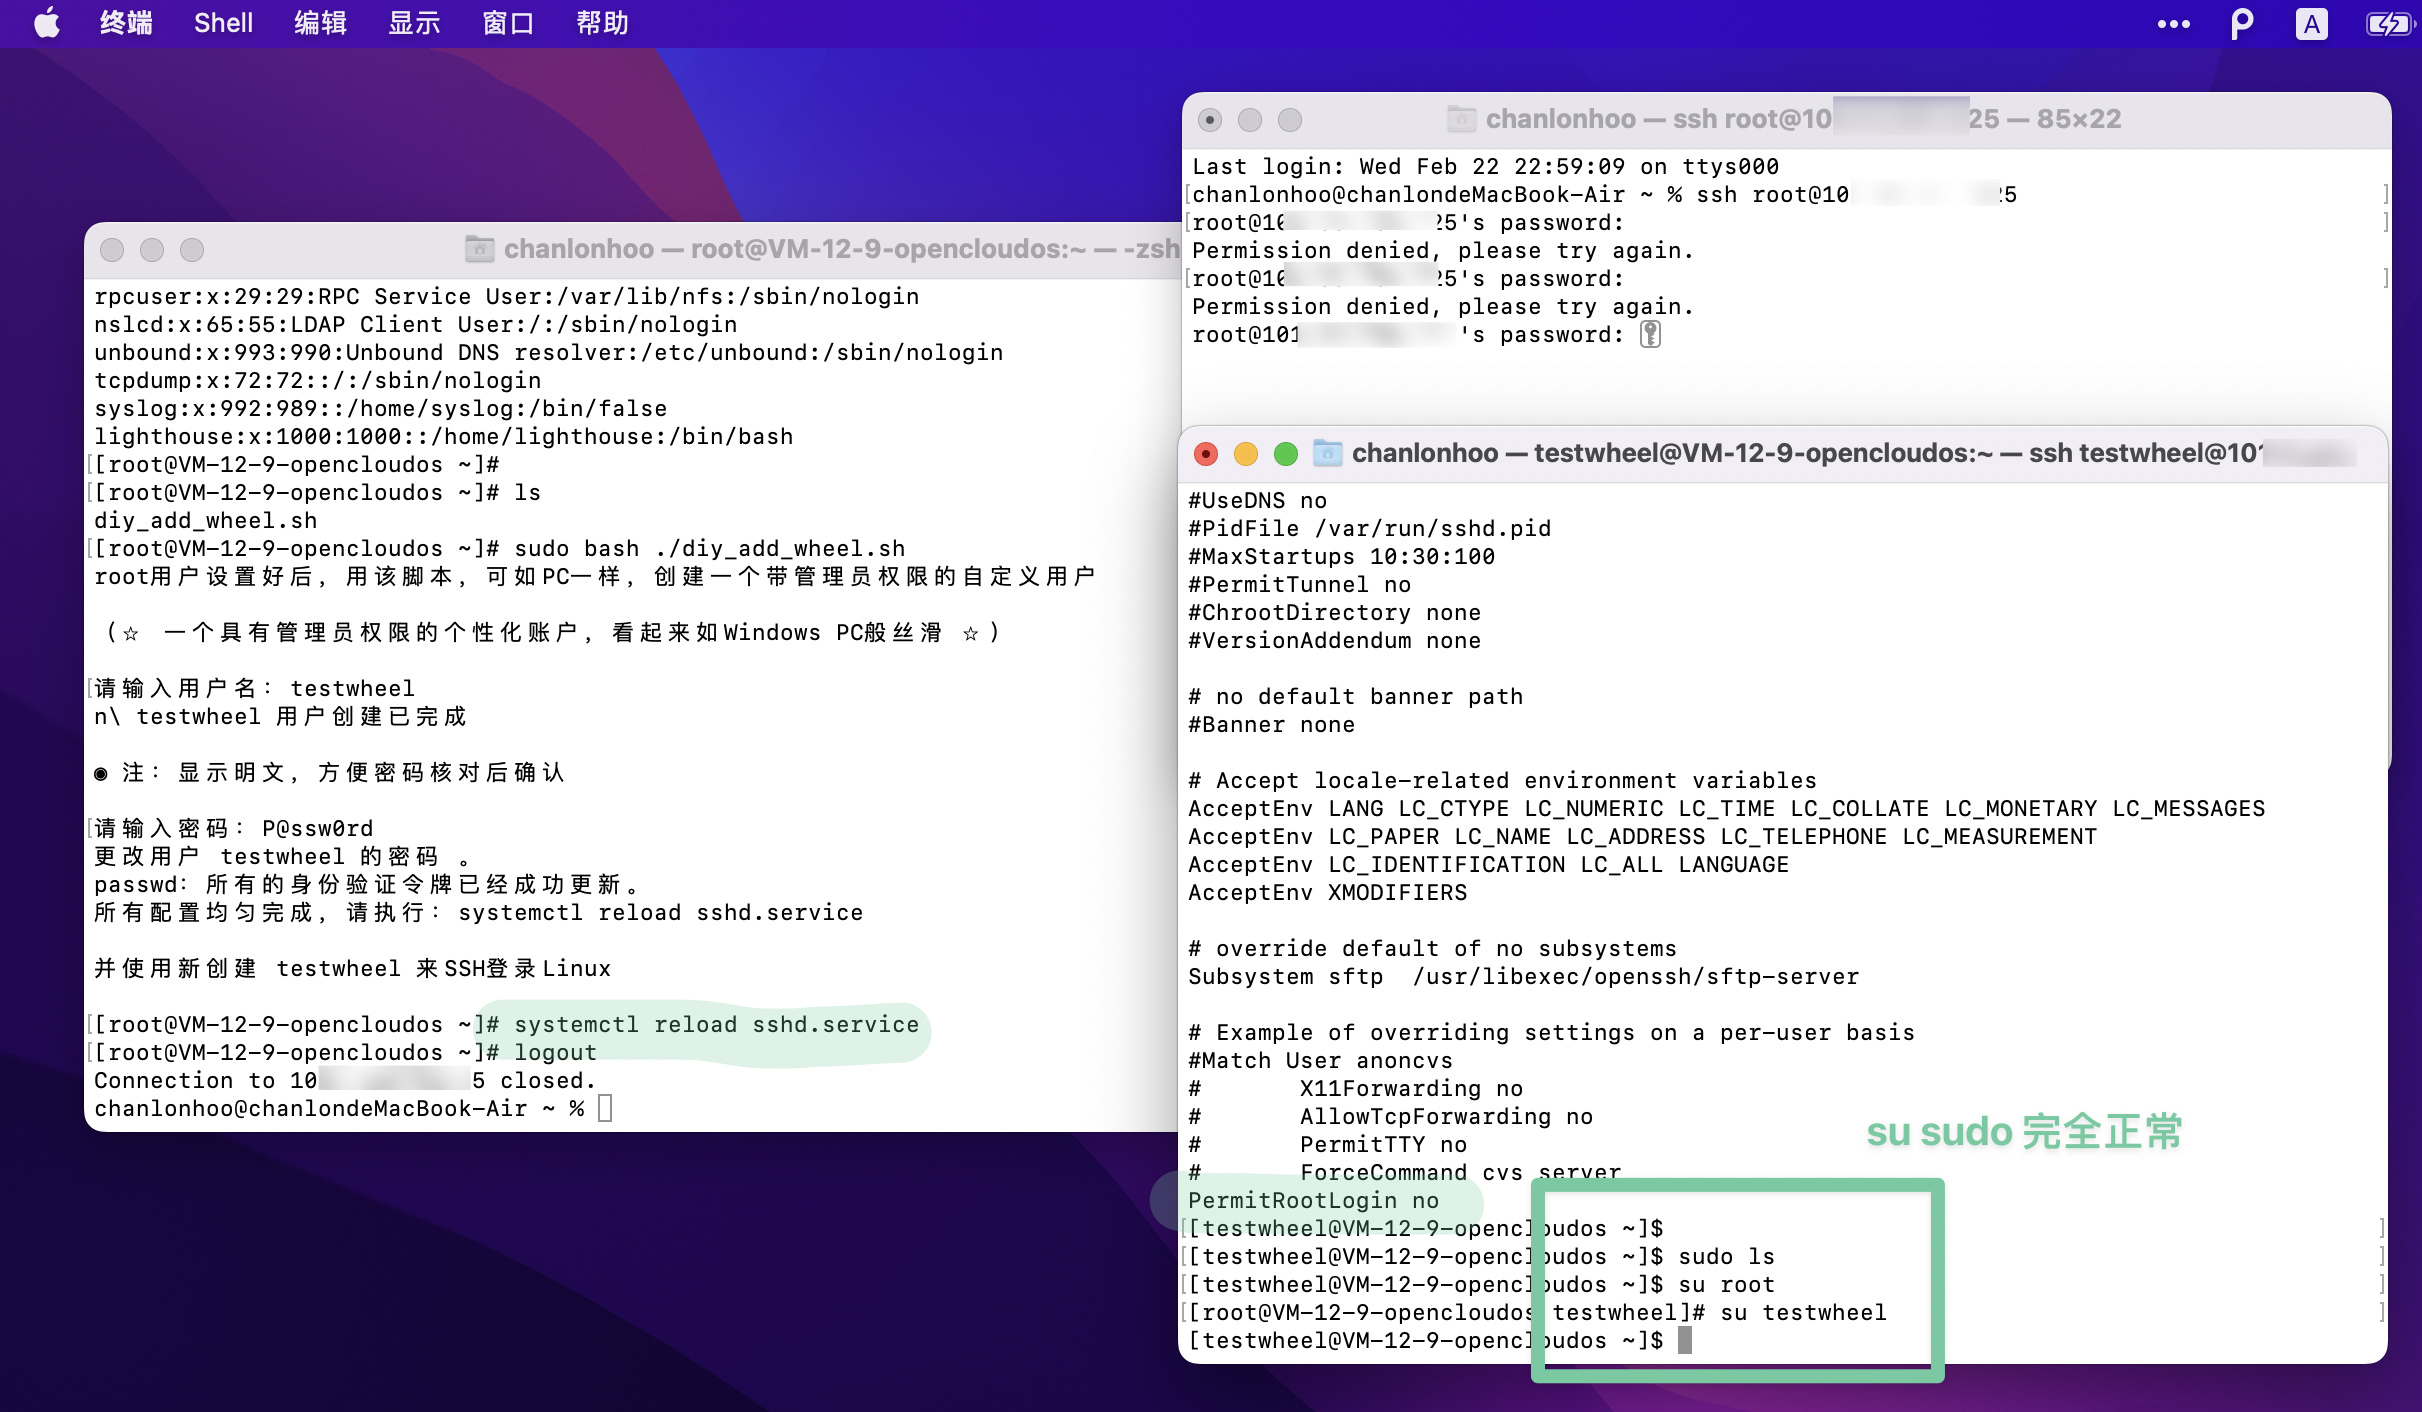
密码不限测试图

整体演示图,锁root、自定义testwheel用户测试 su、sudo,均已成功。

### SSH单项、fail2ban单项
一键调用SSH快速配置 SSH密钥登录策略、用户简单密码配置规则。(单项部分是开启限定自己IP访问的,即 AllowUsers)
GitHub源码地址:https://github.com/hoochanlon/ihs-simple/blob/main/d-shell/simple_ssh.sh
```shell
sudo bash -c"$(curl -fL https://ghproxy.com/https://raw.githubusercontent.com/hoochanlon/ihs-simple/main/d-shell/simple_ssh.sh)"
```
一键fail2ban从下载到安装及生成配置与启动服务。(再次允许单项部分可以刷新自己公网IP配置)
GitHub源码地址:https://github.com/hoochanlon/ihs-simple/blob/main/d-shell/simple_ban.sh
```shell
sudo bash -c"$(curl -fL https://ghproxy.com/https://raw.githubusercontent.com/hoochanlon/ihs-simple/main/d-shell/simple_ban.sh)"
```
### 这次查资料的发现
自检脚本、ban ip、软件杀毒、防火墙、防ddos的。
* LinuxCheck Linux自检脚本: (https://github.com/al0ne/LinuxCheck)
* Linux图形化防火墙:(https://github.com/soonxf/Firewalld-UI)
* Ban ip: (https://github.com/fail2ban/fail2ban)
* Linux防ddos:(https://github.com/anti-ddos/Anti-DDOS)
* Linux杀毒:[河马查杀](https://www.shellpub.com/doc/hm_linux_usage.html)、(https://github.com/Cisco-Talos/clamav)
### 遇到的疑难,参考资料整理
参考资料有些多,列出主要部分,并分类一下。
#### ssh与密码规则配置
* (https://blog.csdn.net/lux_veritas/article/details/8255613)
* (https://unix.stackexchange.com/questions/131886/ssh-public-key-wont-send-to-server)
* (https://www.cnblogs.com/Leroscox/p/9627809.html)
* (https://www.cnblogs.com/kevingrace/p/6110842.html)
* [腾讯云-Linux多台服务器共用密钥ssh自动登陆](https://cloud.tencent.com/developer/article/2036440)
* (https://blog.csdn.net/mynumber1/article/details/123699660)
* (https://blog.csdn.net/qq_42951560/article/details/125030247)
* (https://gitee.com/openeuler/kernel/issues/I29Z76)
* (https://blog.csdn.net/qq_41054313/article/details/121786781)
#### fail2ban
fail2ban配置报错的参考资料
* (https://stackoverflow.com/questions/42320994/cant-enable-fail2ban-jail-sshd)
* ["the jail "ssh_iptables' does not exist" and "View fail2ban.log for errors"](https://github.com/fail2ban/fail2ban/issues/3463)
* (https://github.com/fail2ban/fail2ban/issues/3462)
* (https://learnku.com/server/t/36233)
* [豆瓣-CentOS7 - 安装配置Fail2ban教程](https://www.douban.com/note/626688457/?_i=6892452FeAKN2V)
* (https://blog.csdn.net/m0_47748508/article/details/119203994)
* (https://www.tecmint.com/install-fail2ban-rocky-linux-almalinux/)
####字符串处理
主要集中于正则
* (https://blog.csdn.net/qq_42767455/article/details/104180726)
* (https://blog.csdn.net/vincent_wen0766/article/details/108256276)
* (https://blog.csdn.net/u013541325/article/details/126049060)
* (https://blog.csdn.net/qq_32907195/article/details/128553287)
* (https://blog.csdn.net/qq_43551263/article/details/111343584)
#### wheel用户配置与创建用户相关
* (https://blog.csdn.net/weixin_45178128/article/details/103155720)
* (https://blog.csdn.net/xiunai78/article/details/84578529)
* (https://blog.csdn.net/kfepiza/article/details/124701762)
* (https://blog.51cto.com/gblfy/5652817#_38)
### 核心源码部分
### lite_ssh_n_ban.sh
lite_ssh_n_ban.sh是对simple_ssh、simple_ban.sh的整合。fail2ban配置没中文注释,是因为fail2ban其中一个服务有调用json,在json格式下会报错,参考我的issue提问:
*(https://github.com/fail2ban/fail2ban/issues/3462)
*[ Found the solution to the "the jail "ssh_iptables' does not exist" and "View fail2ban.log for errors and exceptions" errors ](https://github.com/fail2ban/fail2ban/issues/3463)
```
echo -e "置顶:执行脚本需要使用 sudo bash 指令"
# 备份ssh服务端、客户端配置文件到ssh.bak目录
mkdir -p /etc/bak/ssh && cp -p /etc/ssh/{ssh_config,sshd_config} /etc/bak/ssh
# netstat -t查询连接情况,awk抓取第五列信息,过滤掉端口含字母的。获得正确的IP池。
# 再从IP池中cut掉":"端口,取第二行数据提纯,获得了连接服务器上的IP。
# get_my_ip=$(netstat -t|awk '{print $5}'|grep -v -E ''|cut -d":" -f1|sed -n '1p')
# get_my_ip=$(netstat -t|awk '{print $5}'|grep -v -E '|^10|^169|^172|^192'|cut -d":" -f1|sed -n '1p')
# 筛选方式优化,选有:22就行了。
get_my_ip=$(netstat -n|grep -i :22|awk '{print $5}'|cut -d":" -f1|sed -n '1p')
get_my_ip_port=$(netstat -n|grep -i :22|awk '{print $5}'|sed -n '1p')
# 编辑、修改配置权限、重启服务生效
echo -e \
"
PubkeyAuthentication yes # 是否允许Public Key
PermitRootLogin yes # 是否允许Root登录
PasswordAuthentication no # 设置是否使用口令验证
ClientAliveInterval 30 # 客户端每隔多少秒向服务发送一个心跳数据,类似web响应。
ClientAliveCountMax 86400# 客户端多少秒没有相应,服务器自动断掉连接
# AllowUsers *@$get_my_ip *@127.0.0.1 # 刚登录上就立马切代理容易中断SSH连接。
" \
>>/etc/ssh/sshd_config
# 该授权的授权,>/dev/null 2>&1 屏蔽报错,有不明白的查找注释的参考资料。
chmod 700 $HOME && chmod 700 ~/.ssh
touch ~/.ssh/authorized_keys && chmod 600 ~/.ssh/authorized_keys >/dev/null 2>&1
systemctl restart sshd.service
#---------------账户密码简化要求-----------------------
# 备份文件
mkdir -p /etc/bak/pam.d/ && cp -p /etc/pam.d/system-auth/etc/bak/pam.d/
# 可行,但会有Linux系统的无效至少8位字符;pam.d/system-auth优先级远高于login.defs
# 一个是配置系统模块的,另一个只是辅助性质的账号登录策略,两者相差很大
echo -e "
# 新增自定义密码策略配置 密码验证三次 不限特殊字符、大小写、最低3位长度
password\trequisite\tpam_pwquality.so\ttry_first_pass local_users_only retry=3
password\trequisite\tpam_pwquality.so\tauthtok_type= minlen=4
password\trequisite\tpam_pwquality.so dcredit=0 ocredit=0 lcredit=0 ucredit=0
" >>/etc/pam.d/system-auth
#******************安装及配置fail2ban*****************************
echo -e "安装fail2ban以及各项依赖"
yum install epel-release -y && yum update -y
yum install fail2ban-firewalld fail2ban-systemd -y
yum -y install git python3
# 备份原始文件
mkdir -p /etc/bak/fail2ban_conf/ && cp -p /etc/fail2ban/jail.conf /etc/bak/fail2ban_conf/
echo -e \
"
ignoreip = 127.0.0.1 $get_my_ip
maxretry = 3
findtime= 10
bantime = -1
enabled = true
filter = sshd
action = iptables
logpath= /var/log/secure
" > /etc/fail2ban/jail.local
echo -e "加入守护进程,已设定自启,fail2ban现已启动 \n"
systemctl enable fail2ban.service && systemctl start fail2ban.service
echo -e "-----------------服务端整体配置--------------------\n"
echo -e "\nSSH服务端密钥、登录策略、心跳响应,以及限制IP范围"
echo -e "简化用户密码规则:任意大小写/符号/纯数字,并可设4位长度"
echo -e "fail2ban: 除自己IP($get_my_ip)不限外;其他IP访问,3次密码错误,直接封永久。\n"
echo -e "至此,SSH服务端(Linux)的所有设置,均已圆满完成。\n"
#************所有设置完成,开始啰嗦的ECHO*********************
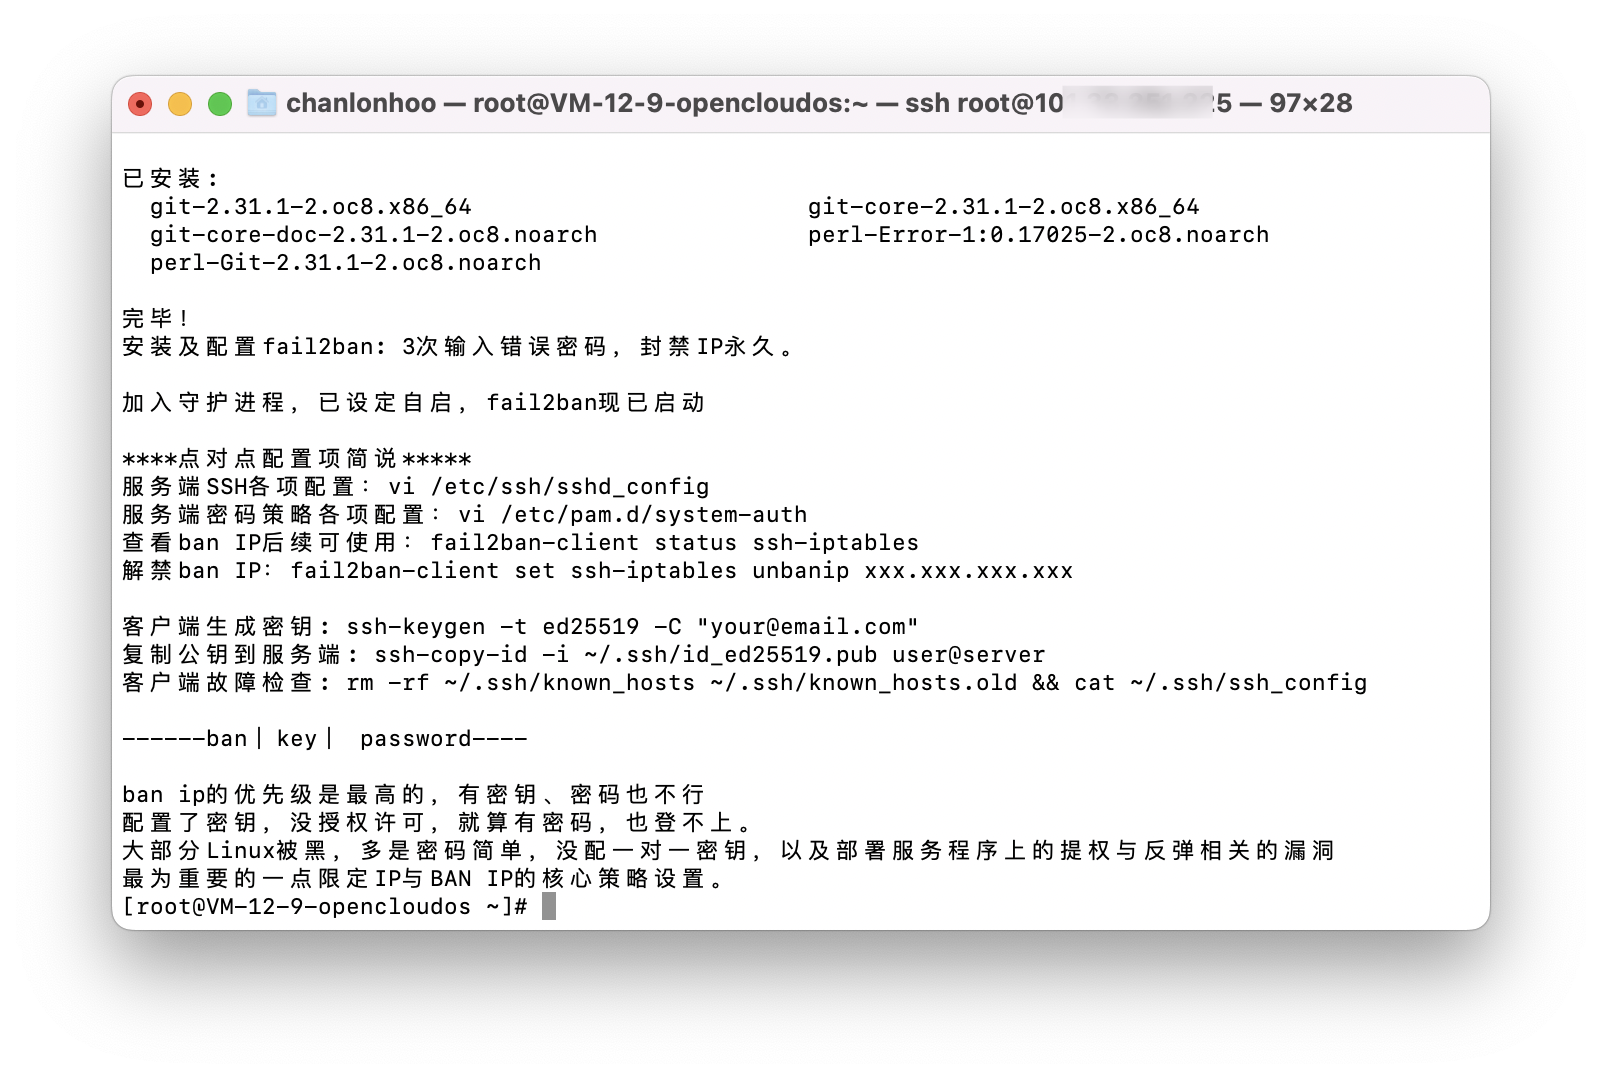
echo -e "****点对点配置项简说*****"
echo -e "服务端SSH各项配置:vi /etc/ssh/sshd_config"
echo -e "服务端密码策略各项配置:vi /etc/pam.d/system-auth"
echo -e "查看ban IP后续可使用:fail2ban-client status ssh-iptables"
echo -e "解禁ban IP:fail2ban-client set ssh-iptables unbanip xxx.xxx.xxx.xxx \n"
echo -e '客户端生成密钥: ssh-keygen -t ed25519 -C "your@email.com"'
echo -e "复制公钥到服务端: ssh-copy-id -i ~/.ssh/id_ed25519.pub user@server"
echo -e "客户端故障检查: rm -rf ~/.ssh/known_hosts ~/.ssh/known_hosts.old && cat ~/.ssh/ssh_config \n"
echo -e "------ban|key| password----\n"
echo -e "ban ip的优先级是最高的,有密钥、密码也不行"
echo -e "配置了密钥,没授权许可,就算有密码,也登不上。"
echo -e "大部分Linux被黑,多是密码简单,没配一对一密钥,以及部署服务程序上的提权与反弹相关的漏洞"
echo -e "最为重要的一点限定IP与BAN IP的核心策略设置。"
rm -rf $0
```
### diy_add_wheel.sh
```
echo -e "root用户设置好后,用该脚本,可如PC一样,创建一个带管理员权限的自定义用户 \n"
echo -e "(⭐︎ 一个具有管理员权限的个性化账户,看起来如Windows PC般丝滑 ⭐︎)\n"
#******************创建wheel组用户*****************
# 接收用户输入流,并创建wheel组用户
read -p "请输入用户名:" user_name && useradd -g wheel $user_name
echo -e "$user_name 用户创建已完成 \n"
echo -e "◉ 注:显示明文,方便密码核对后确认 \n"
# -s: 隐藏输入的数据,适用于机密信息的输入
read -p "请输入密码:" pass_word
# 将 P@ssw0rd 密码传递至passwd的标准输入(stdin)
echo $pass_word | passwd --stdin $user_name
# **************开启wheel组功能**************
# 授权读写,并开启wheel的免密sudo
chmod u+w /etc/sudoers && sed -i 's/# %wheel/%wheel/g' /etc/sudoers
# 灵感来自腾讯云lighthouse配置。他这么配,我也这么配好了。
echo "$user_name ALL=(ALL) NOPASSWD: ALL" >> /etc/sudoers
# 关闭授权
chmod u-w /etc/sudoers
# 最后让wheel组的成员,切换sudo也全都免密。
# 替换 #a成a(懒人做法),centos 默认是注释,关闭着的。
sed -i 's/#a/a/g' /etc/pam.d/su
#**********************其他关键性操作*******************
# 拷贝公钥认证到wheel用户目录,没有就算啦。抛个异常,不显示,完事。
cp -p ~/.ssh/authorized_keys /home/$user_name/.ssh/authorized_keys > /dev/null 2>&1
# 替换掉PermitRootLogin yes,关闭root远程登录 (但没设定 PermitRootLogin yes,就没什么效果)
# sudo sed -i 's/^PermitRootLogin yes/PermitRootLogin no/g' /etc/ssh/sshd_config
# 所以还是删除,再追加 PermitRootLogin no 吧。
sed -i '/^PermitRootLogin/d' /etc/ssh/sshd_config
echo "PermitRootLogin no" >> /etc/ssh/sshd_config
# sshd.service 重载
systemctl reload sshd.service
echo -e "\n root SSH登录已关闭(PermitRootLogin no),所有配置均匀完成。"
echo -e "重新再SSH登录即生效, 现可使用 $user_name SSH登录Linux \n"
#********************参考部分***************************
# 字符串处理参考:
# (https://blog.csdn.net/qq_42767455/article/details/104180726)
# wheel 组管理参考
# (https://blog.csdn.net/kfepiza/article/details/124701762)
# (https://blog.51cto.com/gblfy/5652817#_38)
# shell接收输入参数
# (https://blog.csdn.net/u013541325/article/details/126049060)
#*******************************************************
# 本地调试代码
# scp ~/Desktop/diy_add_wheel.sh root@10x.xxx.xxx.xx5:$HOMEPATH
# 删除自身
rm -rf $0
``` jffwoo 发表于 2023-3-15 11:48
楼主您好,想问一下:
您这个是登录服务器的,可以设置证书登录
有没有脚本,批量登录网络设备(只能用户 ...
这个批量登录可能需要自己写,或者网上找案例。密码登录,修改ssh的策略就好了。(初步理解)
实际过程还是需要自己写的和调试的,因为每个人的环境不一样,没有环境就算写出来也难通过实机验证的。 tanzhiwei 发表于 2023-2-24 08:30
拓展下业务啊
差不多都是按需编程,我 GitHub主页上https://github.com/hoochanlon基本也就是收藏一些常用项CMD、shell、pwsh语法之类,觉得自己用得上。 厉害了啊 大佬建议弄个离线包以及离线命令,毕竟机房都没网{:1_918:} tanzhiwei 发表于 2023-2-23 22:46
大佬建议弄个离线包以及离线命令,毕竟机房都没网
哈哈。这是给阿里云、腾讯云服务器用的。虽然制作离线包难度不大,个人觉得这适合测试组、个人维护类型,不适用机房环境(当然,最主要取决你的环境了...)。 dongjing520 发表于 2023-2-23 21:51
厉害了啊
谢谢夸奖。今晚刚折腾完IDM,好累。 好棒啊,谢谢楼主分享 很实用。 hoochanlon 发表于 2023-2-23 23:33
哈哈。这是给阿里云、腾讯云服务器用的。虽然制作离线包难度不大,个人觉得这适合测试组、个人维护类型, ...
{:1_918:} 拓展下业务啊
感谢分享
页:
[1]
2