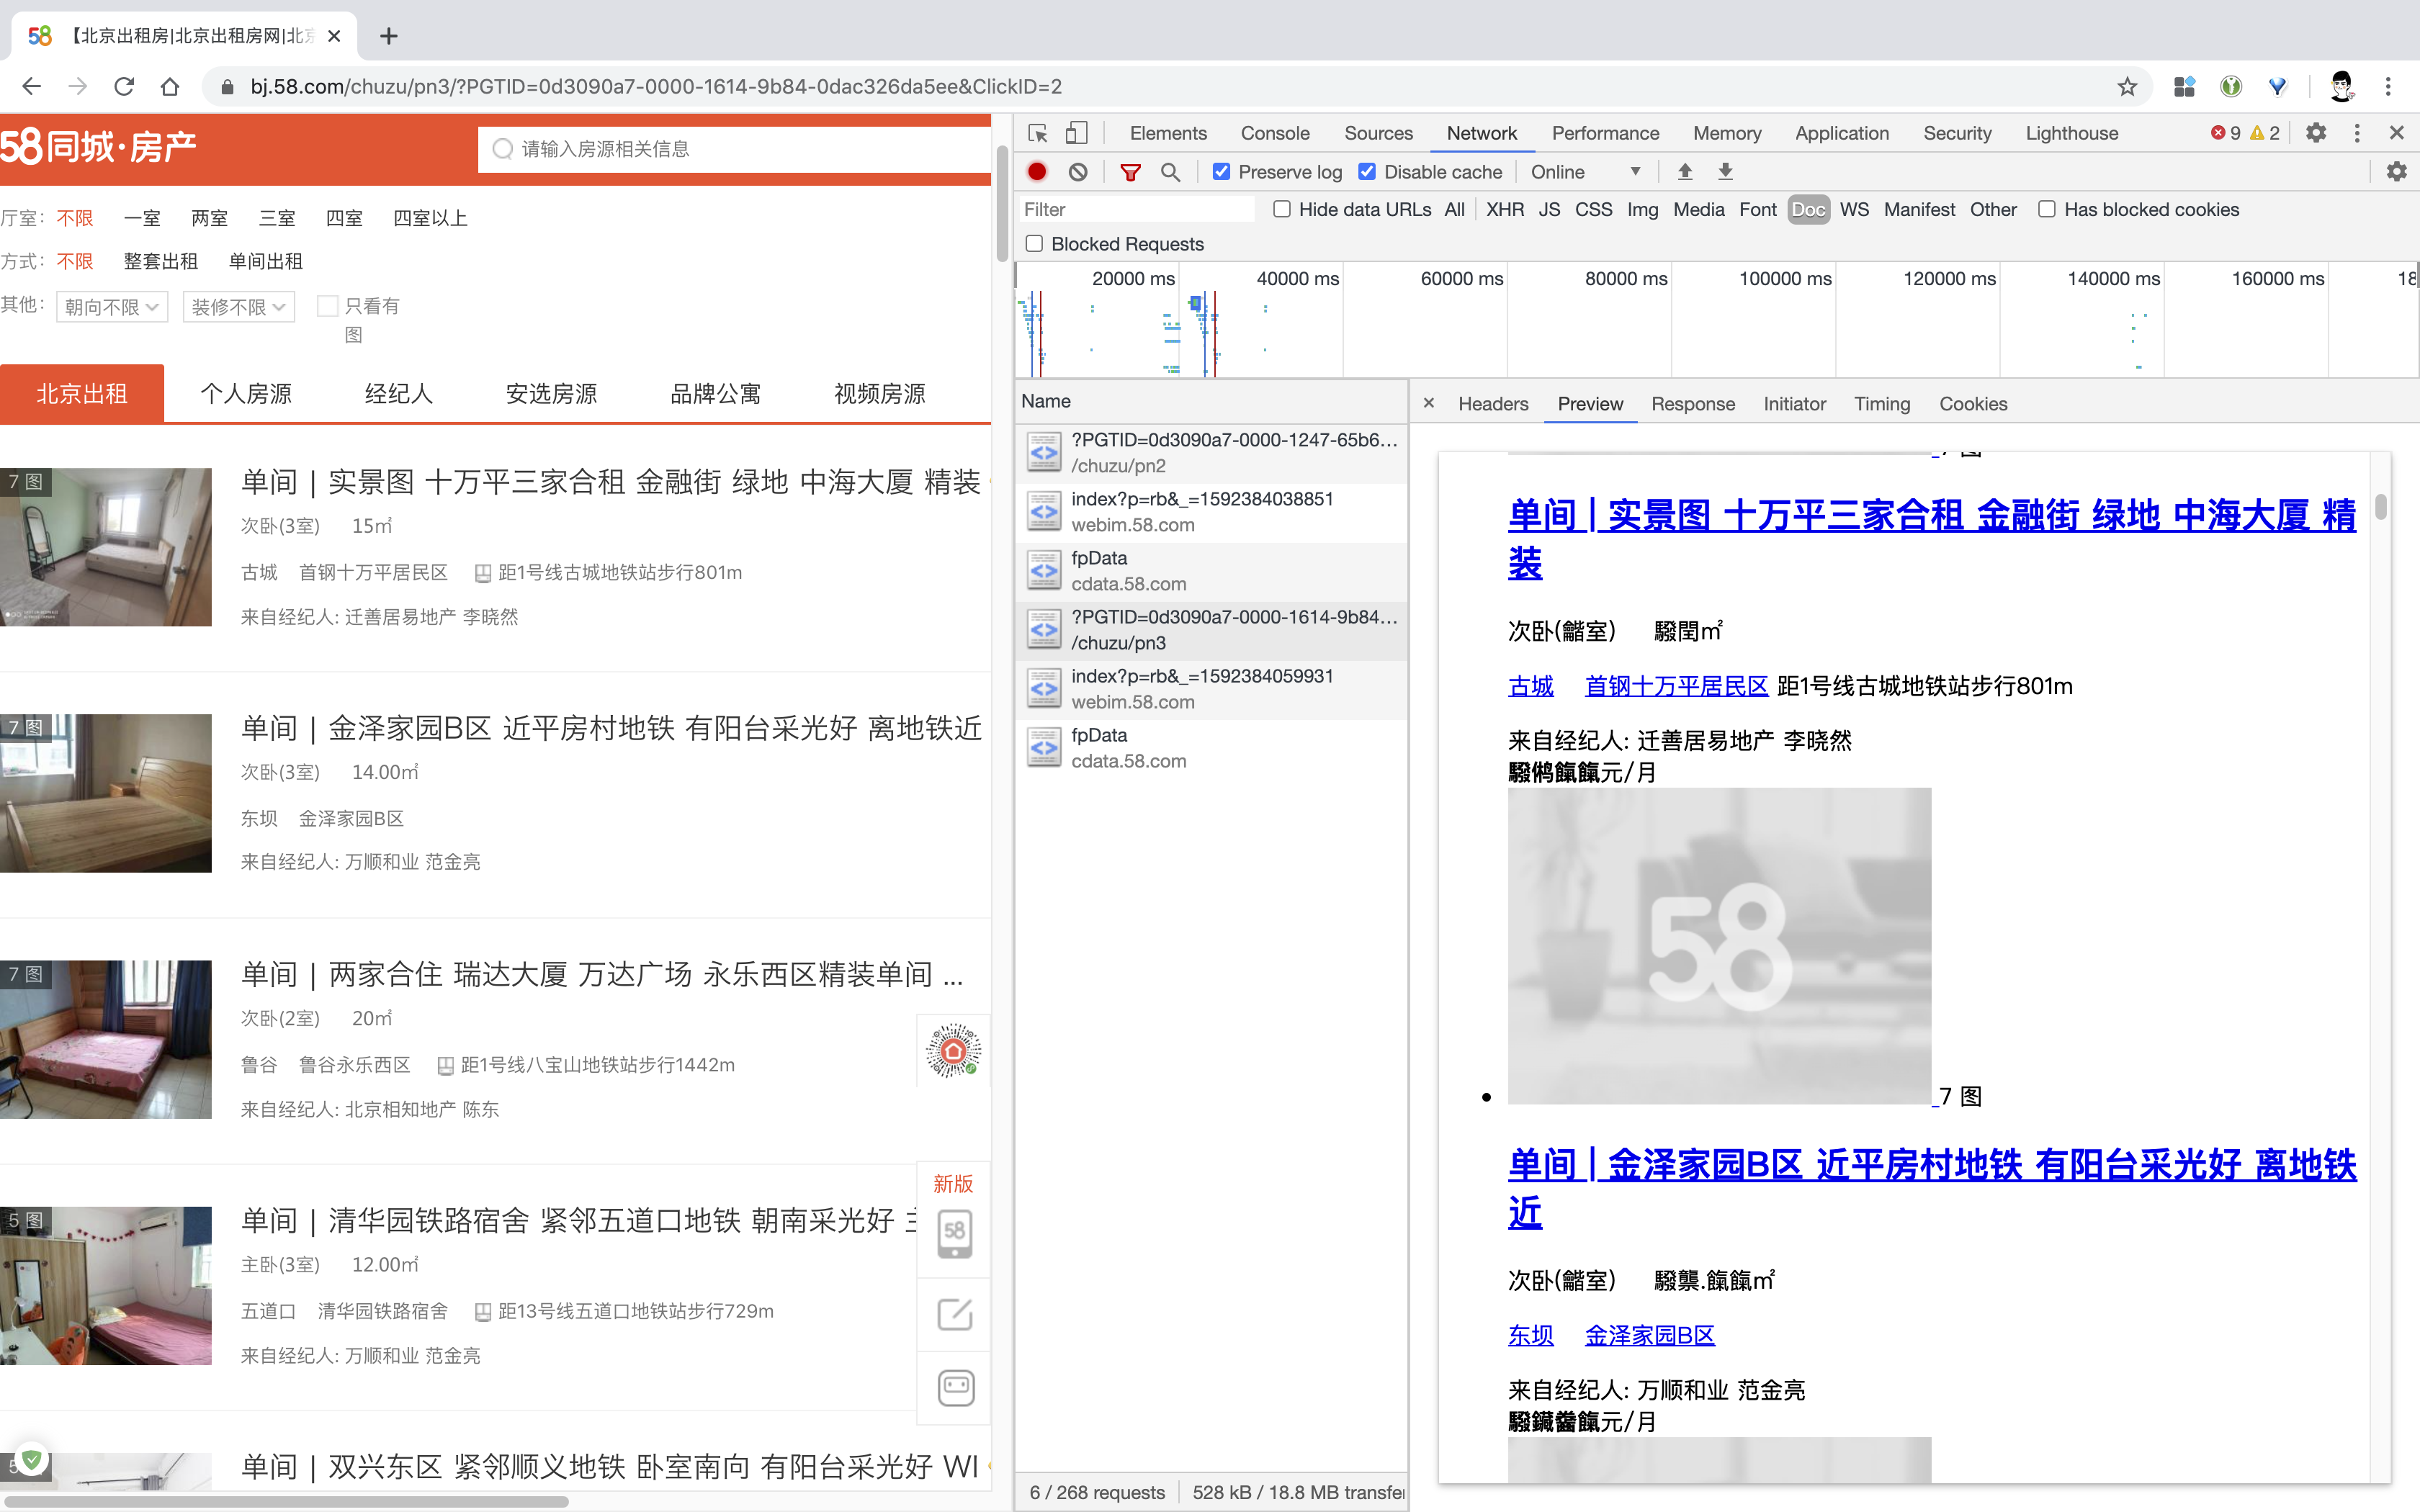
前两天看了 58 同城的租房页面,先打开 Chrome 的开发者工具查看有哪些请求,发现并没有类似请求接口取数据,而是直接将数据渲染到页面,但是会发现,数字部分被做了手脚。🍒查看原文获取更佳排版效果

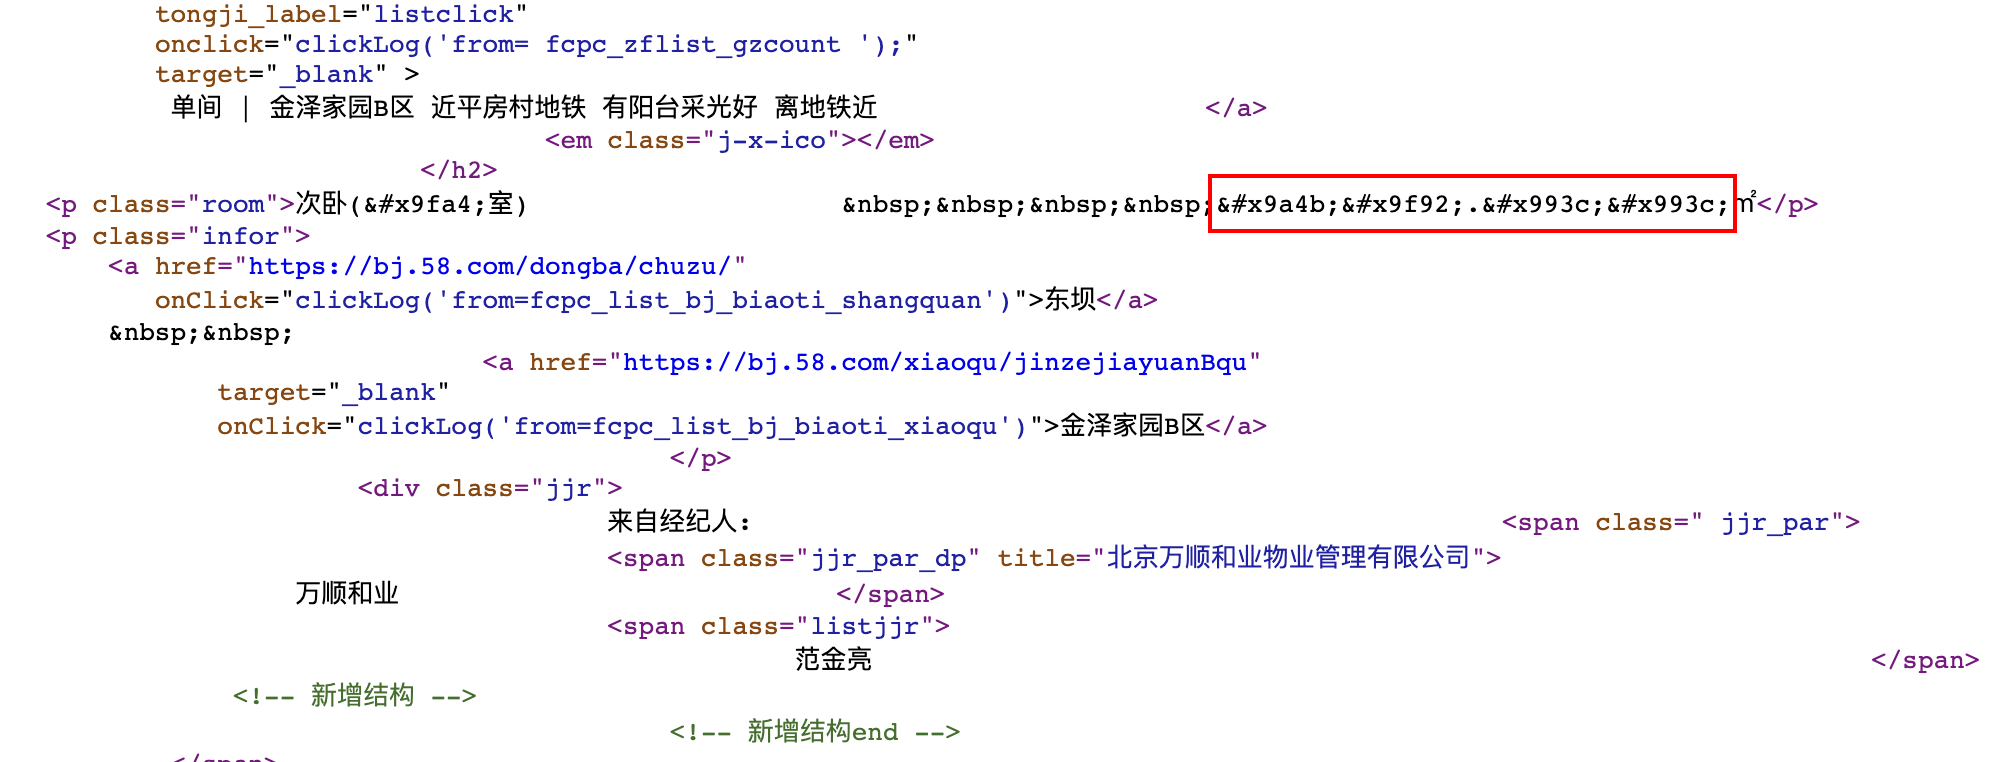
查看网页源码,发现数字都被转换成了类似 驋 的格式。

既然是和网页渲染字体有关的操作,下意识想到先看一眼 css,看看字体是如何使用的。

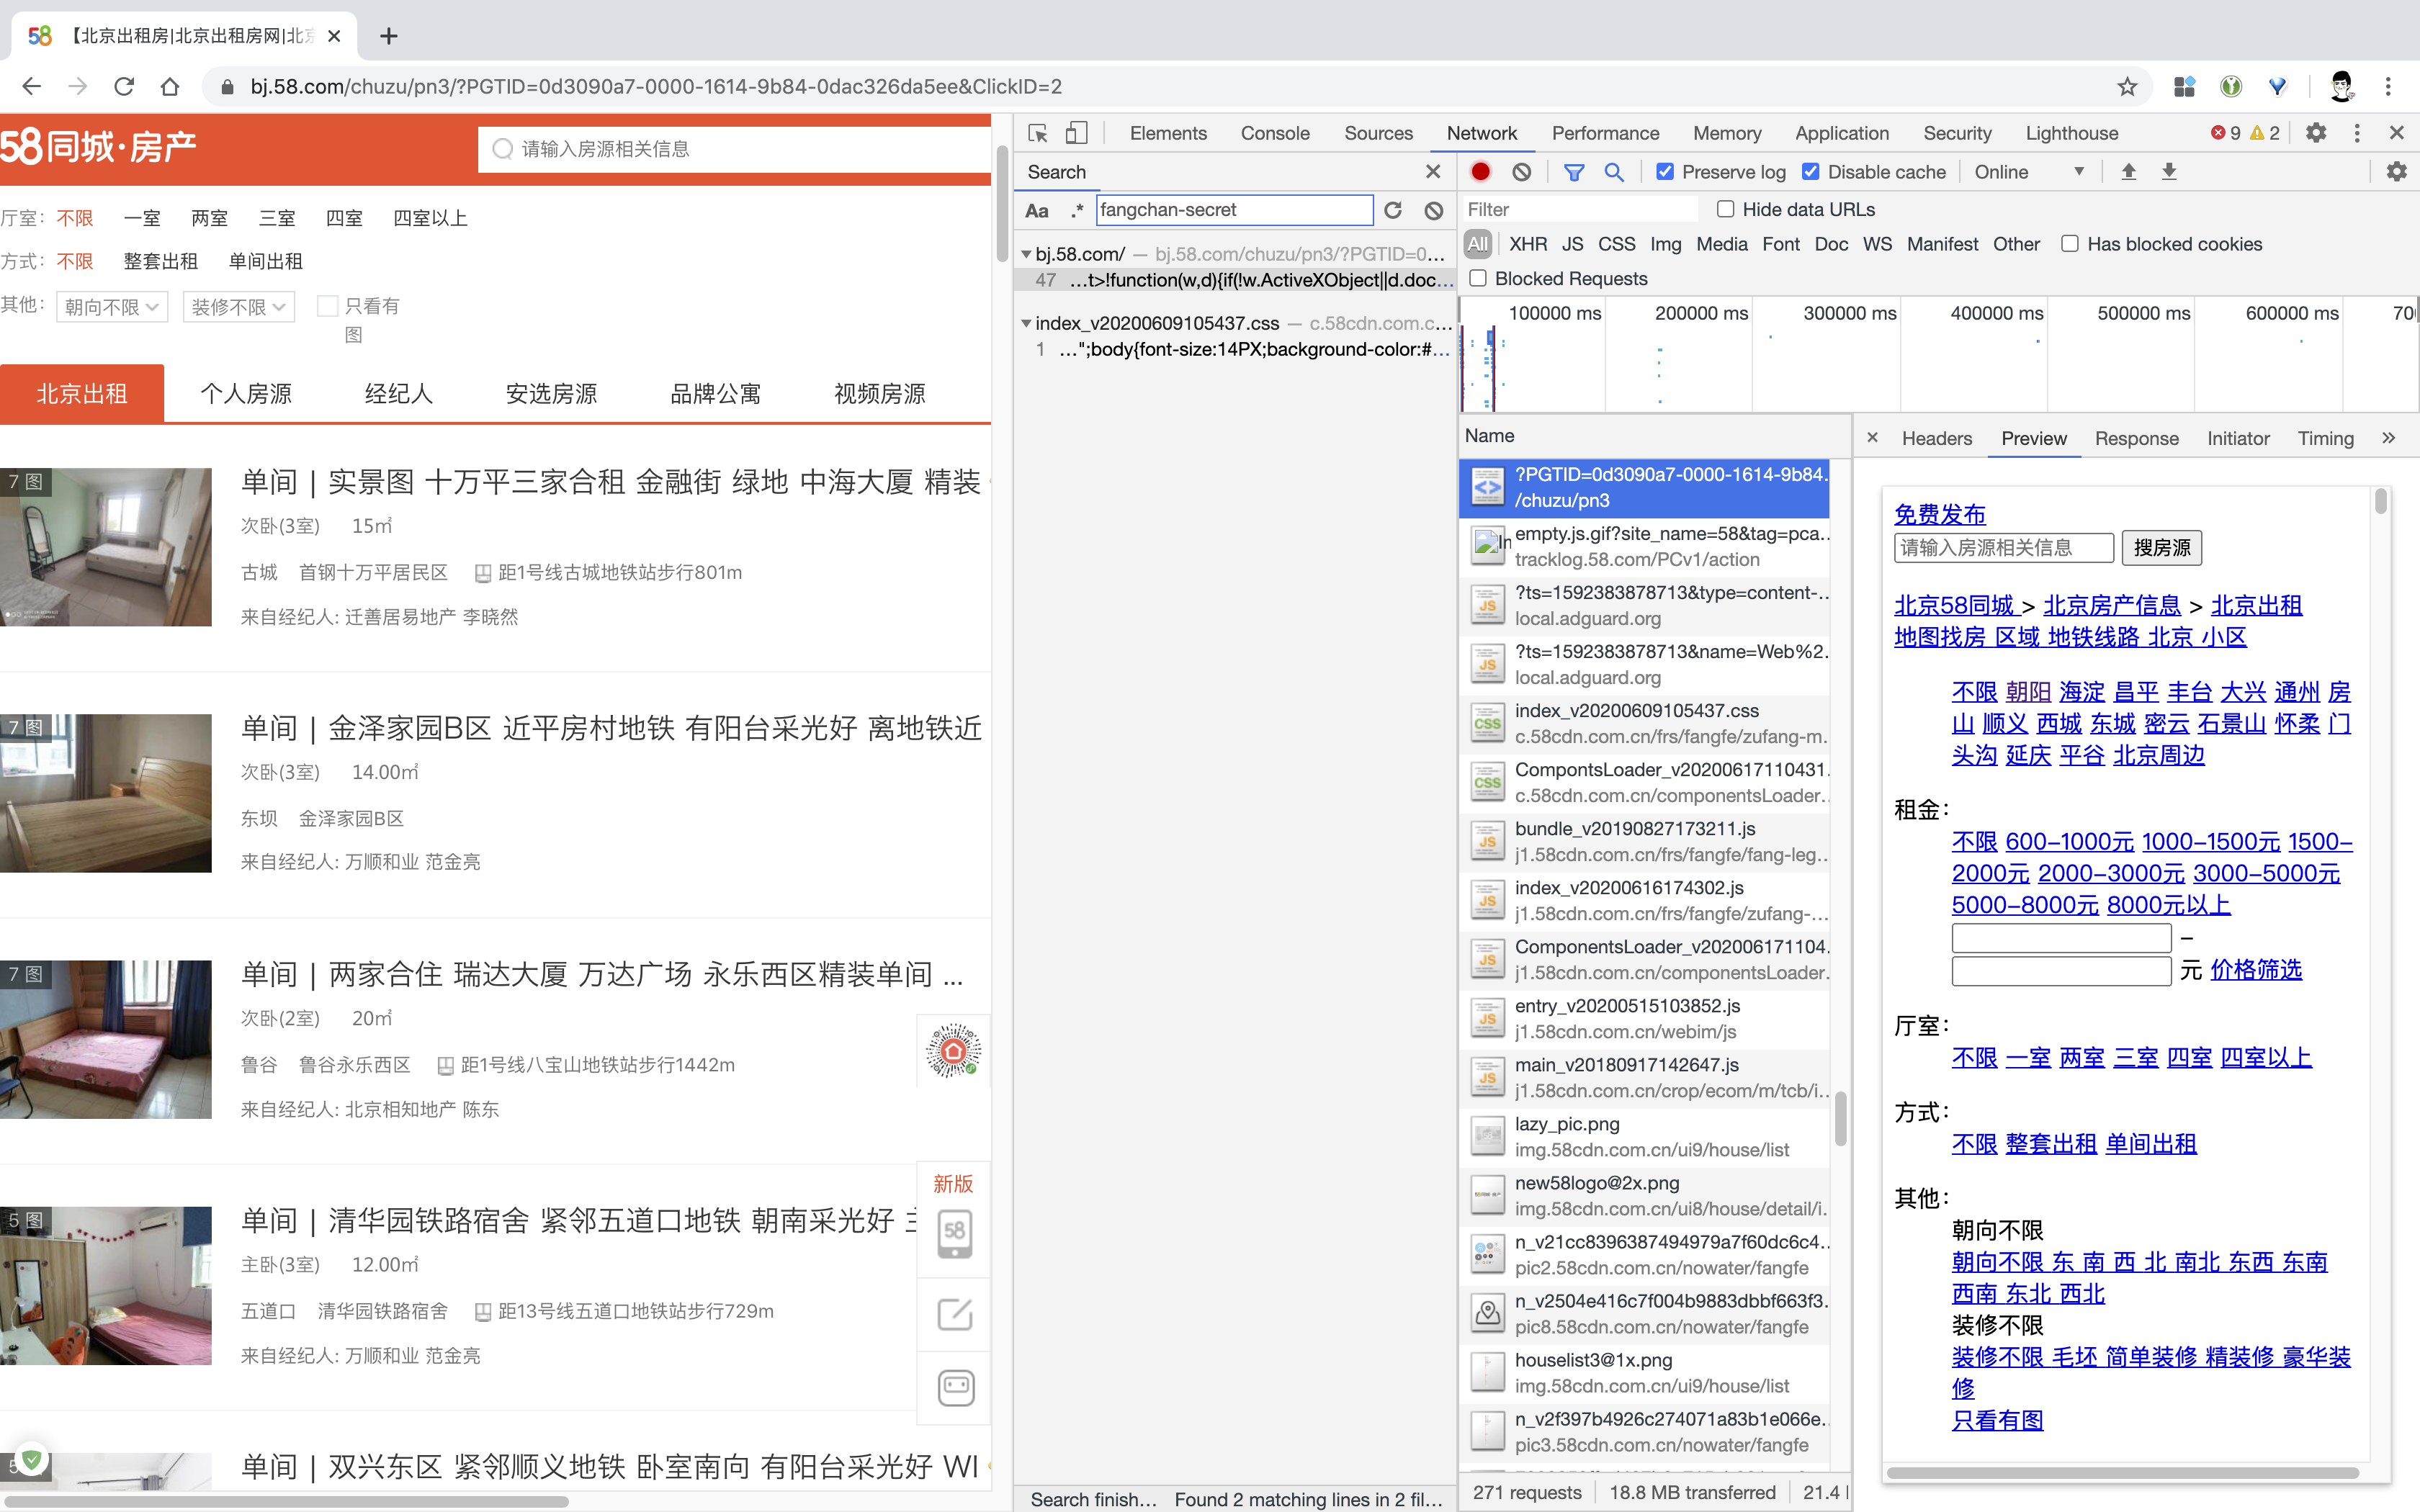
看到有一个 fangchan-secret 字段,搜索一下,发现只有两个地方出现:一个是 css 文件,另一个是我们当前页面的源码文件。

搜索后找到一段 base64 编码,应该就是加密数字的字体文件了。解码后保存到二进制文件。
# 使用正则将 base64 编码匹配到,保存到 font_data.ttf 文件中

_base64_code = re.findall(
    "data:application/font-ttf;charset=utf-8;base64,(.*?)'\) format",
    response)[0]
_data = base64.decodebytes(_base64_code.encode())
with open('font_data.ttf', 'wb') as f:
    f.write(_data)
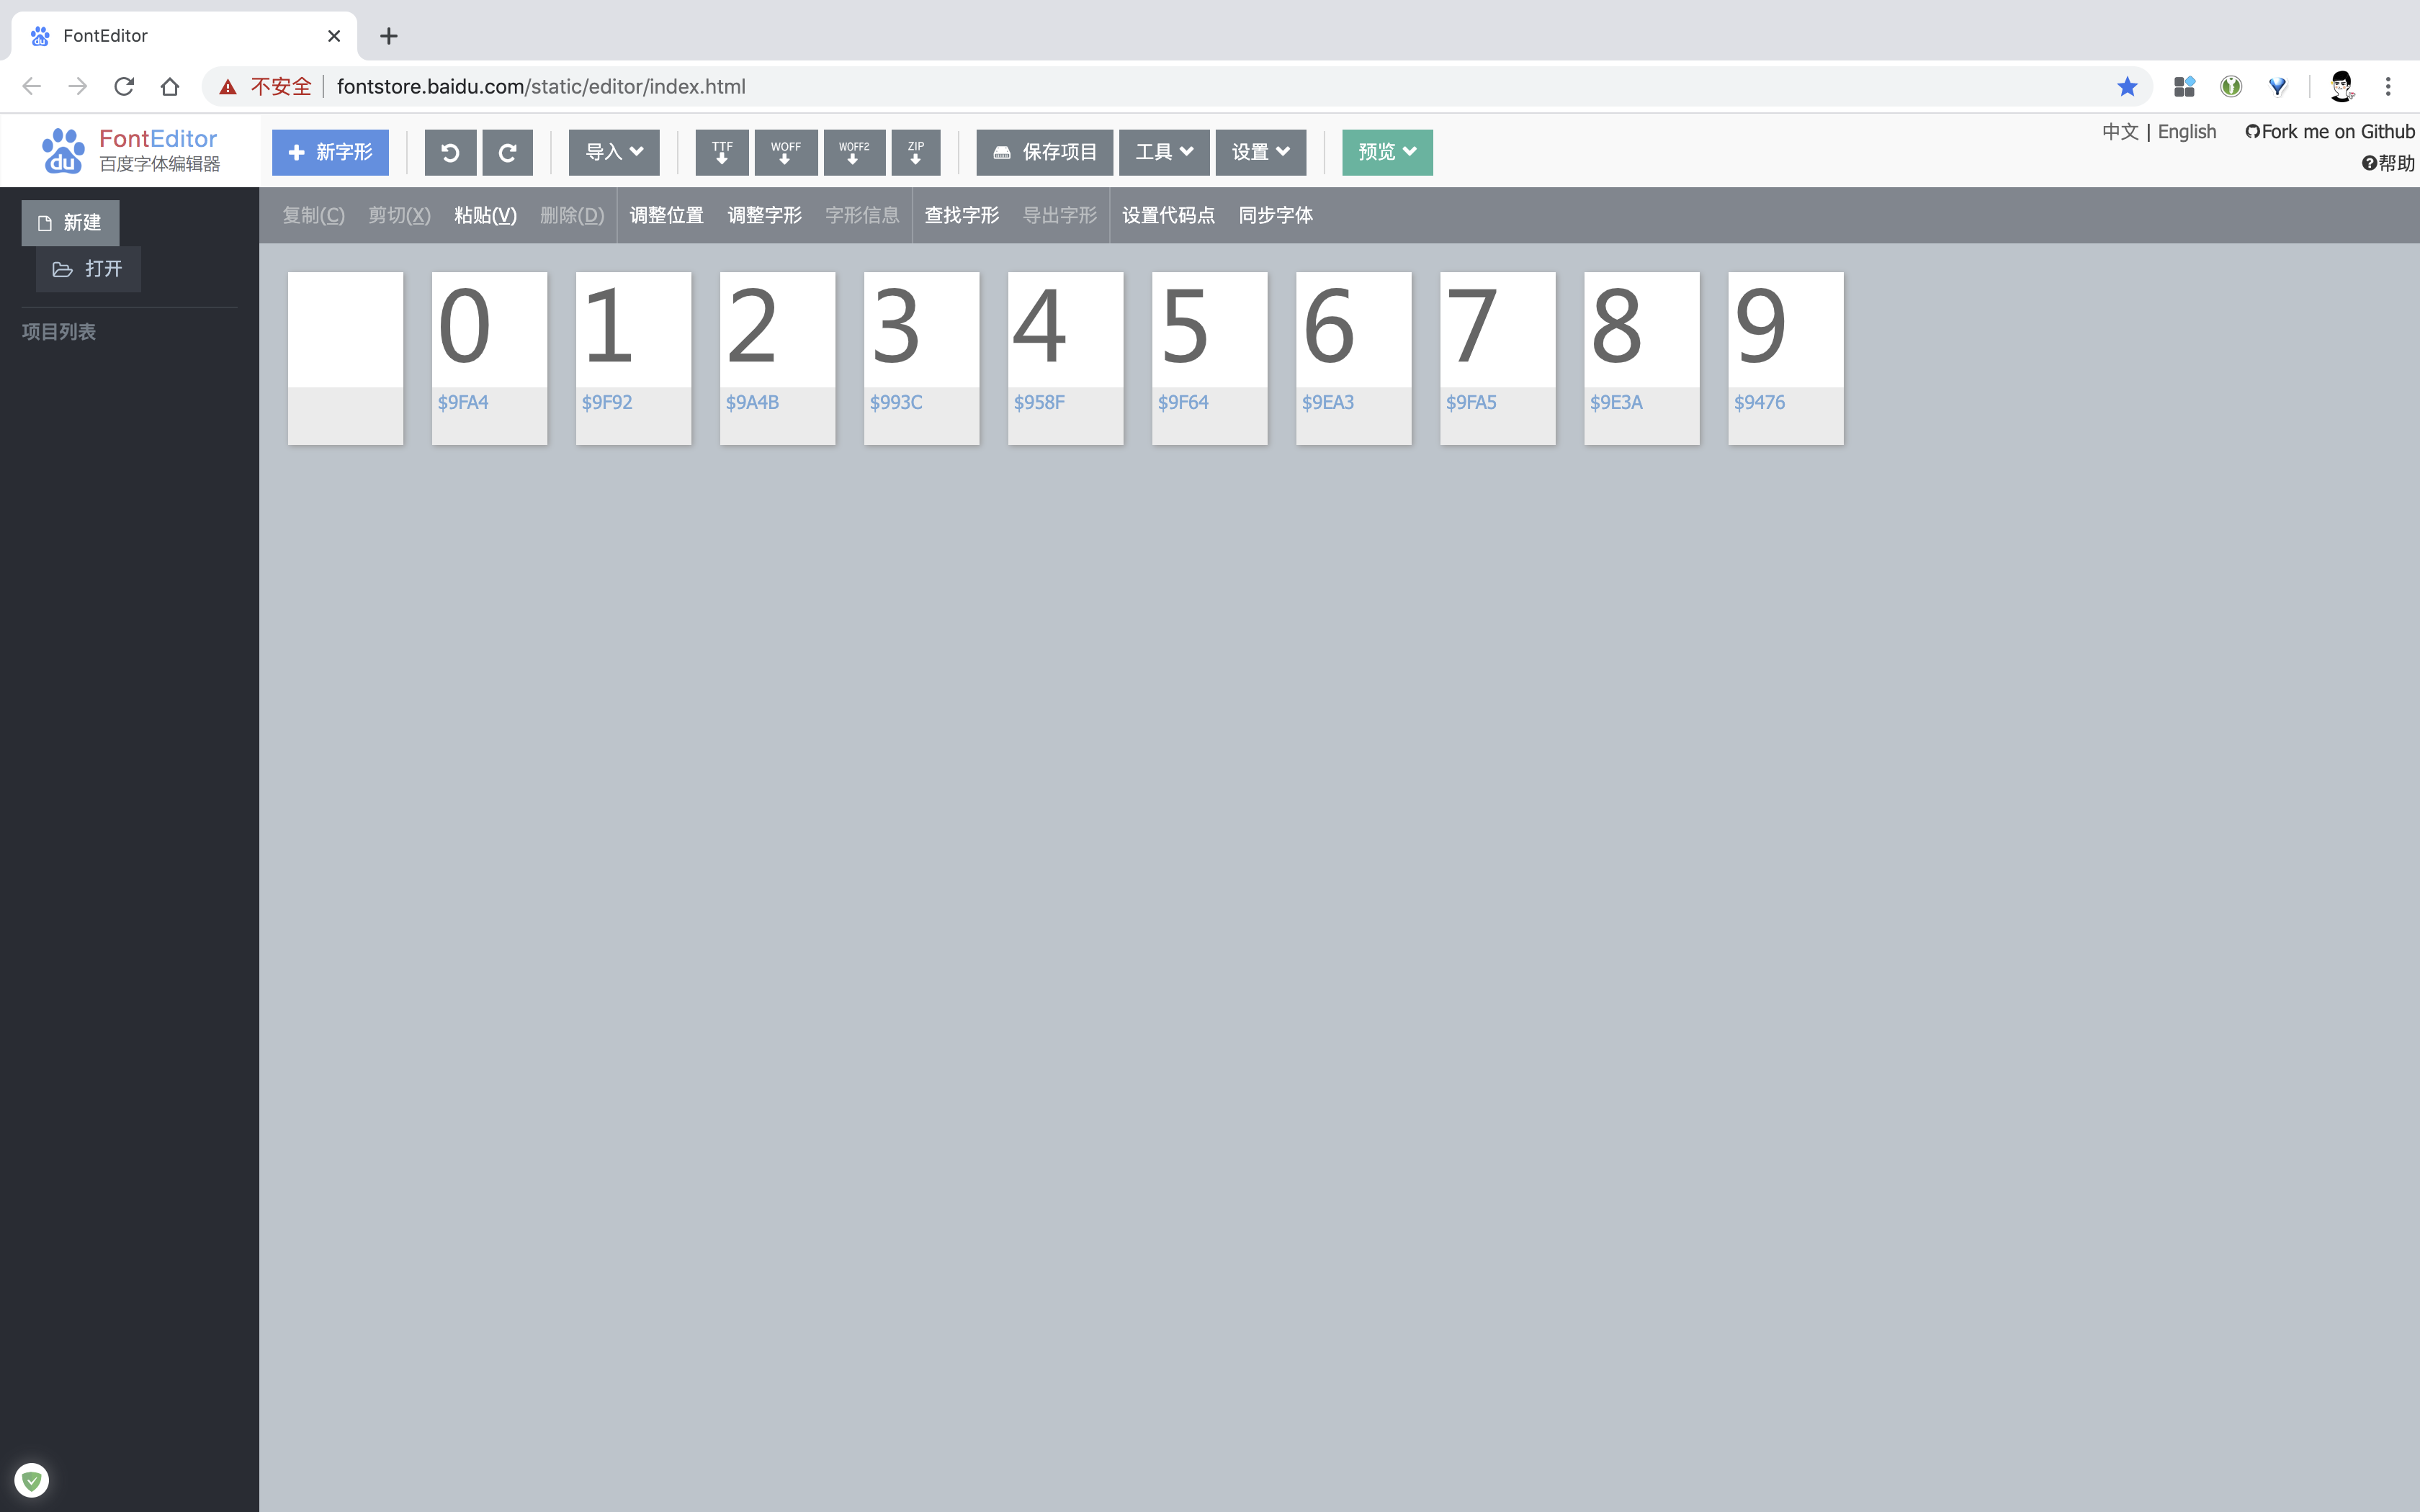
然后用百度字体编辑器打开,我们发现了字符串与数字的对应关系。

数字 0 对应字符串 9FA4,数字 1 对应字符串 9F92,以此类推...
但是当我们进入一个详情页面后,多次刷新会发现每次展示数字不会变化,但是对应的字符串却发生了变化。说明对应关系应该是在网页渲染的时候随机生成的。
一定在某个地方还有对应关系没有找到。
这个时候需要用到字体相关的工具库 fontTools,这个库可以把字体文件转换为 xml 文件。
from fontTools.ttLib import TTFont

font = TTFont('font_data.ttf')
font.saveXML('font_data.xml')
将刚才保存的文件转换成 xml 文件。发现的确还有一层对应关系:
<cmap_format_4 platformID="0" platEncID="3" language="0">
  <map code="0x9476" name="glyph00010"/><!-- CJK UNIFIED IDEOGRAPH-9476 -->
  <map code="0x958f" name="glyph00005"/><!-- CJK UNIFIED IDEOGRAPH-958F -->
  <map code="0x993c" name="glyph00004"/><!-- CJK UNIFIED IDEOGRAPH-993C -->
  <map code="0x9a4b" name="glyph00003"/><!-- CJK UNIFIED IDEOGRAPH-9A4B -->
  <map code="0x9e3a" name="glyph00009"/><!-- CJK UNIFIED IDEOGRAPH-9E3A -->
  <map code="0x9ea3" name="glyph00007"/><!-- CJK UNIFIED IDEOGRAPH-9EA3 -->
  <map code="0x9f64" name="glyph00006"/><!-- CJK UNIFIED IDEOGRAPH-9F64 -->
  <map code="0x9f92" name="glyph00002"/><!-- CJK UNIFIED IDEOGRAPH-9F92 -->
  <map code="0x9fa4" name="glyph00001"/><!-- CJK UNIFIED IDEOGRAPH-9FA4 -->
  <map code="0x9fa5" name="glyph00008"/><!-- CJK UNIFIED IDEOGRAPH-9FA5 -->
</cmap_format_4>
和上图在百度字体编辑器对应,发现 0x9476 对应 glyph00010 对应数字 9,0x958f 对应 glyph00005 对应数字 4...
多次测试后发现 code 和 name 的对应关系会变化,但是 name 和数字的关系永远保持一致。这样就好解决了。
我们需要做的有:
- 请求网页,获取 base64 编码和网页源码
- 将当前页面的加密字符串和数字对应关系找到
- 把当前网页的加密字符串全部替换成数字
这样就完成了 58 同城的网页解析工作。代码就很好写了。
import os
import re
import json
import base64

import requests
from lxml import etree
from fontTools.ttLib import TTFont

class TongChengSpider(object):

    """
    58同城 | 北京市朝阳区租房信息爬虫 Demo

    ~~~~~~

    - 网址:https://bj.58.com/chaoyang/chuzu/

    - 网站反爬较严重,不仅有字体反爬,对 IP 限制也较严格,所以把网页源码保存到了本地,
      在无代{过}{滤}理的情况使用本地文件,有代{过}{滤}理的情况实时抓取。
    """

    def __init__(self):
        self.url = "https://bj.58.com/chaoyang/chuzu/"
        self.headers = {
            "referer": "https://bj.58.com/",
            "User-Agent": "Mozilla/5.0 (Macintosh; Intel Mac OS X 10_14_6) AppleWebKit/537.36 (KHTML, like Gecko) Chrome/83.0.4103.97 Safari/537.36"
        }
        # 存放解密后的字符串与数字对应关系
        self.keys = dict()
        self.proxies = dict()

    def crawler(self):
        """获取网页内容"""

        if self.proxies:
            # 有代{过}{滤}理就请求网页
            _response = requests.get(self.url, headers=self.headers).text
        else:
            # 无代{过}{滤}理使用本地文件
            with open("./_58.html", "r") as f:
                _response = f.read()
        return _response

    def _init_data(self):
        """处理网页加密字符串,将 tff 格式转化为 xml 格式,并找出对应关系"""

        self.get_font_data()
        self.parse_font_data()

    def get_font_data(self):
        """获取网站加密字体数据"""

        response = self.crawler()
        _base64_code = re.findall(
            "data:application/font-ttf;charset=utf-8;base64,(.*?)'\) format",
            response)[0]
        _data = base64.decodebytes(_base64_code.encode())
        with open('font_data.ttf', 'wb') as f:
            f.write(_data)
        font = TTFont('font_data.ttf')
        font.saveXML('font_data.xml')

    def parse_font_data(self):
        """解析 XML 格式的字体文件
           找出 unicode 和加密字符的对应关系"""

        unicode_list = ['0x9476', '0x958f', '0x993c', '0x9a4b', '0x9e3a',
                        '0x9ea3', '0x9f64', '0x9f92', '0x9fa4', '0x9fa5']
        glyph_list = {'glyph00001': '0', 'glyph00002': '1', 'glyph00003': '2',
                      'glyph00004': '3', 'glyph00005': '4', 'glyph00006': '5',
                      'glyph00007': '6', 'glyph00008': '7', 'glyph00009': '8',
                      'glyph00010': '9'}

        data = etree.parse("./font_data.xml")
        self.keys = {item: glyph_list[data.xpath("//cmap//map[@code='{}']/@name".format(item))[0]]
                     for item in unicode_list}

    def replace_secret_code(self, raw_string, rep_string, rep_dict):
        """替换加密字体"""

        return raw_string.replace(rep_string, rep_dict[rep_string])

    def get_real_resp(self):
        """替换掉原始网页中的加密字体"""

        _response = self.crawler()

        # 将获取到的字符串替换为网页中的字符串样式
        _keys = json.loads(json.dumps(self.keys).replace("0x", "&#x").replace('":', ';":'))

        response = None
        for item in _keys.keys():
            if not response:
                response = self.replace_secret_code(_response, item, _keys)
            else:
                response = self.replace_secret_code(response, item, _keys)

        with open("demo.html", "w") as f:
            f.write(response)

    def del_(self):
        """删除无用文件"""

        os.remove("font_data.xml")
        os.remove("font_data.ttf")

    def run(self):
        self._init_data()
        self.get_real_resp()
        self.del_()

if __name__ == '__main__':
    tc = TongChengSpider()
    tc.run()
更详细代码可见:https://github.com/alpha87/58tc_zufang。
包含 Pipenv 和 requirements.txt 文件。
本文主要介绍字体反爬思路,所以具体爬虫就不赘述了。
 发表于 2020-6-30 10:47
 发表于 2020-6-30 10:57
 发表于 2020-6-30 11:04
 发表于 2020-6-30 11:37
 发表于 2020-6-30 11:39