好友
阅读权限10
听众
最后登录1970-1-1
|
 LHW
发表于 2022-4-3 14:50
本帖最后由 LHW 于 2022-4-4 08:51 编辑
(12)从零开始学前端(学习笔记)-JavaWeb-CSS-边距、轮廓
本人自学两年,想通过笔记来帮助一些刚入门的小白快速的了解前端知识,如果喜欢这个系列,可以点赞评论支持一下嘛,谢谢各位啦
纯手打非复制,如有错误可以在评论区纠正,感谢支持
--续借上集--
前言
今天的我们需要学习CSS边距和CSS轮廓,其中CSS边距是今天的重点,在以后的学习中也是经常需要使用的CSS样式是希望大家在学习完之后能够记录一下,以防笔记丢失...
CSS边距
1. 什么是CSS边距?
CSS边距就是在盒子(div)的内外部添加的间距,也就是用来设置页面中一个元素所占空间的边缘到相邻元素之间的距离。CSS边距又分为CSS外边距和CSS内边距。
2. CSS边距属性:
(1)CSS外边距
一个元素离另一个元素相距的距离叫做边距,那么想设置这个边距,我们就要给其中一个元素添加边距属性,那么这个边距就叫做外边距,使用margin属性来定义元素的外边距。如图,div2距离div1有一个边距,这个边距就叫做外边距。

[HTML] 纯文本查看 复制代码 <!DOCTYPE html>
<html lang="en">
<head>
<meta charset="UTF-8">
<meta http-equiv="X-UA-Compatible" content="IE=edge">
<meta name="viewport" content="width=device-width, initial-scale=1.0">
<title>CSS外边距</title>
<style>
* {
margin: 0;
padding: 0;
}
div {
width: 300px;
height: 300px;
background-color: greenyellow;
}
div + div {
background-color: skyblue;
margin: 20px; /* 给第二个div定义一个margin(边距)属性,值为20像素 */
}
</style>
</head>
<body>
<div></div>
<div></div>
</body>
</html>
(2)CSS外边距-单独边距与简写
CSS外边距也可以给每个边设置边距属性:
- margin-top
- margin-right
- margin-bottom
- margin-left
当然如果觉得麻烦也可以用直接在margin上设置四个边的边距属性(简写)。如图,上面div1是用单独定义外边距的写法,下面的div2是用margin属性简写的外边距,是不是感觉简单多了呢?

[HTML] 纯文本查看 复制代码 <!DOCTYPE html>
<html lang="en">
<head>
<meta charset="UTF-8">
<meta http-equiv="X-UA-Compatible" content="IE=edge">
<meta name="viewport" content="width=device-width, initial-scale=1.0">
<title>CSS外边距简写</title>
<style>
* {
margin: 0;
padding: 0;
}
div {
width: 300px;
height: 300px;
background-color: greenyellow;
margin-top: 10px; /* 单独给上边距定义边距 */
margin-right: 20px; /* 单独给右边距定义边距 */
margin-bottom: 30px; /* 单独给下边距定义边距 */
margin-left: 40px; /* 单独给左边距定义边距 */
}
div + div {
background-color: skyblue;
margin: 10px 20px 30px 40px; /* 统一定义边距 */
/*格式:margin: 上边距 右边距 下边距 左边距;*/
}
</style>
</head>
<body>
<div></div>
<div></div>
</body>
</html>
(3)CSS内边距
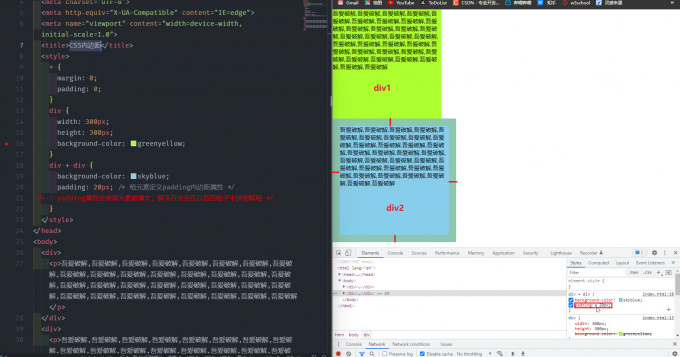
一个元素内部的元素距离父级元素的距离叫做父级内边距,那么想设置这个边距,我们就需要给父级元素添加内边距,使用padding给元素定义内边距。如图,div2中的元素距离div2有一个间距,而div1中的元素距离div1并没有间距。注意:padding属性会使得元素盒子被撑大,解决方法在以后文章中也会提到。

[HTML] 纯文本查看 复制代码 <!DOCTYPE html>
<html lang="en">
<head>
<meta charset="UTF-8">
<meta http-equiv="X-UA-Compatible" content="IE=edge">
<meta name="viewport" content="width=device-width, initial-scale=1.0">
<title>CSS内边距</title>
<style>
* {
margin: 0;
padding: 0;
}
div {
width: 300px;
height: 300px;
background-color: greenyellow;
}
div + div {
background-color: skyblue;
padding: 20px; /* 给元素定义padding内边距属性 */
/* ! padding属性会使得元素被撑大,解决方法会在以后的帖子中详细解释 */
}
</style>
</head>
<body>
<div>
<p>吾爱破解,吾爱破解,吾爱破解,吾爱破解,吾爱破解,吾爱破解,吾爱破解,吾爱破解,吾爱破解,吾爱破解,吾爱破解,吾爱破解,吾爱破解,吾爱破解,吾爱破解,吾爱破解,吾爱破解,吾爱破解,吾爱破解,吾爱破解,吾爱破解,吾爱破解,吾爱破解,吾爱破解,吾爱破解,吾爱破解,吾爱破解,吾爱破解,吾爱破解,吾爱破解,吾爱破解,吾爱破解</p>
</div>
<div>
<p>吾爱破解,吾爱破解,吾爱破解,吾爱破解,吾爱破解,吾爱破解,吾爱破解,吾爱破解,吾爱破解,吾爱破解,吾爱破解,吾爱破解,吾爱破解,吾爱破解,吾爱破解,吾爱破解,吾爱破解,吾爱破解,吾爱破解,吾爱破解,吾爱破解,吾爱破解,吾爱破解,吾爱破解,吾爱破解,吾爱破解,吾爱破解,吾爱破解,吾爱破解,吾爱破解,吾爱破解,吾爱破解</p>
</div>
</body>
</html>
(4)CSS内边距-单独边距与简写
CSS内边距也可以给每个边设置边距属性:
- padding-top
- padding-right
- padding-bottom
- padding-left
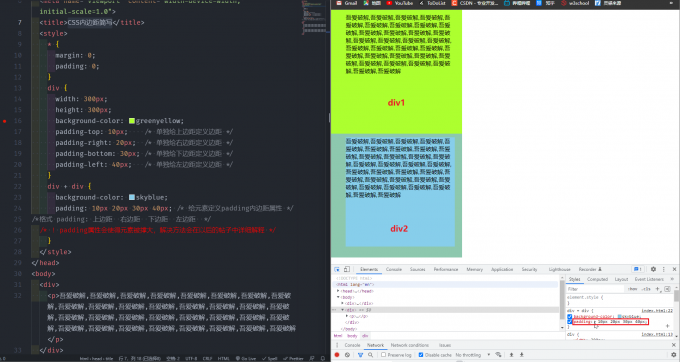
当然如果觉得麻烦也可以用直接在padding上设置四个边的边距属性(简写)。如图,上面div1是用单独定义内边距的写法,下面的div2是用padding属性简写的内边距,是不是感觉简单多了呢?

[HTML] 纯文本查看 复制代码 <!DOCTYPE html>
<html lang="en">
<head>
<meta charset="UTF-8">
<meta http-equiv="X-UA-Compatible" content="IE=edge">
<meta name="viewport" content="width=device-width, initial-scale=1.0">
<title>CSS内边距简写</title>
<style>
* {
margin: 0;
padding: 0;
}
div {
width: 300px;
height: 300px;
background-color: greenyellow;
padding-top: 10px; /* 单独给上边距定义边距 */
padding-right: 20px; /* 单独给右边距定义边距 */
padding-bottom: 30px; /* 单独给下边距定义边距 */
padding-left: 40px; /* 单独给左边距定义边距 */
}
div + div {
background-color: skyblue;
padding: 10px 20px 30px 40px; /* 给元素定义padding内边距属性 */
/*格式 padding: 上边距 右边距 下边距 左边距 */
/* ! padding属性会使得元素被撑大,解决方法会在以后的帖子中详细解释 */
}
</style>
</head>
<body>
<div>
<p>吾爱破解,吾爱破解,吾爱破解,吾爱破解,吾爱破解,吾爱破解,吾爱破解,吾爱破解,吾爱破解,吾爱破解,吾爱破解,吾爱破解,吾爱破解,吾爱破解,吾爱破解,吾爱破解,吾爱破解,吾爱破解,吾爱破解,吾爱破解,吾爱破解,吾爱破解,吾爱破解,吾爱破解,吾爱破解,吾爱破解,吾爱破解,吾爱破解,吾爱破解,吾爱破解,吾爱破解,吾爱破解</p>
</div>
<div>
<p>吾爱破解,吾爱破解,吾爱破解,吾爱破解,吾爱破解,吾爱破解,吾爱破解,吾爱破解,吾爱破解,吾爱破解,吾爱破解,吾爱破解,吾爱破解,吾爱破解,吾爱破解,吾爱破解,吾爱破解,吾爱破解,吾爱破解,吾爱破解,吾爱破解,吾爱破解,吾爱破解,吾爱破解,吾爱破解,吾爱破解,吾爱破解,吾爱破解,吾爱破解,吾爱破解,吾爱破解,吾爱破解</p>
</div>
</body>
</html>
CSS轮廓
1. 什么是CSS轮廓?
CSS轮廓是围绕着盒子(div)的线,与边框(border)的区别就在于轮廓在是在边框外面的,且轮廓不受到元素的高度宽度影响,作用也就是让元素更显眼。
2. CSS轮廓属性:
CSS轮廓属性有五个,分别为:
- outline-style
- outlint-color
- outlint-width
- outline-offset
- outline
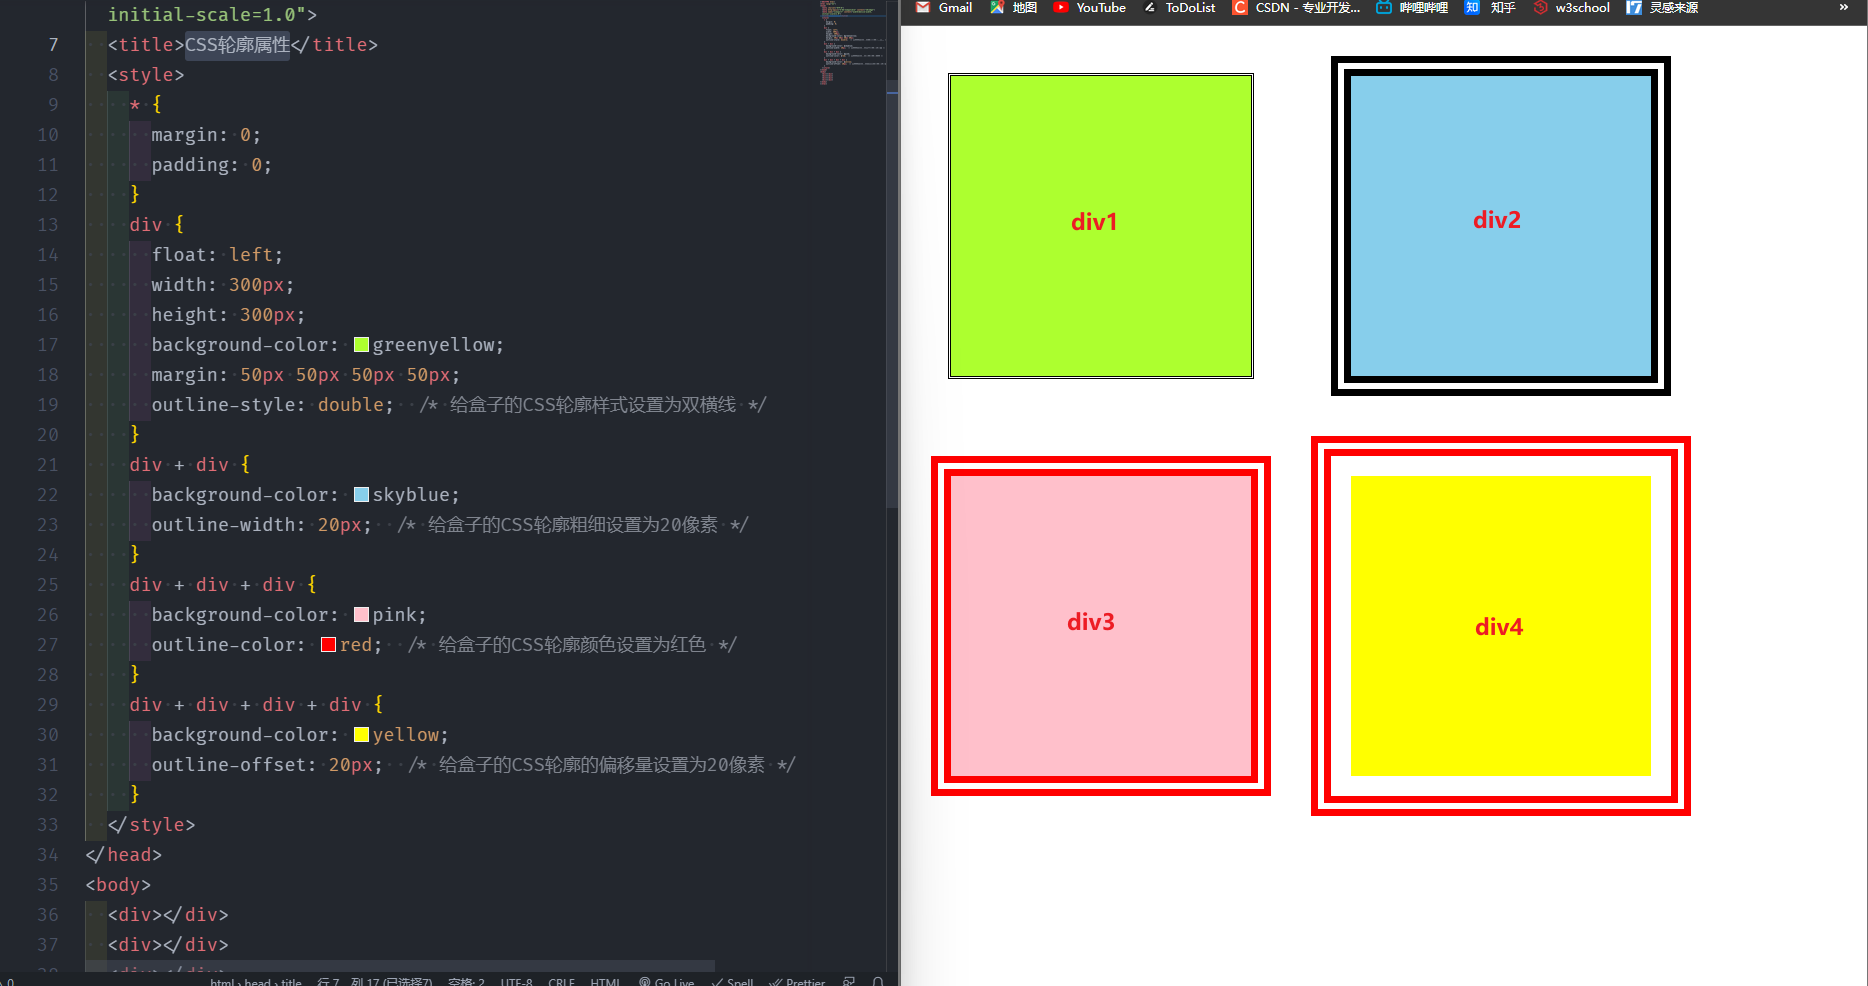
outline-style是给轮廓定义样式的,outlint-color是给轮廓更改颜色的,outlint-width是给轮廓更改宽度的,outlint-offset是给轮廓更改偏移量(距离元素的距离类似于外边距)。如图,div1是更改了CSS轮廓样式,div2是更改了CSS轮廓粗细,div3是更改了CSS轮廓颜色,div4是设置了CSS轮廓偏移量。

[HTML] 纯文本查看 复制代码 <!DOCTYPE html>
<html lang="en">
<head>
<meta charset="UTF-8">
<meta http-equiv="X-UA-Compatible" content="IE=edge">
<meta name="viewport" content="width=device-width, initial-scale=1.0">
<title>CSS轮廓属性</title>
<style>
* {
margin: 0;
padding: 0;
}
div {
float: left;
width: 300px;
height: 300px;
background-color: greenyellow;
margin: 50px 50px 50px 50px;
outline-style: double; /* 给盒子的CSS轮廓样式设置为双横线 */
}
div + div {
background-color: skyblue;
outline-width: 20px; /* 给盒子的CSS轮廓粗细设置为20像素 */
}
div + div + div {
background-color: pink;
outline-color: red; /* 给盒子的CSS轮廓颜色设置为红色 */
}
div + div + div + div {
background-color: yellow;
outline-offset: 20px; /* 给盒子的CSS轮廓的偏移量设置为20像素 */
}
</style>
</head>
<body>
<div></div>
<div></div>
<div></div>
<div></div>
</body>
</html>
如果觉得麻烦的话,我们可以直接使用outline来定义轮廓的粗细、样式和颜色属性。偏移量只能通过outline-offset进行设置,代码如下:
[CSS] 纯文本查看 复制代码 div{
background-color: yellow;
outline: 20px double red;
/*格式:outline: 粗细 样式 颜色*/
outline-offset: 20px;
}
2. CSS轮廓样式:
CSS的轮廓的样式有十个,分别为:
- solid - 实线
- dotted - 虚线
- dashed - 点线
- double - 双实线
- groove - 3D凹槽轮廓
- ridge - 3D脊状轮廓
- inset - 3D插图轮廓
- outset - 3D开始轮廓
- none - 无轮廓
- hidden - 隐藏轮廓

[HTML] 纯文本查看 复制代码 <!DOCTYPE html>
<html lang="en">
<head>
<meta charset="UTF-8">
<meta http-equiv="X-UA-Compatible" content="IE=edge">
<meta name="viewport" content="width=device-width, initial-scale=1.0">
<title>CSS轮廓属性</title>
<style>
* {
margin: 0;
padding: 0;
}
div {
float: left;
width: 100px;
height: 100px;
background-color: red;
margin: 50px 50px 50px 50px;
outline: 10px solid rgb(180, 177, 177);
outline-offset: 20px;
}
div+div {
background-color: orange;
outline-style: dotted;
}
div+div+div {
background-color: yellow;
outline-style: dashed;
}
div+div+div+div {
background-color: green;
outline-style: double;
}
div+div+div+div+div {
background-color: blue;
outline-style: groove;
}
div+div+div+div+div+div {
background-color: indigo;
outline-style: ridge;
}
div+div+div+div+div+div+div {
background-color: purple;
outline-style: inset;
}
div+div+div+div+div+div+div+div {
background-color: skyblue;
outline-style: outset;
}
div+div+div+div+div+div+div+div+div {
background-color: greenyellow;
outline-style: none;
}
div+div+div+div+div+div+div+div+div+div {
background-color: pink;
outline-style: hidden;
}
</style>
</head>
<body>
<div></div>
<div></div>
<div></div>
<div></div>
<div></div>
<div></div>
<div></div>
<div></div>
<div></div>
<div></div>
</body>
</html>
总结
本文参考:https://www.w3school.com.cn/css/css_margin.asp CSS外边距 CSS内边距
https://www.w3school.com.cn/css/css_outline.asp CSS轮廓
本文主要内容:CSS外边距、CSS内边距、CSS轮廓,后续也会推出续集。希望大家能持续关注
 谢谢大家能够看到这里,如果觉得对你有帮助的话,可以点赞评论支持一下嘛谢谢各位啦 谢谢大家能够看到这里,如果觉得对你有帮助的话,可以点赞评论支持一下嘛谢谢各位啦
|
免费评分
-
查看全部评分
|
 发表于 2022-4-3 14:50
 发表于 2022-4-3 15:05
 发表于 2022-4-3 15:16
 发表于 2022-4-3 16:58
 发表于 2022-4-3 17:36
 发表于 2022-4-4 10:56