吾爱破解 - 52pojie.cn

 找回密码
 注册[Register]

QQ登录

只需一步,快速开始

查看: 1291|回复: 14
收起左侧

[学习记录] 《跟闪电侠学Netty》阅读笔记 - Netty入门程序解析

  [复制链接]
zxdsb666. 发表于 2023-7-7 14:56

引言

上一节《跟闪电侠学Netty》阅读笔记 - 开篇入门Netty 中介绍了Netty的入门程序,本节如标题所言将会一步步分析入门程序的代码含义。

思维导图
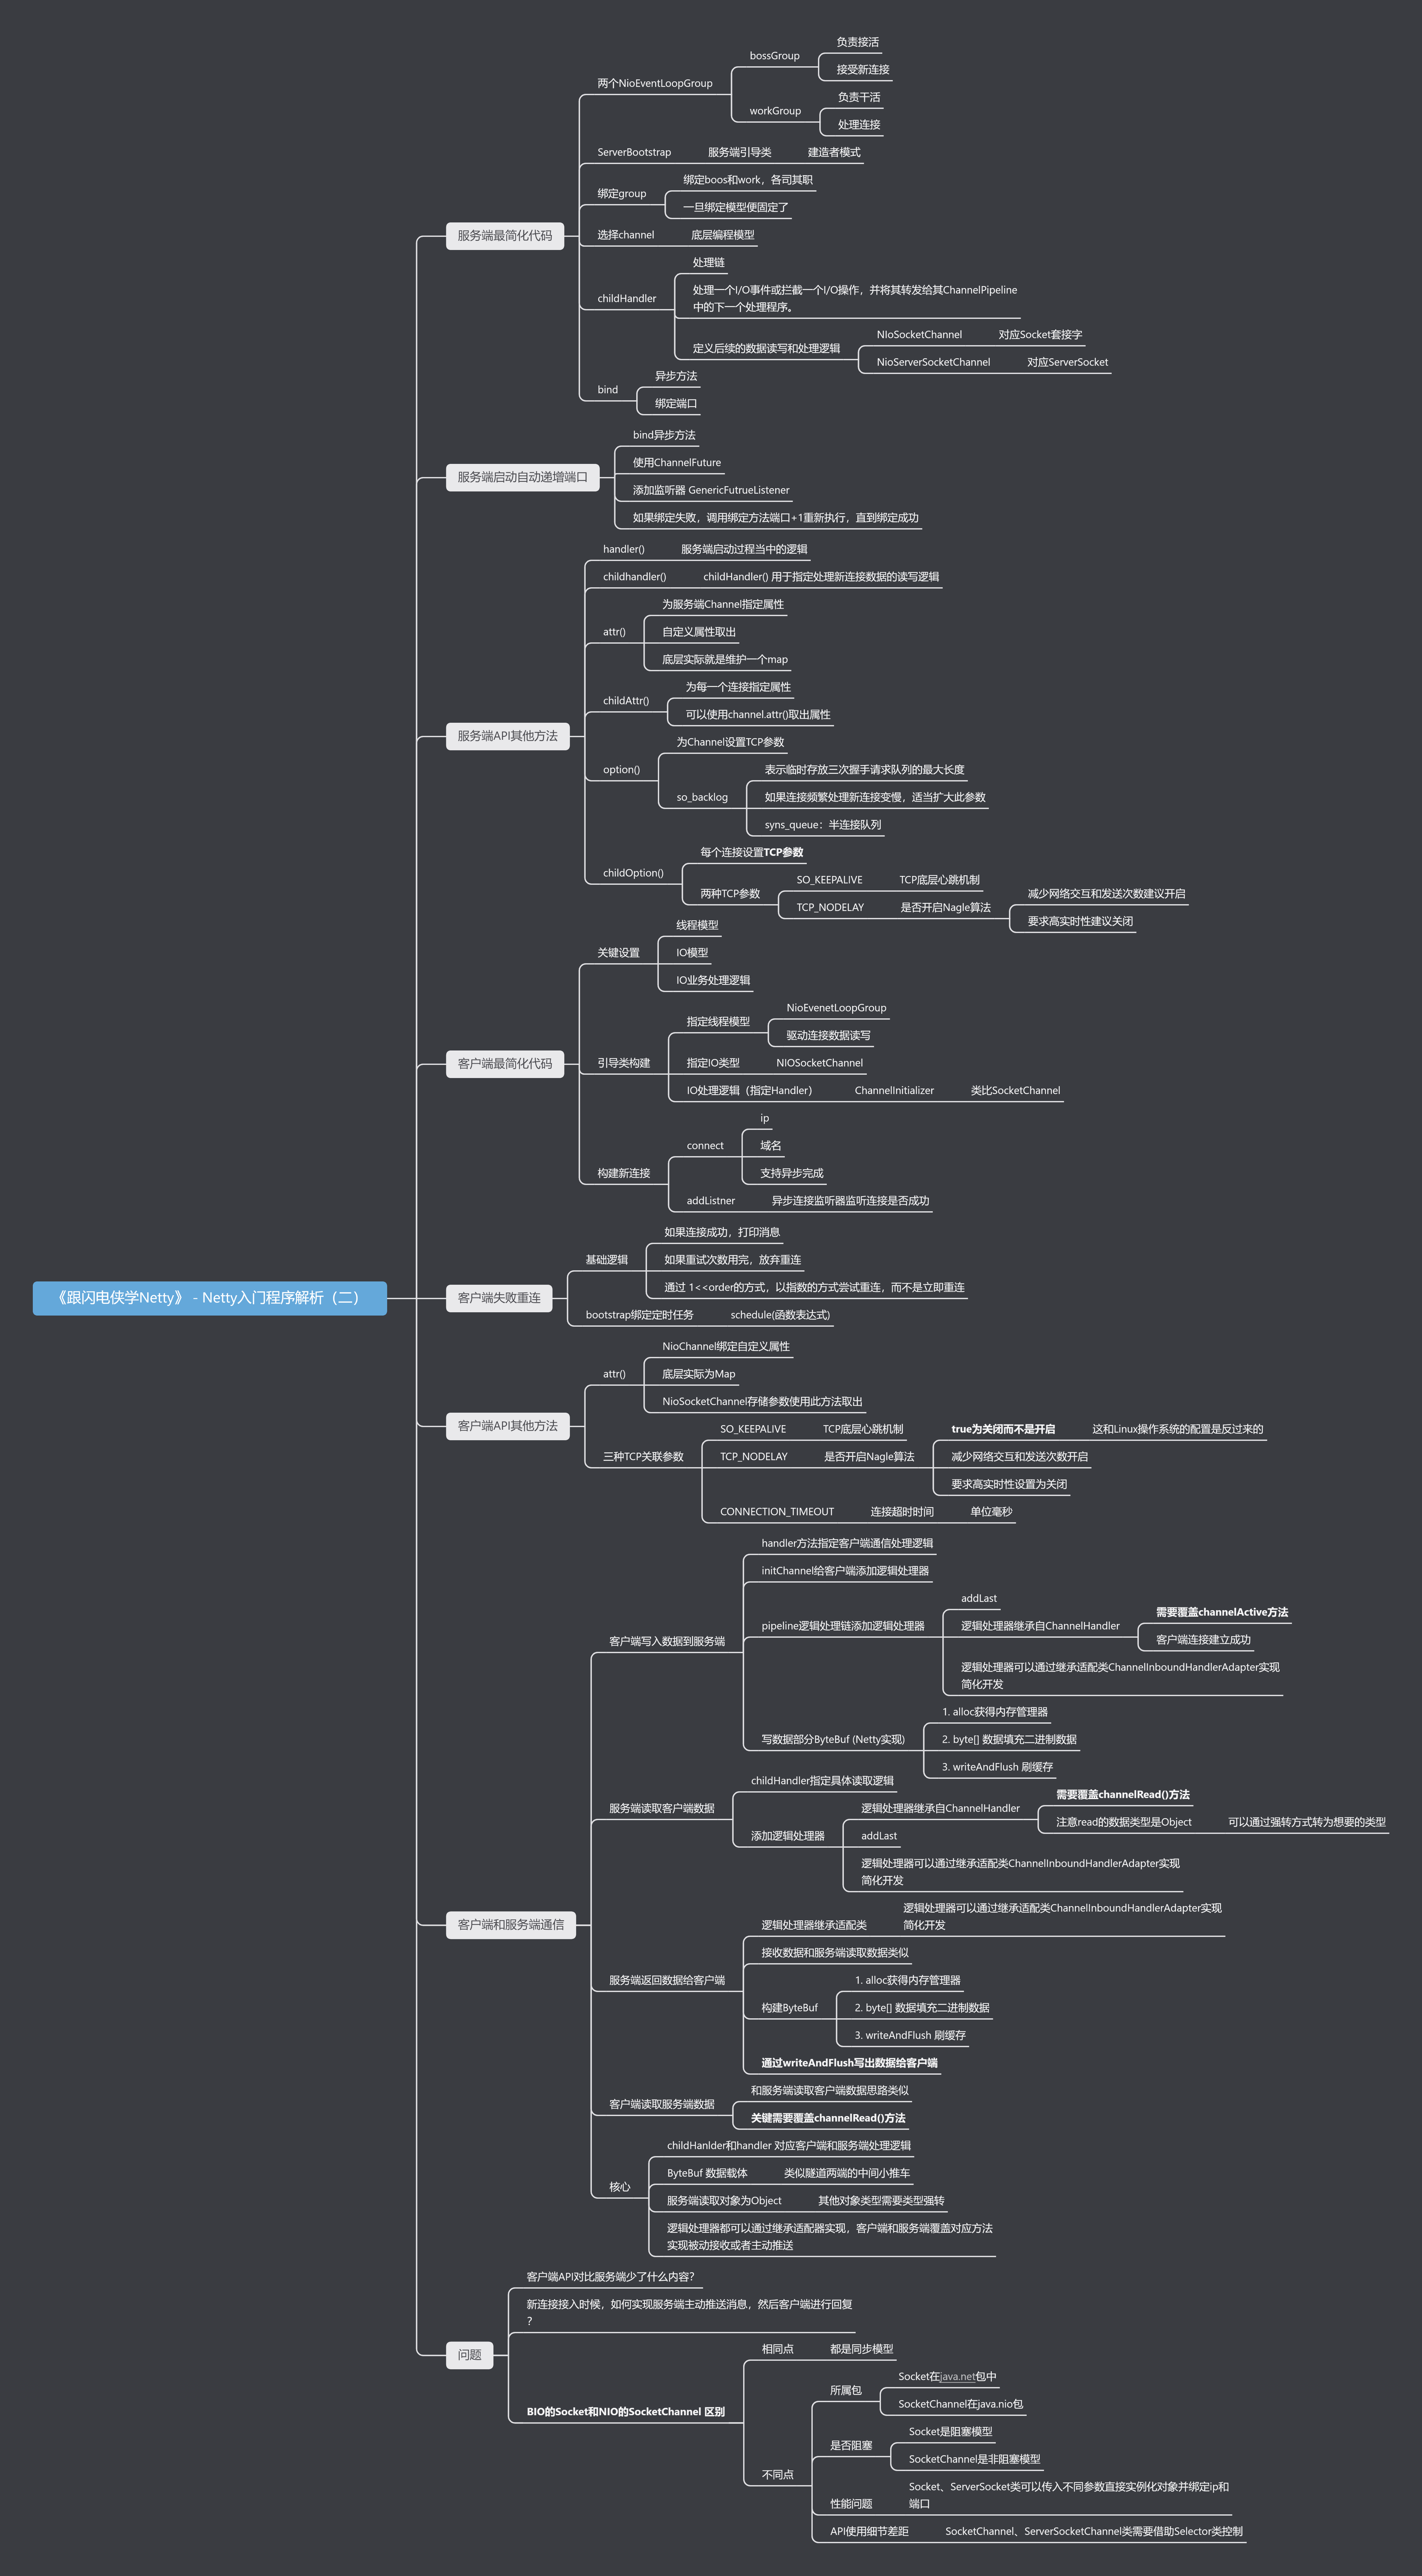
《跟闪电侠学Netty》 - Netty入门程序解析(二).png

服务端最简化代码

 public static void main(String[] args) {
        ServerBootstrap serverBootstrap = new ServerBootstrap();

        NioEventLoopGroup boos = new NioEventLoopGroup();
        NioEventLoopGroup worker = new NioEventLoopGroup();
        serverBootstrap
            .group(boos, worker)
            .channel(NioServerSocketChannel.class)
            .childHandler(new ChannelInitializer<NioSocketChannel>() {
                protected void initChannel(NioSocketChannel ch) {
                    ch.pipeline().addLast(new StringDecoder());
                    ch.pipeline().addLast(new SimpleChannelInboundHandler<String>() {
                        @Override
                        protected void channelRead0(ChannelHandlerContext ctx, String msg) {
                            System.out.println(msg);
                        }
                    });
                }
            })
            .bind(8000);
    }

两个NioEventLoopGroup

服务端一上来先构建两个对象NioEventLoopGroup,这两个对象将直接决定Netty启动之后的工作模式,在这个案例中boos和JDK的NIO编程一样负责进行新连接的“轮询”,他会定期检查客户端是否已经准备好可以接入。worker则负责处理boss获取到的连接,当检查连接有数据可以读写的时候就进行数据处理。

NioEventLoopGroup boos = new NioEventLoopGroup();
NioEventLoopGroup worker = new NioEventLoopGroup();

那么应该如何理解?其实这两个Group对象简单的看成是线程池即可,和JDBC的线程池没什么区别。通过阅读源码可以知道,bossGroup只用了一个线程来处理远程客户端的连接,workerGroup 拥有的线程数默认为2倍的cpu核心数

那么这两个线程池是如何配合的?boss和worker的工作模式和我们平时上班,老板接活员工干活的模式是类似的。bossGroup负责接待,再转交给workerGroup来处理具体的业务

整体概念上贴合NIO的设计思路,不过它要做的更好。

ServerBootstrap

ServerBootstrap serverBootstrap = new ServerBootstrap();
serverBootstrap.
    .xxx()
    .xxx()

服务端引导类是ServerBootstrap,引导器指的是引导开发者更方便快速的启动Netty服务端/客户端,

这里使用了比较经典的建造者设计模式。

group设置

.group(boos, worker)

group方法绑定boos和work使其各司其职,这个操作可以看作是绑定线程池。

注意gorup方法一旦确定就意味着Netty的线程模型被固定了,中途不允许切换,整个运行过程Netty会按照代码实现计算的线程数提供服务。

下面是group的api注释:

Set the EventLoopGroup for the parent (acceptor) and the child (client). These EventLoopGroup's are used to handle all the events and IO for ServerChannel and Channel's.

机翻过来就是:为父(acceptor)和子(client)设置EventLoopGroup。这些EventLoopGroup是用来处理ServerChannelChannel的所有事件和IO的。注意这里的 Channel's 是Netty中的概念,初学的时候可以简单的类比为BIO编程的Socket套接字。

channel

.channel(NioServerSocketChannel.class)

设置底层编程模型或者说底层通信模式,一旦设置中途不允许更改。所谓的底层编程模型,其实就是JDK的BIO,NIO模型(Netty摈弃了JDK的AIO编程模型),除此之外Netty还提供了自己编写的Epoll模型,当然日常工作中是用最多的还是NIO模型。

childHandler

childHandler方法主要作用是初始化和定义处理链来处理请求处理的细节。在案例代码当中我们添加了Netty提供的字符串解码handler(StringDecoder)和由Netty实现的SimpleChannelInboundHandler简易脚手架,脚手架中自定义的处理逻辑为打印客户端发送的请求数据。

.childHandler(new ChannelInitializer<NioSocketChannel>() {
                protected void initChannel(NioSocketChannel ch) {
                    ch.pipeline().addLast(new StringDecoder());
                    ch.pipeline().addLast(new SimpleChannelInboundHandler<String>() {
                        @Override
                        protected void channelRead0(ChannelHandlerContext ctx, String msg) {
                            System.out.println(msg);
                        }
                    });
                }
            })

Handler负责处理一个I/O事件或拦截一个I/O操作,处理完成将其转发给其ChannelPipeline中的下一个处理Handler,以此形成经典的处理链条。 比如案例里面StringDecoder解码处理数据之后将会交给SimpleChannelInboundHandlerchannelRead0方法,该方法中将解码读取到的数据打印到控制台。

借助pipeline,我们可以定义连接收到请求后续的数据读写细节和处理逻辑。为了方便理解,这里可以认为NIoSocketChanne 对应BIO编程模型的Socket套接字 ,NioServerSocketChannel对应BIO编程模型的ServerSocket

bind

.bind(8000)

bind操作是一个异步方法,它会返回ChannelFuture,服务端编码中可以通过添加监听器方式,自定义在Netty服务端启动回调通知之后的下一步处理逻辑,当然也可以完全不关心它是否启动继续往下执行其他业务代码的处理。

Netty的 ChannelFuture 类注释中有一个简单直观的例子介绍ChannelFuture的使用。

// GOOD
  Bootstrap b = ...;
  // Configure the connect timeout option.
  b.option(ChannelOption.CONNECT_TIMEOUT_MILLIS, 10000);
  ChannelFuture f = b.connect(...);
  f.awaitUninterruptibly();

  // Now we are sure the future is completed.
  assert f.isDone();

  if (f.isCancelled()) {
      // Connection attempt cancelled by user
  } else if (!f.isSuccess()) {
      f.cause().printStackTrace();
  } else {
      // Connection established successfully
  }

这个过程类似外面员把外卖送到指定地点之后打电话通知我们。

实践:服务端启动失败自动递增端口号重新绑定端口

第一个案例是通过服务端启动失败自动递增端口号重新绑定端口。

需求

服务端启动必须要关心的问题是指定的端口被占用导致启动失败的处理,这里的代码实践是利用Netty的API完成服务端端口在检测到端口被占用的时候自动+1重试绑定直到所有的端口耗尽。

思路

实现代码如下:


public class NettyServerStart {  

    public static void main(String[] args) {  
        ServerBootstrap serverBootstrap = new ServerBootstrap();  

        NioEventLoopGroup boss = new NioEventLoopGroup();  
        NioEventLoopGroup worker = new NioEventLoopGroup();  
        int port = 10022;  
        serverBootstrap  
                .group(boss, worker)  
                .channel(NioServerSocketChannel.class)  
                .handler(new ChannelInitializer() {  
                    @Override  
                    protected void initChannel(Channel ch) throws Exception {  
                        // 指定服务端启动过程的一些逻辑  
                        System.out.println("服务端启动当中");  
                    }  
                })  

                // 指定自定义属性,客户端可以根据此属性进行一些判断处理  
                // 可以看作给Channel维护一个Map属性,这里的channel是服务端  
                // 允许指定一个新创建的通道的初始属性。如果该值为空,指定键的属性将被删除。  
                .attr(AttributeKey.newInstance("hello"), "hello world")  

                // 给每个连接指定自定义属性,Channel 进行属性指定等  
                // 用给定的值在每个 子通道 上设置特定的AttributeKey。如果该值为空,则AttributeKey将被删除。  
                // 区别是是否是 子channel,子Channel代表给客户端的连接设置  
                .childAttr(AttributeKey.newInstance("childAttr"), "childAttr")  

                // 客户端的 Channel 设置TCP 参数  
                // so_backlog 临时存放已完成三次握手的请求队列的最大长度,如果频繁连接可以调大此参数  
                .option(ChannelOption.SO_BACKLOG, 1024)  

                // 给每个连接设置TCP参数  
                // tcp的心跳检测,true为开启  
                .childOption(ChannelOption.SO_KEEPALIVE, true)  
                // nagle 算法开关,实时性要求高就关闭  
                .childOption(ChannelOption.TCP_NODELAY, true)  

                .childHandler(new ChannelInitializer<NioSocketChannel>() {  
                    @Override  
                    protected void initChannel(NioSocketChannel ch) throws Exception {  
                        ch.pipeline().addLast(new StringDecoder());  
                        ch.pipeline().addLast(new SimpleChannelInboundHandler<String>() {  
                            @Override  
                            protected void channelRead0(ChannelHandlerContext ctx, String msg) throws Exception {  
                                System.err.println(msg);  
                            }  
                        });  

                    }  

                });  
        bind(serverBootstrap, port);  
    }  

    /**  
     * 自动绑定递增端口  
     * @Param serverBootstrap  
     * @param port  
     */  
    public static void bind(ServerBootstrap serverBootstrap, int port){  
        serverBootstrap.bind(port).addListener(future -> {  
            if(future.isSuccess()){  
                System.out.println("端口绑定成功");  
                System.out.println("绑定端口"+ port +"成功");  
            }else{  
                System.out.println("端口绑定失败");  
                bind(serverBootstrap, port+1);  
            }  
        });  
    }  
}

服务端API其他方法

详细介绍和解释API个人认为意义不大,这里仅仅对于常用的API进行解释:

  • handler():代表服务端启动过程当中的逻辑,服务端启动代码中基本很少使用。
  • childHandler():用于指定每个新连接数据的读写处理逻辑,类似流水线上安排每一道工序的处理细节。
  • attr():底层实际上就是一个Map,用户可以为服务端Channel指定属性,可以通过自定义属性实现一些特殊业务。(不推荐这样做,会导致业务代码和Netty高度耦合)
  • childAttr():为每一个连接指定属性,可以使用channel.attr()取出属性。
  • option():可以为Channel配置TCP参数。
    • so_backlog:表示临时存放三次握手请求队列(syns_queue:半连接队列)的最大容量,如果连接频繁处理新连接变慢,适当扩大此参数。这个参数的主要作用是预防“DOS”攻击占用。
  • childOption():为每个连接设置TCP参数。
    • TCP_NODELAY:是否开启Nagle算法,如果需要减少网络交互次数建议开启,要求高实时性建议关闭。
    • SO_KEEPALIVE:TCP底层心跳机制。

客户端最简化代码

客户端的启动代码如下。


public static void main(String[] args) throws InterruptedException {  
    Bootstrap bootstrap = new Bootstrap();  
    NioEventLoopGroup eventExecutors = new NioEventLoopGroup();  
    // 引导器引导启动  
    bootstrap.group(eventExecutors)  
            .channel(NioSocketChannel.class)  
            .handler(new ChannelInitializer<Channel>() {  
                @Override  
                protected void initChannel(Channel channel) throws Exception {  
                    channel.pipeline().addLast(new StringEncoder());  
                }  
            });  

    // 建立通道  
    Channel channel = bootstrap.connect("127.0.0.1", 8000).channel();  

    while (true){  
        channel.writeAndFlush(new Date() + " Hello world");  
        Thread.sleep(2000);  
    }  

}

客户端代码最主要的三个关注点是:线程模型IO模型IO业务处理逻辑,其他代码和服务端的启动比较类似。这里依旧是从上往下一条条分析代码。

Bootstrap

客户端连接不需要监听端口,为了和服务端区分直接被叫做Bootstrap,代表客户端的启动引导器。

Bootstrap bootstrap = new Bootstrap();  

NioEventLoopGroup

Netty中客户端也同样需要设置线程模型才能和服务端正确交互,客户端的NioEventLoopGroup同样可以看作是线程池,负责和服务端的数据读写处理。

NioEventLoopGroup eventExecutors = new NioEventLoopGroup();  

group

客户端 group 线程池的设置只需要一个即可,因为主要目的是和服务端建立连接(只需要一个线程即可)。

.group(eventExecutors)

channel

和服务端设置同理,作用是底层编程模型的设置。官方注释中推荐使用NIO / EPOLL / KQUEUE这几种,使用最多的是NIO

.channel(NioSocketChannel.class)

这里比较好奇如果用OIO模型的客户端连接NIO的服务端会怎么样? 于是做了个实验,把如下代码改为OioServerSocketChannel(生产禁止使用,此方式已被Deprecated),启动服务端之后启动客户端即可观察效果。

.channel(OioServerSocketChannel.class)

从实验结果来看,显然不允许这么干。

15:24:00.934 [main] WARN  io.netty.bootstrap.Bootstrap - Unknown channel option 'SO_KEEPALIVE' for channel '[id: 0xd0aaab57]'
15:24:00.934 [main] WARN  io.netty.bootstrap.Bootstrap - Unknown channel option 'TCP_NODELAY' for channel '[id: 0xd0aaab57]'

handler

上文介绍服务端的时候提到过 handler()代表服务端启动过程当中的逻辑,在这里自然就表示客户端启动过程的逻辑,客户端的handler()可以直接看作服务端引导器当中的childHandler()

这里读者可能会好奇为什么客户端代码用childHandler呢?答案是Netty为了防止使用者误解Bootstrap中只有handler,所以我们可以直接等同于服务端的childHandler()

吐槽:这个child不child的API名称看的比较蛋疼,不加以区分有时候确实容易用错。这里生活化理解服务端中的childHandler是身上带了连接,所以在连接成功之后会调用,没有child则代表此时没有任何连接,所以会发送在初始化的时候调用。

而客户端为什么只保留 handler() 呢?个人理解是客户端最关注的是连接上服务端之后所做的处理,增加初始化的时候做处理没啥意义,并且会导致设计变复杂。

handler内部是对于Channel进行初始化并且添加pipline自定义客户端的读写逻辑。这里同样添加Netty提供的StringEncoder默认会是用字符串编码模式对于发送的数据进行编码处理。

channel.pipeline().addLast(new StringEncoder());  

ChannelInitializer可以直接类比SocketChannel

connect

当配置都准备好之后,客户端的最后一步是启动客户端并且和服务端进行TCP三次握手建立连接。这里方法会返回Channel对象,Netty的connect支持异步连接。

Channel channel = bootstrap.connect("127.0.0.1", 8000).channel();  

再次强调,connect 是一个异步方法,同样可以通过给返回的channel对象调用addListner添加监听器,在Netty的客户端成功和服务端建立连接之后会回调相关方法告知监听器所有数据准备完成,此时可以在监听器中添加回调之后的处理逻辑。

我们还可以用监听器对于连接失败的情况做自定义处理逻辑,比如下面例子将会介绍利用监听器实现客户端连接服务端失败之后,定时自动重连服务端多次直到重连次数用完的例子。

实践:客户端失败重连

第二个实践代码是客户端在连接服务端的时候进行失败重连。失败重连在网络环境较差的时候十分有效,但是需要注意这里的代码中多次重试会逐渐增加时间间隔。

客户端失败重连的整体代码如下:

private static void connect(Bootstrap bootstrap, String host, int port, int retry) {  
    bootstrap.connect(host, port).addListener(future -> {  
        if (future.isSuccess()) {  
            System.out.println(new Date() + ": 连接成功,启动控制台线程……");  
            Channel channel = ((ChannelFuture) future).channel();  
            startConsoleThread(channel);  
        } else if (retry == 0) {  
            System.err.println("重试次数已用完,放弃连接!");  
        } else {  
            // 第几次重连  
            int order = (MAX_RETRY - retry) + 1;  
            // 本次重连的间隔  
            int delay = 1 << order;  
            System.err.println(new Date() + ": 连接失败,第" + order + "次重连……");  
            bootstrap.config().group().schedule(() -> connect(bootstrap, host, port, retry - 1), delay, TimeUnit  
                    .SECONDS);  
        }  
    });  
}

private static void startConsoleThread(Channel channel) {  
    ConsoleCommandManager consoleCommandManager = new ConsoleCommandManager();  
    LoginConsoleCommand loginConsoleCommand = new LoginConsoleCommand();  
    Scanner scanner = new Scanner(System.in);  

    new Thread(() -> {  
        while (!Thread.interrupted()) {  
            if (!SessionUtil.hasLogin(channel)) {  
                loginConsoleCommand.exec(scanner, channel);  
            } else {  
                consoleCommandManager.exec(scanner, channel);  
            }  
        }  
    }).start();  
}

加入失败重连代码之后,客户端的启动代码需要进行略微调整,在链式调用中不再使用直接connection,而是传递引导类和相关参数,通过递归的方式实现失败重连的效果:

connect(bootstrap, "127.0.0.1", 10999, MAX_RETRY);

客户端API其他方法和相关属性

attr()

  • NioChannel绑定自定义属性  
  • 底层实际为Map  
  • NioSocketChannel存储参数使用此方法取出

三种TCP关联参数

SO_KEEPALIVE

对应源码定义如下:

public static final ChannelOption<Boolean> SO_KEEPALIVE = valueOf("SO_KEEPALIVE");

主要关联TCP底层心跳机制。SO_KEEPALIVE用于开启或者关闭保活探测,默认情况下是关闭的。当SO_KEEPALIVE开启时,可以保持连接检测对方主机是否崩溃,避免(服务器)永远阻塞于TCP连接的输入。

TCP_NODELAY

Nagle 算法解释

这个参数的含义是:是否开启Nagle算法。首先需要注意这个参数和Linux操作系统的默认值不一样,true 传输到Linux是关闭调Nagle算法。

Nagele算法的出现和以前的网络带宽资源有限有关,为了尽可能的利用网络带宽,TCP总是希望尽可能的发送足够大的数据,Nagle算法就是为了尽可能发送大块数据,避免网络中充斥着许多小数据块

为了理解Nagle算法,我们需要了解TCP的缓冲区通常会设置 MSS 参数。

MSS 参数:除去 IP 和 TCP 头部之后,一个网络包所能容纳的 TCP 数据的最大长度; 最大 1460。
MTU:一个网络包的最大长度,以太网中一般为 1500 字节;

为什么最大为1460个字节? 因为TCP传输过程中都会要求绑定 TCP 和 IP 的头部信息,这样服务端才能回送ACK确认收到包正确。

image.png

也就是说传输大数据包的时候,数据会按照MSS的值进行切割。回到Nagle算法,它的作用就是定义任意时刻只能有一个未被ACK确认的小段(MSS对应切割的一个块)。

这就意味着当有多个未被ACK确认的小段的时候,此时client端会小小的延迟一下等待合并为更大的数据包才发送。

Netty 默认关闭了这个算法,意味着一有数据就理解发送,满足低延迟和高并发的设计。

Netty源码关联

TCP_NODELAY 配置选项定义如下:

public static final ChannelOption<Boolean> TCP_NODELAY = valueOf("TCP_NODELAY");

此参数的配置介绍可以从 SocketChannelConfig 关联的配置中获取。

/**  
 * Gets the {@link StandardSocketOptions#TCP_NODELAY} option.  Please note that the default value of this option  
 * is {@Code true} unlike the operating system default ({@code false}). However, for some buggy platforms, such as  
 * Android, that shows erratic behavior with Nagle's algorithm disabled, the default value remains to be * {@code false}.  
 */
 boolean isTcpNoDelay();

注释翻译如下。

获取 StandardSocketOptions.TCP_NODELAY 配置。请注意,该选项的默认值为 true,与操作系统的默认值(false)不同。然而,对于一些有问题的平台,比如Android,在禁用Nagle算法的情况下会出现不稳定的行为,默认值仍然为false。

CONNECTION_TIMEOUT

表示连接超时时间,单位为毫秒。

客户端和服务端通信

本部分可以参考作者代码,这里仅仅用笔记归档一下大致代码编写思路。

https://github.com/lightningMan/flash-netty

客户端写入数据到服务端

  • handler 方法:指定客户端通信处理逻辑  
  • initChannel 方法:给客户端添加逻辑处理器  
  • pipeline:逻辑处理链添加逻辑处理器  
    • addLast 添加自定义ChannelHandler
    • 逻辑处理器继承自ChannelHandler  
      • 覆盖channelActive()方法  
      • 客户端连接建立成功提示打印
    • 逻辑处理器可以通过继承适配类ChannelInboundHandlerAdapter实现简化开发  
  • 写数据部分ByteBuf (Netty实现)  
      1. alloc获得内存管理器  
      1. byte[] 数据填充二进制数据  
      1. writeAndFlush 刷缓存

服务端读取客户端数据

  • 逻辑处理器继承适配类  
    • 逻辑处理器可以通过继承适配类ChannelInboundHandlerAdapter实现简化开发  
  • 接收数据和服务端读取数据类似  
  • 构建ByteBuf  
      1. alloc获得内存管理器  
      1. byte[] 数据填充二进制数据  
      1. writeAndFlush 刷缓存  
  • 通过writeAndFlush写出数据给客户端

服务端返回数据给客户端

  • 逻辑处理器继承适配类  
    • 逻辑处理器可以通过继承适配类ChannelInboundHandlerAdapter实现简化开发  
  • 接收数据和服务端读取数据类似
  • 构建ByteBuf
      1. alloc获得内存管理器  
      1. byte[] 数据填充二进制数据  
      1. writeAndFlush 刷缓存  
  • 通过writeAndFlush写出数据给客户端

客户端读取服务端数据

  • 和服务端读取客户端数据思路类似
  • 关键是需要覆盖channelRead() 方法

核心概念

  • Netty当中,childHanlder 和 handler 对应客户端服务端处理逻辑  
  • ByteBuf 数据载体,类似隧道两端的中间小推车。JDK官方实现java.nio.ByteBuffer存在各种问题,Netty官方重新实现了io.netty.buffer.ByteBuf
  • 服务端读取对象基本单位为Object,如果需要读取其他对象类型通常需要强转。  
  • 逻辑处理器都可以通过继承适配器实现,客户端和服务端覆盖对应方法实现被动接收或者主动推送。

章节末尾问题

客户端API对比服务端少了什么内容?

  1. “group”。
  2. 客户端只有childHandler

新连接接入时候,如何实现服务端主动推送消息,然后客户端进行回复?

答案是添加监听器,在监听到客户端连接成功之后直接主动推送自定义信息。

handler()和childHandler()有什么区别

初学者比较容易困扰的问题。handler()childHandler()的主要区别是:handler()是发生在初始化的时候childHandler()是发生在客户端连接之后

“知其所以然”的部分放到后续的源码分析笔记当中,这里暂时跳过,初次阅读只需要记住结论即可。

八股

BIO的Socket和NIO的SocketChannel 区别?

本质上都是客户端和服务端进行网络通信的连接的一种抽象,但是使用上有不小的区别。下面的内容摘录自参考资料:

Socket、SocketChannel区别:
https://blog.csdn.net/A350204530/article/details/78606298
Netty Channel的理解:
https://segmentfault.com/q/1010000011974154

发帖前要善用论坛搜索功能,那里可能会有你要找的答案或者已经有人发布过相同内容了,请勿重复发帖。

 楼主| zxdsb666. 发表于 2023-7-7 14:57

《跟闪电侠学Netty》阅读笔记 - 数据载体 ByteBuf

引言

API设计更建议实战过程中逐渐了解熟悉掌握,本文记录基础设计和相关API,只需要大致了解ByteBuf设计思想即可。

思维导图

[https://www.mubucm.com/doc/58ehM7v4PP5]()

《跟闪电侠学Netty》 - 数据载体ByteBuf.png

基础结构

整个ByteBuf的数据结构组成如下,整个设计思想有点类似计算机如何实现从北京到上海,那就是一段足够长的铁轨,不断“拆掉”后面的铁轨放到前面的铁轨上,这样实现火车一直在铁轨上跑的错觉。

  • 容量上限:maxCapacity  
  • 容量:capacity  
  • 数组:
    • 废弃字节  :被丢弃的字节数据无效
    • 可读字节(writerIndex -readerIndex)
    • 可写字节(capacity - writerIndex)
    • 读指针 readerIndex :每读取(read)一个字节,readerIndex 自增 1
    • 写指针 writerIndex  :每写入(write)一个字节,writeIndex 自增 1
    • 剩余可用空间

image.png

结构解析

    1. 字节容器:分为三部分  
      • 废弃空间 :被丢弃的字节,数据无效
      • 可读空间 :从ByteBuf读取出来的数据都属于这部分
      • 可写空间 :未来所有的写入都会写入到此处
    1. 划分依据:两个指针加一个变量  
      • 读指针
      • 写指针
      • 总容量
    1. 最大容量和和容量限制  
      • 容量可以在写满的时候扩容  
      • 如果扩容到最大容量就报错

容量API

实践容量API之前,我们先构建ByteBuf。

ByteBuf buffer = ByteBufAllocator.DEFAULT.buffer(9, 100);  
print("allocate ByteBuf(9,100) => {} \n", buffer);
// allocate ByteBuf(9,100) => PooledUnsafeDirectByteBuf(ridx: 0, widx: 0, cap: 9/100) 

capacity()

表示 ByteBuf 底层占用了多少字节的内存(包括丢弃的字节、可读字节、可写字节),不同的底层实现机制有不同的计算方式,后面我们讲 ByteBuf 的分类的时候会讲到。

从案例看出,默认创建的方式容量为初始化指定的容量。

print("allocate ByteBuf(9,100) capacity => {} \n", buffer.capacity());
// allocate ByteBuf(9,100) capacity => 9 

maxCapacity()

表示 ByteBuf 底层最大能够占用多少字节的内存,当向 ByteBuf 中写数据的时候,如果发现容量不足,则进行扩容,直到扩容到 maxCapacity,超过这个数,就抛异常。

从案例可以得知,如果扩容到 100 就会报错

print("allocate ByteBuf(9,100) maxCapacity => {} \n", buffer.maxCapacity());  
// allocate ByteBuf(9,100) maxCapacity => 100

readableBytes() 与 isReadable()

readableBytes() 表示 ByteBuf 当前可读的字节数,它的值等于 writerIndex-readerIndex,如果两者相等,则不可读,isReadable() 方法返回 false。

// readableBytes() 与 isReadable()
print("allocate ByteBuf(9,100) isReadable => {} \n", buffer.isReadable());  
print("allocate ByteBuf(9,100) readableBytes => {} \n", buffer.readableBytes());
//        allocate ByteBuf(9,100) isReadable => false  
//        allocate ByteBuf(9,100) readableBytes => 0

// write 方法改变写指针  
buffer.writeBytes(new byte[]{1, 2, 3, 4});
// 改变写指针 writeBytes(new byte[]{1,2,3,4}) => PooledUnsafeDirectByteBuf(ridx: 0, widx: 4, cap: 9/100) 

// 写入数据之后,重新执行readableBytes() 与 isReadable()
print("allocate ByteBuf(9,100) isReadable => {} \n", buffer.isReadable());
print("allocate ByteBuf(9,100) readableBytes => {} \n", buffer.readableBytes());
//allocate ByteBuf(9,100) isReadable => true 
//allocate ByteBuf(9,100) readableBytes => 4 

writableBytes()、 isWritable() 与 maxWritableBytes()

writableBytes() 表示 ByteBuf 当前可写的字节数,它的值等于 capacity-writerIndex,如果两者相等,则表示不可写,isWritable() 返回 false。

注意这个时候,并不代表不能往 ByteBuf 中写数据了, 如果发现往 ByteBuf 中写数据写不进去的话,Netty 会自动扩容 ByteBuf,直到扩容到底层的内存大小为 maxCapacity

maxWritableBytes() 就表示可写的最大字节数,它的值等于 maxCapacity-writerIndex

在初始化构建过程中,由于没有读写任何数据,可以看到他们的值基本和前面计算的容量是一致的。

ByteBuf buffer = ByteBufAllocator.DEFAULT.buffer(9, 100); 
// writableBytes()、 isWritable() 与 maxWritableBytes()
print("allocate ByteBuf(9,100) writableBytes => {} \n", buffer.writableBytes());
print("allocate ByteBuf(9,100) isWritable => {} \n", buffer.isWritable());
print("allocate ByteBuf(9,100) maxWritableBytes => {} \n", buffer.maxWritableBytes());
//        allocate ByteBuf(9,100) writableBytes => 9
//        allocate ByteBuf(9,100) isWritable => true
//        allocate ByteBuf(9,100) maxWritableBytes => 100

读写指针相关的 API

实践读写指针相关的 API之前,我们先构建初始化ByteBuf。

ByteBuf buffer = ByteBufAllocator.DEFAULT.buffer(9, 100);  
print("allocate ByteBuf(9,100) => {} \n", buffer);  

image.png

readerIndex() 与 readerIndex(int)

  • readerIndex():返回当前的读指针 readerIndex
  • readerIndex(int):表示设置读指针

在没有写入任何数据的时候,读指针为0。

// readerIndex() 返回当前读指针  
print("allocate ByteBuf(9,100) readerIndex => {} \n", buffer.readerIndex());  
// allocate ByteBuf(9,100) readerIndex => 0

下面的案例说明读指针不能越过写指针的界限。

// 尝试手动重定向渎指针位置  
// print("allocate ByteBuf(9,100) readerIndex(int) => {} \n", buffer.readerIndex(2));  
// readerIndex: 2, writerIndex: 0 (expected: 0 <= readerIndex <= writerIndex <= capacity(9))

我们写入一些数据之后,再进行读指针重定向。

buffer.writeBytes(new byte[]{1, 2, 3, 4});

// 重定向读指针  
print("allocate ByteBuf(9,100) readerIndex(int) => {} \n", buffer.readerIndex(2));  
print("重定向读指针 之后 (new byte[]{1,2,3,4}) => {} \n", buffer);  

// allocate ByteBuf(9,100) readerIndex(int) => PooledUnsafeDirectByteBuf(ridx: 2, widx: 4, cap: 9/100) 

// 重定向读指针 之后 (new byte[]{1,2,3,4}) => PooledUnsafeDirectByteBuf(ridx: 2, widx: 4, cap: 9/100)

writerIndex() 与 writerIndex(int)

  • writeIndex() 表示返回当前的写指针 writerIndex。
  • writeIndex(int) 表示设置写指针。

案例以初始化写入四个字节之后作为开始。

// writeIndex() 与 writeIndex(int)
print("allocate ByteBuf(9,100) writerIndex => {} \n", buffer.writerIndex());
print("allocate ByteBuf(9,100) writerIndex(int) => {} \n", buffer.writerIndex(2));
//        allocate ByteBuf(9,100) writerIndex => 4
//        allocate ByteBuf(9,100) writerIndex(int) => PooledUnsafeDirectByteBuf(ridx: 0, widx: 2, cap: 9/100)

markReaderIndex() 与 resetReaderIndex()

区别:

  • markReaderIndex() :表示把当前的读指针保存起来,
  • resetReaderIndex() :表示把当前的读指针恢复到之前保存的值。

下面两段代码是等价的。

// 代码片段1
int readerIndex = buffer.readerIndex();

// … 其他操作
buffer.readerIndex(readerIndex);
// 代码片段二
// (不需要自己定义变量,推荐使用)
buffer.markReaderIndex();

// … 其他操作
// resetReaderIndex() 可以恢复到之前状态
// (解析自定义协议的数据包常用)
buffer.resetReaderIndex(); 

希望大家多多使用代码片段二这种方式,不需要自己定义变量,无论 buffer 当作参数传递到哪里,调用 resetReaderIndex() 都可以恢复到之前的状态,在解析自定义协议的数据包的时候非常常见,推荐大家使用这一对 API markWriterIndex() 与 resetWriterIndex() 这一对 API 的作用与上述一对 API 类似

读写API

实践读写API之前,我们先构建ByteBuf。

ByteBuf buffer = ByteBufAllocator.DEFAULT.buffer(9, 100);  
print("allocate ByteBuf(9,100) => {} \n", buffer);  

上面的代码

writeBytes(byte[] src) 与 buffer.readBytes(byte[] dst)

writeBytes() 表示把字节数组 src 里面的数据全部写到 ByteBuf。注意此方法执行之后,会移动前面介绍的 writeIndex 写指针。

// write 方法改变写指针  
buffer.writeBytes(new byte[]{1, 2, 3, 4});  
print("改变写指针 writeBytes(new byte[]{1,2,3,4}) => {} \n", buffer);  
// 改变写指针 writeBytes(new byte[]{1,2,3,4}) => PooledUnsafeDirectByteBuf(ridx: 0, widx: 4, cap: 9/100)

readBytes()指的是把 ByteBuf 里面的数据全部读取到 dst。

//只有read方法改变指针  
byte[] bytes = new byte[buffer.readableBytes()];  
buffer.readBytes(bytes);  

print("bytes 内容 => {}", bytes);  
// bytes 内容 =>     

这里 dst 字节数组的大小通常等于 readableBytes(),而 src 字节数组大小的长度通常小于等于writableBytes()。

writeByte(byte b) 与 buffer.readByte()

writeByte() 表示往 ByteBuf 中写一个字节,而 buffer.readByte() 表示从 ByteBuf 中读取一个字节,类似的 API 还有 writeBoolean()、writeChar()、writeShort()、writeInt()、writeLong()、writeFloat()、writeDouble() 与 readBoolean()、readChar()、readShort()、readInt()、readLong()、readFloat()、readDouble()这里就不一一赘述。

// write 方法改变写指针  
buffer.writeBytes(new byte[]{1, 2, 3, 4});  
print("改变写指针 writeBytes(new byte[]{1,2,3,4}) => {} \n", buffer);  
// 改变写指针 writeBytes(new byte[]{1,2,3,4}) => PooledUnsafeDirectByteBuf(ridx: 0, widx: 4, cap: 9/100)buffer.writeByte(5);  
print("改变写指针 buffer.writeByte(5) => {} \n", buffer);  
// 改变写指针 buffer.writeByte(5) => PooledUnsafeDirectByteBuf(ridx: 0, widx: 5, cap: 9/100)

getBytes、getByte() 与 setBytes()、setByte() 系列,唯一的区别就是 get/set 不会改变读写指针,而 read/write 会改变读写指针。

//只有read方法改变指针  
byte[] bytes = new byte[buffer.readableBytes()];  
buffer.readBytes(bytes);
print("buffer.readBytes(bytes) => {}\n", buffer);  
// buffer.readBytes(bytes) => PooledUnsafeDirectByteBuf(ridx: 10, widx: 10, cap: 16/100)

release() 与 retain()

由于 Netty 使用了堆外内存,而堆外内存是不被 jvm 直接管理的,也就是说申请到的内存无法被垃圾回收器直接回收,所以需要我们手动回收。

Netty 的 ByteBuf 是通过引用计数的方式管理的,如果一个 ByteBuf 没有地方被引用到,就需要回收底层内存。

默认情况下,当创建完一个 ByteBuf,它的引用为1,然后每次调用 retain() 方法, 它的引用就加一, release() 方法原理是将引用计数减一,减完之后如果发现引用计数为0,则直接回收 ByteBuf 底层的内存。

Test

最后是简单测试程序整合前面的API案例。

public class ByteBufTest {
    public static void main(String[] args) {
        ByteBuf buffer = ByteBufAllocator.DEFAULT.buffer(9, 100);

        print("allocate ByteBuf(9, 100)", buffer);

        // write 方法改变写指针,写完之后写指针未到 capacity 的时候,buffer 仍然可写
        buffer.writeBytes(new byte[]{1, 2, 3, 4});
        print("writeBytes(1,2,3,4)", buffer);

        // write 方法改变写指针,写完之后写指针未到 capacity 的时候,buffer 仍然可写, 写完 int 类型之后,写指针增加4
        buffer.writeInt(12);
        print("writeInt(12)", buffer);

        // write 方法改变写指针, 写完之后写指针等于 capacity 的时候,buffer 不可写
        buffer.writeBytes(new byte[]{5});
        print("writeBytes(5)", buffer);

        // write 方法改变写指针,写的时候发现 buffer 不可写则开始扩容,扩容之后 capacity 随即改变
        buffer.writeBytes(new byte[]{6});
        print("writeBytes(6)", buffer);

        // get 方法不改变读写指针
        System.out.println("getByte(3) return: " + buffer.getByte(3));
        System.out.println("getShort(3) return: " + buffer.getShort(3));
        System.out.println("getInt(3) return: " + buffer.getInt(3));
        print("getByte()", buffer);

        // set 方法不改变读写指针
        buffer.setByte(buffer.readableBytes() + 1, 0);
        print("setByte()", buffer);

        // read 方法改变读指针
        byte[] dst = new byte[buffer.readableBytes()];
        buffer.readBytes(dst);
        print("readBytes(" + dst.length + ")", buffer);

    }

    private static void print(String action, ByteBuf buffer) {
        System.out.println("after ===========" + action + "============");
        System.out.println("capacity(): " + buffer.capacity());
        System.out.println("maxCapacity(): " + buffer.maxCapacity());
        System.out.println("readerIndex(): " + buffer.readerIndex());
        System.out.println("readableBytes(): " + buffer.readableBytes());
        System.out.println("isReadable(): " + buffer.isReadable());
        System.out.println("writerIndex(): " + buffer.writerIndex());
        System.out.println("writableBytes(): " + buffer.writableBytes());
        System.out.println("isWritable(): " + buffer.isWritable());
        System.out.println("maxWritableBytes(): " + buffer.maxWritableBytes());
        System.out.println();
    }
}

最后是个人的实验Test类。


/**  
 * byteBuf 的API测试  
 */  
public class ByteBufTest {  

    public static void main(String[] args) {  
        // 9 代表初始容量, 100代表最大容量  
        ByteBuf buffer = ByteBufAllocator.DEFAULT.buffer(9, 100);  
        print("allocate ByteBuf(9,100) => {} \n", buffer);  
        //allocate ByteBuf(9,100) => PooledUnsafeDirectByteBuf(ridx: 0, widx: 0, cap: 9/100)  

        // write 方法改变写指针  
        buffer.writeBytes(new byte[]{1, 2, 3, 4});  
        print("改变写指针 writeBytes(new byte[]{1,2,3,4}) => {} \n", buffer);  
        // 改变写指针 writeBytes(new byte[]{1,2,3,4}) => PooledUnsafeDirectByteBuf(ridx: 0, widx: 4, cap: 9/100)  
        // write 改变写指针,如果没有到达 capacity 依然可以写入,写入 int 之后写指针增加4  
        buffer.writeInt(12);  
        print("buffer.writeInt(12) => {}\n", buffer);  
        // buffer.writeInt(12) => PooledUnsafeDirectByteBuf(ridx: 0, widx: 8, cap: 9/100)  

        // 继续改变写指针,当前写入等于  initialCapacity 这个初始值之后将不能继续写入  
        buffer.writeBytes(new byte[]{5});  
        print("writeBytes(new byte[]{5}) => {}\n", buffer);  
        // writeBytes(new byte[]{5}) => PooledUnsafeDirectByteBuf(ridx: 0, widx: 9, cap: 9/100)  

        // 继续写入指针,此时发现 已经超过 initialCapacity 的值,此时会进行扩容  
        buffer.writeBytes(new byte[]{6});  
        print("writeBytes(new byte[]{6}) => {}\n", buffer);  
        // writeBytes(new byte[]{6}) => PooledUnsafeDirectByteBuf(ridx: 0, widx: 10, cap: 16/100)  

        // get 方法调用之后不改变读指针  
        print("getByte(3) return => {}\n", buffer.getByte(3));  
        print("getShort(3) return => {}\n", buffer.getShort(3));  
        print("getInt(3) return => {}\n", buffer.getInt(3));  
        print("getChar(3) return => {}\n", buffer.getChar(3));  
        /*  
       getByte(3) return => 4        getShort(3) return => 1024        getInt(3) return => 67108864        getChar(3) return => Ѐ  
        * */  
        // set 方法不改变读写指针  
        buffer.setByte(buffer.readableBytes() + 1, 0);  
        print("setByte(buffer.readableBytes() + 1, 0) => {}\n", buffer);  
        // setByte(buffer.readableBytes() + 1, 0) => PooledUnsafeDirectByteBuf(ridx: 0, widx: 10, cap: 16/100)  

        //只有read方法改变指针  
        byte[] bytes = new byte[buffer.readableBytes()];  
        buffer.readBytes(bytes);  

        print("buffer.readBytes(bytes) => {}\n", buffer);  
        // buffer.readBytes(bytes) => PooledUnsafeDirectByteBuf(ridx: 10, widx: 10, cap: 16/100)  
        print("buffer.readBytes(readBuffer); => {}\n", buffer);  

        ByteBuf readBuffer = ByteBufAllocator.DEFAULT.buffer(6, 6);  
        // 原始writeIndex要有足够空间可读  
//        buffer.writeBytes(new byte[]{5,1,1,1,1,1,1,1});  

//        buffer.writeBytes(new byte[]{5});  
        //  readerIndex(10) + length(6) exceeds writerIndex(11): PooledUnsafeDirectByteBuf(ridx: 10, widx: 11, cap: 16/100)        buffer.readBytes(readBuffer);  

        System.err.println(readBuffer.readableBytes());  

//        buffer.readBytes(readBuffer);  
        // readerIndex(10) + length(9) exceeds writerIndex(10): PooledUnsafeDirectByteBuf(ridx: 10, widx: 10, cap: 16/100)  
    }  

}

写在最后

比较简单的一个章节,主要介绍ByteBuf在Java中的使用,整个使用过程简单易懂十分清晰。

zhangsan2022 发表于 2023-7-7 15:08
zhangsan2022 发表于 2023-7-7 15:09
lqgyglk 发表于 2023-7-7 15:28
感谢分享
tmliuyl 发表于 2023-7-7 15:32
感谢分享
zhangxm 发表于 2023-7-7 15:38
感谢大佬分析,用心学习
头像被屏蔽
moruye 发表于 2023-7-7 15:55
提示: 作者被禁止或删除 内容自动屏蔽
redfieldw 发表于 2023-7-7 17:06
感谢分享,学习了
梧桐听雨6.5 发表于 2023-7-7 17:18
感谢分享,大佬厉害了
您需要登录后才可以回帖 登录 | 注册[Register]

本版积分规则

返回列表

RSS订阅|小黑屋|处罚记录|联系我们|吾爱破解 - LCG - LSG ( 京ICP备16042023号 | 京公网安备 11010502030087号 )

GMT+8, 2024-11-24 23:07

Powered by Discuz!

Copyright © 2001-2020, Tencent Cloud.

快速回复 返回顶部 返回列表